Machine Readiness
Stored receipt and evidence
27
90
0
0
0
 Lynx
LynxSamples
No stored offer samples.
Samples
No stored action samples.
Samples
No stored product samples.
Document
Not stored for this site.
Document
# Read This Before Building with Lynx
> This guide targets developers who are already familiar with the web front-end stack. It explains Lynx's core principles, how it differs from the web, and how to build cross-platform applications with Lynx.
---
> \[!IMPORTANT] > **Critical information:**
>
> Reference links are provided after certain statements, pointing to the corresponding sections of the official Lynx documentation. Please read them **proactively** for a complete understanding.
---
## 1. Positioning and Capability Boundaries
* **What**: Lynx is a cross-platform rendering engine that treats the web as its semantic baseline. It targets iOS, Android, HarmonyOS, and the web with a single codebase. A unified element abstraction maps to native views or custom web elements on different hosts, avoiding the performance bottlenecks of traditional WebViews. (See [Composing Elements](https://lynxjs.org/guide/ui/elements-components.md))
* **Why**: Mobile users are extremely sensitive to first-screen time and interaction latency. Lynx combines a dual-thread JavaScript runtime, Instant First-Frame Rendering (IFR), and a native rendering pipeline to deliver the React developer experience alongside near-native performance. (See [Instant First-Frame Rendering](https://lynxjs.org/guide/interaction/ifr.md))
* **How**: On the tooling side, use Rspeedy (an Rspack-powered build tool) to generate a Lynx bundle. On the front end, ReactLynx (a React implementation with a Preact core) describes the UI and communicates with the host through Native Modules or Custom Elements. (See [ReactLynx](https://lynxjs.org/react/introduction.md), [Native Modules](https://lynxjs.org/guide/use-native-modules.md))
## 2. Mental Model: Align Lynx with the Web
| Web Mental Model | Lynx Counterpart | Key Differences |
| ---------------------------- | ------------------------------------------------------------------------------- | ----------------------------------------------------------------------------------------------------------------------------------------------------------------------------------------------------------------------------- |
| `index.html` + assets | Lynx bundle (binary that contains JS bytecode + styles) or a `template.js` file | Bundles must be compatible with the Lynx engine version; configure `engineVersion` (previously `targetSdkVersion`). (See [Compatibility](https://lynxjs.org/guide/compatibility.md)) |
| DOM + CSSOM | Element tree + styling system | Every element behaves like a block-level node. Custom tags such as `view`/`text` map to native controls. (See [Composing Elements](https://lynxjs.org/guide/ui/elements-components.md)) |
| Browser main thread | Lynx main thread | Handles first-screen rendering, layout, and main-thread scripts, executing PrimJS bytecode. (See [Main Thread Runtime](https://lynxjs.org/guide/scripting-runtime/main-thread-runtime.md)) |
| Browser rendering-task queue | Lynx background thread | Runs ReactLynx scheduling, lifecycle, and most side effects. Executes PrimJS/JavaScriptCore with syntax support up to ES2015 (SWC transpiles during build). (See [JavaScript Runtime](https://lynxjs.org/guide/scripting-runtime/index.md)) |
| `window` / `document` | `lynx` global object + API set | No DOM APIs. Access nodes via `lynx.getElementById`, SelectorQuery, `main-thread:ref`, etc. (See [ReactLynx](https://lynxjs.org/react/introduction.md), [Direct Manipulation](https://lynxjs.org/guide/interaction/event-handling/manipulating-element.react.md)) |
## 3. Runtime Architecture: How Dual-Thread React Works
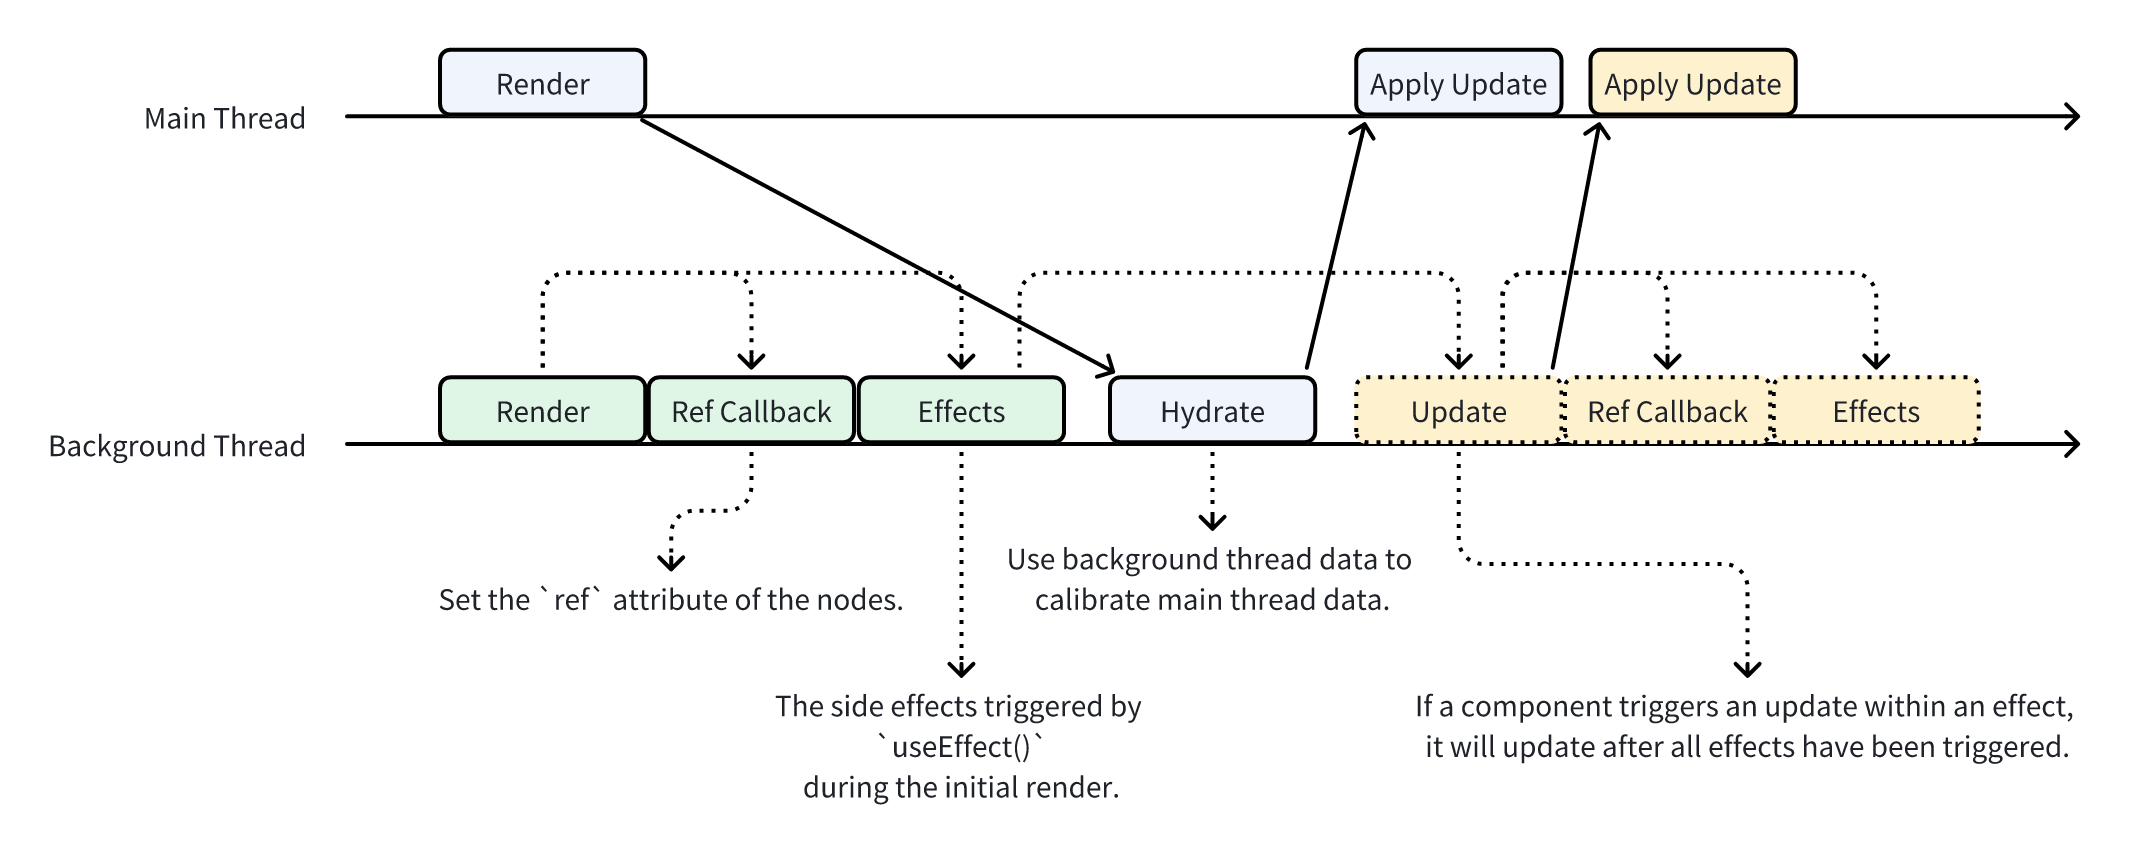
* **Dual-thread parallel rendering**: The main thread renders ReactLynx output immediately for the first screen, while the background thread constructs the full node tree and syncs state back to the main thread to avoid a white screen. (See [Rendering Process and Lifecycle](https://lynxjs.org/react/lifecycle.md), [IFR](https://lynxjs.org/guide/interaction/ifr.md))
* **“Your code runs on two threads”**: Dual-thread React means your logic can run on both threads. However, not all code can execute in both environments—some APIs are only available on the background thread, and ReactLynx only executes events, lifecycle hooks, and `useEffect`-style side effects from the background thread.
* **`'background only'`**: Any function **except a function component** that does not need to run on the main thread (for example event handlers, lifecycle hooks, side effects) or that touches background-only APIs must add `'background only'` as the first statement. Modules can declare `import "background-only"` to indicate they expect to run exclusively on the background thread.
* **Main Thread Script (MTS)**: Functions marked with the `'main thread';` directive run directly on the main thread, ideal for high-frequency gestures, animations, and zero-delay feedback. Main-thread events must use the `main-thread:` prefix (for example `main-thread:bindtap`, `useMainThreadRef`). (See [Main Thread Script](https://lynxjs.org/react/main-thread-script.md))
* **Cross-thread communication**: Use `runOnMainThread` and `runOnBackground` for asynchronous cross-thread calls. Arguments must be JSON-serializable.
## 4. UI Construction: Element System and Native Mapping
* **Element tags**: Built-in tags such as `view`, `text`, `image`, `scroll-view`, etc. abstract native controls. They are not DOM nodes, but the syntax (start/end tag, attributes) stays HTML-like. (See [Composing Elements](https://lynxjs.org/guide/ui/elements-components.md))
* **Cross-platform mapping**: The same element automatically maps to the platform’s native view (`view` → iOS `UIView`, Android `ViewGroup`; on the web it becomes a custom element), so you do not need platform-specific code.
* **Text semantics**: Text must live inside the `text` element. You cannot drop plain text inside a `div` equivalent. Inline layout relies on nested `text` elements. (See [Typography](https://lynxjs.org/guide/styling/text-and-typography.md))
* **Extensibility**: When the built-in set is not enough, register custom native elements. Implement them per platform (iOS/Android/Harmony) and use them through a unified tag. (See [Custom Element](https://lynxjs.org/guide/custom-native-component.md))
Additionally:
* The `svg` element differs significantly from its web counterpart. Pass the SVG markup through the `content` attribute or SVG url through the `src` attribute on `<svg />`:
```jsx
<svg content={`<svg ... />`} />;
// or
<svg src={urlOfYourSvgFile} />;
```
## 5. Layout System: Block by Default with Four Layout Modes
| Layout mode | Web counterpart | Lynx-specific notes |
| ------------------- | -------------------------------------------------- | --------------------------------------------------------------------------------------------------------------------------------------------------------------------------------------------- |
| `display: linear` | No direct counterpart; simplified flex-like layout | The main axis is vertical by default. Use `linear-direction` and `linear-weight` to distribute space—suited for linear arrangements. (See [Linear Layout](https://lynxjs.org/guide/ui/layout/linear-layout.md)) |
| `display: flex` | CSS Flexbox | Most properties match CSS, but `min-content` is unsupported and the shrink lower bound is treated as `0px`. (See [Flexible Box Layout](https://lynxjs.org/guide/ui/layout/flexible-box-layout.md)) |
| `display: grid` | CSS Grid | Supports common row/column definitions and gaps; currently lacks `grid-area` and line names. (See [Grid Layout](https://lynxjs.org/guide/ui/layout/grid-layout.md)) |
| `display: relative` | Android RelativeLayout mental model | Effective on mobile only. Use `relative-*` properties to describe positioning relative to siblings/parent. (See [Relative Layout](https://lynxjs.org/guide/ui/layout/relative-layout.md)) |
Additionally:
* Every element defaults to `box-sizing: border-box`; margin collapsing does not occur. (See [Understanding Layout](https://lynxjs.org/guide/ui/layout/index.md))
* There is no `inline` vs. `block` toggle; text layout relies on the `text` element. (See [Typography](https://lynxjs.org/guide/styling/text-and-typography.md))
* Logical directions (such as `inline-start`) depend on `direction` and require CSS inheritance to be enabled.
* `overflow: scroll` is unsupported. Use `<scroll-view />` and enable scrolling with either the `scroll-y` or `scroll-x` attribute.
* `position` supports `relative`, `absolute`, and `fixed`. Nodes with `fixed` are promoted directly under the root node.
## 6. Styling System: CSS Syntax with Lynx Configuration
* **Special units**: Supports the `rpx` unit to adapt to different screen sizes.
* **Selectors and inline styles**: Largely identical to the web. Combine with PostCSS/Sass nesting if needed. (See [Styling with CSS](https://lynxjs.org/guide/ui/styling.md))
* **Extended properties**: `-x-` prefixed properties expose mobile capabilities such as `-x-auto-font-size`. (See [Styling with CSS](https://lynxjs.org/guide/ui/styling.md))
* **Theming and inheritance**: CSS variables and class switching are supported. Regular properties do not inherit by default—enable `enableCSSInheritance` in `pluginReactLynx` or configure `customCSSInheritanceList`. (See [Custom properties (`--*`): CSS variables](https://lynxjs.org/api/css/properties/css-variable.md), [Theming](https://lynxjs.org/guide/styling/custom-theming.md))
* **Fonts**: Supports `@font-face` and `lynx.addFont`, but the host must implement font loading.
## 7. ReactLynx: Familiar APIs with Lynx Constraints
* **API parity**: Almost identical to React; `import { useState } from '@lynx-js/react'`. The runtime is powered by Preact. (See [What is ReactLynx](https://lynxjs.org/react/introduction.md))
* **Lifecycle**: All lifecycle hooks run asynchronously on the background thread. `useLayoutEffect` is disabled; use `main-thread:bindlayoutchange` to obtain layout information and update properties instead. (See [Rendering Process and Lifecycle](https://lynxjs.org/react/lifecycle.md))
* **Background-only restrictions**: The framework can statically infer some direct cases, but once indirection is introduced—passing event handlers through components or writing custom hooks—you must explicitly add the `'background only'` directive. (See [Thinking in ReactLynx](https://lynxjs.org/react/thinking-in-reactlynx.md))
* **Main-thread functions**: Add `'main thread';` at the top of the function body. Such functions can only run on the main thread (for example in event handlers or `main-thread:ref`). Captured outer variables are snapshotted and must be JSON-serializable, so you cannot capture functions directly.
* **Cross-thread execution**: You cannot call a function defined on the other thread directly. Use `runOnMainThread` / `runOnBackground`, which return Promises for cross-thread calls.
* **Module system**: ESM and CommonJS are both supported and can be mixed, though ESM is recommended. Rspeedy/SWC handles module transformation during the build. (See [JavaScript Runtime](https://lynxjs.org/guide/scripting-runtime/index.md))
## 8. Type System
* **TypeScript support**: Official typings live in `@lynx-js/types`; using TypeScript throughout is highly encouraged. (See [TypeScript Support](https://lynxjs.org/rspeedy/typescript))
* **`tsconfig.json`**: Set `compilerOptions.jsx` to `react-jsx` and `compilerOptions.jsxImportSource` to `@lynx-js/react`.
* **Import types correctly**: All Lynx API types are exported from `@lynx-js/types`, for example `import type { MainThread, NodesRef } from '@lynx-js/types'`. ReactLynx APIs and types come from `@lynx-js/react`.
## 9. Event Model: Naming and Propagation
* **Event attribute names**: `bindtap`, `catchtap`, `capture-bindtap`, `global-bindtap`, etc. denote phase/interception. Main-thread events require the `main-thread:` prefix. (See [Event Propagation](https://lynxjs.org/guide/interaction/event-handling/event-propagation.md))
* **Propagation phases**: Capture plus bubble over the element tree path. Non-touch events fire only on the target node.
* **Event object differences**: The background thread receives plain JSON. Main-thread events expose `MainThread.Element` through `currentTarget`, allowing direct node operations (such as `setStyleProperty`). (See [Event Handling](https://lynxjs.org/guide/interaction/event-handling.md))
* **Global events**: `GlobalEventEmitter` supports cross-component and host broadcasts and must be used on the background thread. (See [Event Propagation](https://lynxjs.org/guide/interaction/event-handling/event-propagation.md))
* **AOP interception**: `lynx.beforePublishEvent` lets you intercept events centrally on the background thread.
## 10. Node References and Direct Manipulation
* **Background thread**: Use `useRef<NodesRef>` with `ref={...}` and operate via `invoke()` / `setNativeProps()`. Remember to call `.exec()` at the end to submit batched operations. (See [Direct Manipulation](https://lynxjs.org/guide/interaction/event-handling/manipulating-element.react.md))
* **Main thread**: `useMainThreadRef` plus `main-thread:ref` yields `MainThread.Element`, which exposes methods such as `setStyleProperty` and `invoke`.
* **Selector APIs**: On the background thread, `lynx.createSelectorQuery()` produces `NodesRef`. On the main thread, use `lynx.querySelector()` / `lynx.querySelectorAll()` to obtain `MainThread.Element`.
* **Getting the event target**: Background-thread event payloads do not carry node references. On the main thread, `event.currentTarget` is a `MainThread.Element`.
* **Thread model**: Background-thread node operations are asynchronous; main-thread node operations are synchronous.
Case study:
* **Retrieve layout information**: Choose the approach that fits your scenario:
* Via events: Listen to `bindlayoutchange` for layout updates—the event object contains layout data. With Main Thread Script, use the main-thread variant `main-thread:bindlayoutchange`.
* Direct node access: Call `boundingClientRect` on the node. Background thread uses `NodesRef.invoke`; main thread uses `MainThread.Element.invoke`. (See [Direct Manipulation](https://lynxjs.org/guide/interaction/event-handling/manipulating-element.react.md))
Common APIs:
* [Interface `NodesRef`](https://lynxjs.org/api/lynx-api/nodes-ref.md)
* [invoke()](https://lynxjs.org/api/lynx-api/nodes-ref/nodes-ref-invoke.md)
* [setNativeProps()](https://lynxjs.org/api/lynx-api/nodes-ref/nodes-ref-set-native-props.md)
* [Interface `MainThread.Element`](https://lynxjs.org/api/lynx-api/main-thread/main-thread-element.md)
* [animate()](https://lynxjs.org/api/lynx-api/main-thread/lynx-animate-api.md)
* [Interface `SelectorQuery`](https://lynxjs.org/api/lynx-api/selector-query.md)
* [exec()](https://lynxjs.org/api/lynx-api/selector-query/selector-query-exec.md)
* [select()](https://lynxjs.org/api/lynx-api/selector-query/selector-query-select.md)
## 11. Data Input and Host Communication
* **Init data**: The host injects initial data with `LynxView.loadTemplate`. Front-end code accesses it via `useInitData`; updates trigger automatic re-rendering. (See [Using Data from Host Platform](https://lynxjs.org/guide/use-data-from-host-platform.md))
* **Data processors**: Use `lynx.registerDataProcessors` to normalize multi-end data structures with named processors on the front end.
* **Global properties**: Read host configurations (such as dark mode) from `lynx.__globalProps` and pair them with theme switching. Actual properties are host-defined; if the host does not provide them, `lynx.__globalProps` is `null` or an empty object.
* **Guaranteeing IFR**: As long as initial data arrives synchronously and the Lynx bundle loads synchronously, the main thread can render a first frame with no white screen. (See [IFR](https://lynxjs.org/guide/interaction/ifr.md))
## 12. Extending Host Capabilities
* **Native Modules**: Declare TypeScript types, implement them separately on iOS/Android/Harmony, and register them. Front-end code calls `NativeModules.xxx` on the background thread. (See [Native Modules](https://lynxjs.org/guide/use-native-modules.md))
* **Custom elements**: When you need capabilities closer to native controls (for example customized inputs), extend `LynxUI` on the host, implement attributes/events/commands, and use it just like a built-in element. (See [Custom Element](https://lynxjs.org/guide/custom-native-component.md))
* **SelectorQuery invoking native commands**: Call `invoke({ method: 'focus' })` to trigger native methods exposed by custom elements. Consult the element’s documentation for supported commands.
## 13. Networking and Runtime Differences
* **Fetch API**: The interface aligns with the web, but depends on the host-provided HTTP service. Enable streaming responses via `lynxExtension.useStreaming` and read from `response.body`. Review official compatibility notes as needed. (See [Networking](https://lynxjs.org/guide/interaction/networking.md))
* **Encoding helpers**: PrimJS currently lacks `TextEncoder` / `TextDecoder`, so use `TextCodecHelper` for UTF-8 encoding/decoding. (See [Networking](https://lynxjs.org/guide/interaction/networking.md))
* **Global object limitations**: There is no `window` or `document`. Replace browser APIs with `lynx` alternatives (such as `lynx.reload`). (See [ReactLynx](https://lynxjs.org/react/introduction.md))
* **Polyfills and syntax**: PrimJS on the main thread supports up to ES2019; the background thread supports ES2015. The build injects polyfills automatically (primarily for iOS). (See [JavaScript Runtime](https://lynxjs.org/guide/scripting-runtime/index.md))
## 14. Performance Tooling and Tuning
* **Main Thread Script**: Keep animations/gestures responsive while respecting thread isolation and data synchronization. (See [Main Thread Script](https://lynxjs.org/react/main-thread-script.md))
* **NodesRef.invoke**: Batch native operations (for example `autoScroll`) to avoid cross-thread overhead. (See [Direct Manipulation](https://lynxjs.org/guide/interaction/event-handling/manipulating-element.react.md))
* **Lynx DevTool & Trace**: The desktop DevTool offers Elements/Console/Sources/Trace panels to record render pipelines and analyze the ReactLynx render process. (See [Lynx DevTool](https://lynxjs.org/guide/devtool.md), [Trace](https://lynxjs.org/guide/devtool/trace.md))
* **Performance metrics**: Use `lynx.performance` and `PerformanceObserver` to capture metrics such as FCP and InitContainer. (See [Performance API](https://lynxjs.org/guide/performance/metrics/performance-api.md))
## 15. Engineering Practices and Tooling
* **Project initialization**: `pnpm create rspeedy` scaffolds a ReactLynx project with Rspeedy configuration and sample code. (See [Quick Start](https://lynxjs.org/rspeedy/start/quick-start.md))
* **Development and debugging**: `pnpm dev` starts the Rspeedy dev server. The terminal prints a QR code—scan it with the LynxExample app (iOS/Android/Harmony emulator) for hot-update previews. (See [Quick Start](https://lynxjs.org/rspeedy/start/quick-start.md))
* **DevTool debugging**: After connecting a device, use the desktop Lynx DevTool to debug JS, inspect nodes, and record performance. (See [Lynx DevTool](https://lynxjs.org/guide/devtool.md))
* **Build artifacts**: Rspeedy outputs a bundle that includes the background-thread script (text), main-thread bytecode, styles, and other assets. Set `DEBUG=rspeedy` to dump intermediate artifacts (background script, main-thread bytecode, styles, source maps, etc.) into `dist/.rspeedy`; otherwise only the final bundle is produced. (See [Output Files](https://lynxjs.org/rspeedy/output.md))
* **Docs asset references**: In MDX, prefer the `@assets` alias for local assets (for example `import demoImg from '@assets/foo.png?url'`) and pass the imported variable to components such as `<Go img={demoImg} />`. Do not hardcode `/assets/...` paths in MDX props.
## 16. Key Differences from the Web
1. **No DOM**: You cannot call DOM APIs, `document.querySelector`, or browser globals. Use Lynx selectors and reference APIs instead.
2. **Dual-thread model**: Separate logic between background and main threads. Functions that must run only on the background thread need the `'background only'` directive.
3. **Different event naming**: Uses `bind` / `catch` / `capture` prefixes. Main-thread events add `main-thread:` and `global-bind` supports cross-component listeners.
4. **Layout is element-centric**: All elements default to block layout. Customize `display` to switch modes. Text must live inside the `text` element.
5. **Opt-in CSS inheritance**: Most properties do not inherit unless configured. `box-sizing` is always `border-box`.
6. **Limited syntax support**: Main thread supports up to ES2019; background thread up to ES2015. Builds rely on Rspeedy/SWC for transpilation.
7. **No `useLayoutEffect`**: Use layout events or main-thread scripts for synchronous measurement and updates.
8. **Host-provided services**: Networking (Fetch), font loading, and Native Modules depend on host implementations.
9. **Bundle ↔ engine coupling**: You must ship the correct `engineVersion` to match the host runtime.
10. **Different first-screen strategy**: IFR avoids white screens but requires synchronous resources and pre-fetched data.
## 17. Quick Reference Table
| Scenario | Web habit | Recommended Lynx approach |
| --------------------------- | ---------------------------------------------------- | ----------------------------------------------------------------------------------------------------------------------------------------------------- |
| Global state updates | `window.dispatchEvent` | `GlobalEventEmitter.toggle` or the host’s `sendGlobalEvent` |
| Synchronous DOM measurement | `useLayoutEffect` + `boundingClientRect` | Read layout from the `main-thread:bindlayoutchange` event object, or get a main-thread ref and call `MainThread.Element.invoke('boundingClientRect')` |
| Gesture animation | JS main-thread event handlers | Combine `main-thread:bindtouchmove` with `'main thread'` functions to mutate styles directly |
| DOM refs | `useRef<HTMLDivElement>` | Use `useRef<NodesRef>` + `.invoke()` on the background thread; switch to `useMainThreadRef` for high-performance cases |
| SSR | Next.js / custom SSR | IFR (main-thread synchronous rendering) plus host-provided `initData` |
| Dynamic theming | CSS variables + `document.documentElement.classList` | Bind `themeClass` to `lynx.__globalProps.appTheme` and pair it with CSS variables |
| Bundle-size optimization | Analyze JS files in the build | Optimize by thread: inspect `main-thread.js` for main-thread bundle size and `background.js` for background bundle size |
| Scroll containers | `overflow: scroll` on any element | Use `<scroll-view />` with either the `scroll-y` or `scroll-x` attribute enabled |
## 18. Appendix: APIs Available Only on the Background Thread
* `lynx.getJSModule`
* `NativeModules`
* `lynx.createSelectorQuery`
* `lynx.getElementById`
* `lynx.reload`
* `lynx.performance.addTimingListener`, `lynx.performance.removeTimingListener`, `lynx.performance.removeAllTimingListener`
* `fetch`
* `setTimeout`, `clearTimeout`
* `setInterval`, `clearInterval`
* `requestAnimationFrame`, `cancelAnimationFrame`
## 19. Appendix: Learn from Examples
The following official Lynx tutorials cover scenarios from beginner to advanced—work through them hands-on:
* Product gallery — build a two-column product page step by step: [Tutorial Gallery](https://lynxjs.org/guide/start/tutorial-gallery.md). You will learn to:
* Build foundational UI with styling and interactions
* Componentize the layout
* Render high-performance long lists with the `<list />` element
* Manipulate nodes directly via `NodesRef.invoke` to implement auto-scrolling
* Customize scrollbars and leverage [Main Thread Script](https://lynxjs.org/react/main-thread-script.md) to optimize scrolling performance
* Product detail — implement a carousel component to practice high-performance interaction code: [Tutorial Product Detail](https://lynxjs.org/guide/start/tutorial-product-detail.md). You will learn to:
* Manipulate nodes directly with `NodesRef.setNativeProps` to update styles and attributes
* Use [Main Thread Script](https://lynxjs.org/react/main-thread-script.md) to reduce latency
* Call between main-thread and background-thread functions
* Pass values between main-thread and background-thread scripts
## 20. Appendix: Key Built-in Elements
* [`<view>` element](https://lynxjs.org/api/elements/built-in/view.md)
* [`<text>` element](https://lynxjs.org/api/elements/built-in/text.md)
* [`<image>` element](https://lynxjs.org/api/elements/built-in/image.md)
* [`<scroll-view>` element](https://lynxjs.org/api/elements/built-in/scroll-view.md)
* [`<list>` element](https://lynxjs.org/api/elements/built-in/list.md)
* [`<page>` element](https://lynxjs.org/api/elements/built-in/page.md)
* [`<frame>` element](https://lynxjs.org/api/elements/built-in/frame.md)
* [`<input>` element](https://lynxjs.org/api/elements/built-in/input.md)
* [`<textarea>` element](https://lynxjs.org/api/elements/built-in/textarea.md)
---
With these concepts in place, you can transfer your web experience to Lynx while understanding its unique constraints and strengths. Follow the dual-thread programming model, lean on main-thread scripts, and utilize the host data channels to build cross-platform experiences that balance quality and engineering velocity.
---
## 98. Appendix: Links
You may find more information about Lynx and related resources in the links below:
### Guide
* [Composing Elements](https://lynxjs.org/guide/ui/elements-components.md): A Lynx page may contain various visual elements such as text and images, presented in different layouts to create diverse page styles. This section aims to help everyone understand how to construct the most basic views.
* [Styling with CSS](https://lynxjs.org/guide/ui/styling.md): Cascading Style Sheets (CSS) are used to style and layout Lynx pages. For example, you can change the font, color, size, and position of the content, split the content into multiple columns, or add animations and other decorative elements to make your pages more vivid and interesting. In addition, Lynx provides numerous properties starting with -x- to help you achieve style design more easily. The following tutorial will demonstrate how to add styles to elements using CSS.
* [Understanding Layout](https://lynxjs.org/guide/ui/layout/index.md): Lynx provides: Properties such as width, height, margin, and padding are used to describe the size of elements.The display property, along with linear layout, flexible box layout, grid layout, and relative layout, are used for laying out elements.The aligning properties, including align-items, justify-content and etc., are used for aligning elements.The position property, along with left, right, top, bottom properties, are used to position elements.direction and logical properties are used to support the internationalization of layouts. For the layout properties supported by Lynx with the same name in the Web, the behavior of these properties will be consistent with those in the Web. However, there is a difference in the design concept between Lynx layout and Web layout: Web layout is primarily text-based. While Lynx layout is based on elements (<view>, <text>, <image>, etc.). In other words, elements in Lynx are all block-level elements. The following tutorial will show you how to complete the layout of elements in Lynx.
* [Linear Layout](https://lynxjs.org/guide/ui/layout/linear-layout.md): If you want to arrange children sequentially without dealing with the complexities of flexible box and grid layouts (such as shrink and placement issues), consider using linear layout. This layout is inspired by linear layout in Android. The default layout direction of a linear layout is vertical. You can also use Web's alignment properties such as align-items, align-self, and justify-content with this layout. For the supported properties, please refer to the Reference section.
* [Flexible Box Layout](https://lynxjs.org/guide/ui/layout/flexible-box-layout.md): If you need to make the size of child elements adapt to the space of the parent element (such as expanding child elements to fill the unused space or shrinking child elements to avoid overflow), you can set the display: flex property to the parent element and use the flexible box layout. The following examples show typical features of the flexible box layout.
* [Grid Layout](https://lynxjs.org/guide/ui/layout/grid-layout.md): If you want a responsive layout where multiple elements are staggered both vertically and horizontally, the grid layout is your best choice. This layout is based on a two-dimensional grid, and it is the most powerful CSS layout on the Web. Here is a brief guide on using the grid layout.
* [Relative Layout](https://lynxjs.org/guide/ui/layout/relative-layout.md): If you want a layout that allows easily control the relative position between the parent and children or between the sibling elements without using complex hierarchical structure, relative layout (inspired by relative Layout in Android) is the best choice. While using grid, flexible box, and linear layouts, it's challenging to achieve a design that includes numerous relative positions using only a few styles. Relative layout is a layout that displays children in relative positions, where each view's position can be specified relative to sibling elements (for example, to the left or below another view) or relative to the parent's area (e.g., align at bottom, left or center). For the supported properties, please refer to the Reference section.
* [Managing Scrolling](https://lynxjs.org/guide/ui/scrolling.md): Overflow behavior occurs when the content of an element (its own content and child elements) exceeds the size of the element itself. During the process of building a page, it is inevitable to encounter situations of overflow. You can use the overflow property to crop the overflowing content, or use a \[scrollable element]\(#scrollable element to make the overflowing content scrollable, and control the scrolling direction of the content through the scroll-orientation property. In Lynx, the view component doesn't support the scrolling effect achieved by overflow: scroll as in the Web. Only scrolling containers like <scroll-view> and <list> have the scrolling effect.
* [Event Handling](https://lynxjs.org/guide/interaction/event-handling.md): Lynx provides an event mechanism similar to the Web, allowing developers to design and implement custom interaction logic based on events. However, unlike the Web system, Lynx's event response mechanism supports dual-threaded processing. This means that event handling functions can be executed in the main thread or background thread as needed, thereby optimizing performance and response speed.
* [Event Propagation](https://lynxjs.org/guide/interaction/event-handling/event-propagation.md): When an event is triggered, it will propagate along the event response chain. If the corresponding type of event handler property is set on the node, the node can listen to the corresponding event or even intercept it during the event propagation process. In addition, Lynx also provides cross-component event monitoring, event aspect interface, and GlobalEventEmitter to implement special event propagation.
* [Direct Manipulation of Elements](https://lynxjs.org/guide/interaction/event-handling/manipulating-element.react.md): In daily development, modern front-end frameworks handle most element tree and node property updates for us. However, there are times when you need to manipulate elements directly, such as controlling media players, manipulating view behavior, getting element information, or directly modifying styles. These functionalities are typically implemented by components on the client side, and you need to access them through element references.
* [Visibility detection](https://lynxjs.org/guide/interaction/visibility-detection.md): Lynx provides two capabilities for detecting node visibility. One is Lynx's unique exposure capability, which allows developers to easily monitor whether a node is exposed. The other is a Web-like intersection observer, which is a more atomic capability that allows developers to monitor the intersection positions of nodes.
* [Exposure Ability](https://lynxjs.org/guide/interaction/visibility-detection/exposure-ability.md): The exposure capability provides a capability to observe changes in the visibility of a target node. When a target node changes from invisible to visible, an exposure event is triggered. Otherwise, an anti-exposure event is triggered. Developers can monitor the exposure/anti-exposure events of nodes by setting relevant properties for the target nodes to be observed, thereby achieving requirements such as point reporting and UI lazy loading. The exposure capability observes changes in node visibility through timed exposure detection tasks. The visibility of a node depends on the following factors: Visibility of the target node: The target node itself has width and height and is opaque, and the parent node has no clipping with zero width or height.Viewport intersection of the target node: The target node intersects with the parent scroll container, Lynxview, and the viewport of the screen. <img src="https://lf-lynx.tiktok-cdns.com/obj/lynx-artifacts-oss-sg/lynx-website/assets/doc/exposure-ability.png" width="40%" height="40%" />
* [Intersection Observer](https://lynxjs.org/guide/interaction/visibility-detection/intersection-observer.md): The intersection observer provides a method to observe the intersection status between the target node and the reference node and between the target node and the ancestor node. When the intersection status changes, the corresponding callback is triggered. Developers can observe the changes in the intersection status between the target node and the reference node through the following three steps: Call lynx.createIntersectionObserver to create an IntersectionObserver object and specify the threshold list of intersection status changes.Call the relativeTo method of the IntersectionObserver object to specify the reference node.Call the observe method of the IntersectionObserver object to specify the target node and callback.Call the disconnect method of the IntersectionObserver object to clear the target node and callback. In the following example, the developer monitors whether the parent node and the child node intersect, and outputs the intersecting child node id and the intersection position when they intersect. <Go example="event" defaultFile="src/visibility_intersection/index.tsx" defaultEntryFile="dist/visibility_intersection.lynx.bundle" img="https://lf-lynx.tiktok-cdns.com/obj/lynx-artifacts-oss-sg/lynx-website/assets/doc/event/visibility_intersection.gif" highlight="{8-24}" entry="src/visibility_intersection" /> For the specific syntax of the intersection observer, please refer to IntersectionObserver.
* [Networking](https://lynxjs.org/guide/interaction/networking.md): Many mobile apps need to load resources from remote URLs. You might want to make a POST request to a REST API or fetch a large amount of static content from another server.
* [Instant First-Frame Rendering (IFR)](https://lynxjs.org/guide/interaction/ifr.md): Lynx supports "Instant First-Frame Rendering", which means that your page can display content directly when it is loaded, without a white screen or other intermediate states.
* [Visual Appearance](https://lynxjs.org/guide/styling/appearance.md)
* [Motion](https://lynxjs.org/guide/styling/animation.md): Lynx offers extensive motion capabilities, allowing developers to create more modern, smooth, and intuitive user interfaces. Utilizing these features, developers can produce stunning transition effects and natural motion feedback, thereby enhancing user experience.
* [Theming](https://lynxjs.org/guide/styling/custom-theming.md): Lynx supports a wide range of CSS properties, enabling seamless integration with CSS selectors, CSS variables, and opt-in CSS inheritance. By defining and managing different theme variables, developers can easily switch between various color schemes, font styles, and other visual elements, ensuring an optimal visual experience and interaction for users.
* [Typography](https://lynxjs.org/guide/styling/text-and-typography.md)
* [Accessibility](https://lynxjs.org/guide/inclusion/accessibility.md): Accessibility (A11y) refers to the design concept of building accessibility through technical means to ensure that mobile applications can be equally accessed by all kinds of people. Its core goal is to break down usage barriers, allowing users with different physical conditions, perceptual abilities, and cognitive levels to smoothly obtain information and services. Mainstream mobile platforms provide a complete accessibility support system: iOS and Android not only natively integrate APIs for users with disabilities but also come equipped with standardized assistive technology toolchains, such as screen readers (VoiceOver / TalkBack) designed specifically for visually impaired users. On this basis, the Lynx framework encapsulates cross-platform accessibility interfaces, enabling developers to integrate accessibility features in their apps and build an information-accessible mobile ecosystem.
* [Internationalization](https://lynxjs.org/guide/inclusion/internationalization.md): Internationalization (i18n) refers to the design and development of products and applications to enable localization, making them suitable for users from different cultures, regions, or languages. You can use i18n libraries like i18next to achieve internationalization and provide an accessible experience for users.
* : Lynx DevTool is a collection of performance and debugging tools for Lynx apps. You need to integrate DevTool into your Lynx pages, and then connect to the device via the DevTool Desktop Application to debug the page. \<video src="https://lf-lynx.tiktok-cdns.com/obj/lynx-artifacts-oss-sg/lynx-website/assets/devtool-overview.mp4" loop autoPlay muted </video>
* : The Elements panel allows you to inspect and modify element and element tree.
* : Use the Sources panel to debug JavaScript. Before you start debugging, please take some time to familiarize yourself with the Lynx JavaScript Runtime. After DevTool is enabled, the background thread uses the PrimJS engine for debugging by default. On Android, you can also switch to the V8 engine for a more comprehensive debugging experience. To switch to the V8 engine, open the DevTool Switch Page, toggle the "V8 Engine" switch to "On" and restart the application. You can check the current engine type in the lower-left corner of the Preview Window.
* : The Layers panel helps you understand the composition of Lynx pages and how the framework presents content, analyzing its 3D layers to discover rendering issues.
* : The Preact Devtools panel helps you inspect the hierarchy of ReactLynx components, displaying information such as component props, state, and file paths. The Preact Devtools panel is based on the Preact Devtools web browser extension and offers the same user experience.
* : Trace is a performance analysis tool. With Trace, you can obtain a detailed rendering workflow of Lynx pages, making it easier to locate, analyze, and fix issues such as jank and long-running tasks.
* : This article aims to help you use DevTool to record Trace for Lynx pages. By following these steps, you will be able to capture detailed information about the page rendering process and engine execution, enabling effective performance analysis and problem diagnosis.
* : This guide introduces the main UI structure and common operations to help you quickly get started with performance analysis.
* : Trace supports recording trace during the app startup process, which is essential for analyzing and optimizing app's start performance. <img src="https://lf-lynx.tiktok-cdns.com/obj/lynx-artifacts-oss-sg/plugin/static/startup-trace-config-latest.png" alt="Startup Trace Configuration" className="full_image" /> Set duration (seconds) Enter the desired duration for recording trace during app startup. Press the Enter key to save your configuration. \<img src="https://lf-lynx.tiktok-cdns.com/obj/lynx-artifacts-oss-sg/plugin/static/startup-trace-dur-latest.png" alt="Startup Trace Duration" style={{ width: '300px', margin: '20px', }} /> Restart application Close and relaunch your app. Trace will automatically record trace during the startup period. Load startup trace After the app launches, choose target app, then click the Load Trace button in Lynx DevTool. \<img src="https://lf-lynx.tiktok-cdns.com/obj/lynx-artifacts-oss-sg/plugin/static/load-startup-trace-latest.png" alt="Load Startup Trace" style={{ width: '300px', margin: '20px', }} /> View the startup trace Once the trace data has loaded, you will see a visualization of the app’s startup process for detailed analysis. <img src="https://lf-lynx.tiktok-cdns.com/obj/lynx-artifacts-oss-sg/plugin/static/load-startup-trace-success-latest.png" alt="Load Startup Trace Success" className="full_image" /> FAQ After clicking Load Trace button shows: "Startup tracing is not enabled, cannot pull trace data" Make sure to set a valid trace duration (greater than 0) in Startup Trace Configuration, then restart the app and click Load Trace button again.Ensure a Lynx page is opened during or after the app startup process before clicking Load Trace button. Clicking Load Trace button shows: "Startup tracing is in progress, please try again later" The app startup trace is still being recorded. Please wait for the process to finish and try clicking Load Trace button again later.
* : Trace supports recording detailed JavaScript profile data. A JavaScript Profile is a collection of stack traces sampled during execution, which is crucial for pinpointing performance hotspots and bottlenecks. This allows you to analyze script execution performance. Click JS Profile and Select the correct scripts engine Based on the background thread scripts engine used by your Lynx page, choose the appropriate value in the JS Profile selection. disable: Do not enable JavaScript profiling;primjs: Enable profiling for the PrimJS JavaScript engine.v8: Enable profiling for the V8 JavaScript engine. <img src="https://lf-lynx.tiktok-cdns.com/obj/lynx-artifacts-oss-sg/plugin/static/choose-js-profile-type-latest.png" alt="Choose JS Profile Type" className="full_image" /> Start recording Click Start button to begin recording trace. <img src="https://lf-lynx.tiktok-cdns.com/obj/lynx-artifacts-oss-sg/plugin/static/start-js-profile-trace-latest.png" alt="Start Recording JavaScript Profile" className="full_image" /> Stop recording When finished, click Stop button to end the recording. <img src="https://lf-lynx.tiktok-cdns.com/obj/lynx-artifacts-oss-sg/plugin/static/stop-js-profile-trace-latest.png" alt="Stop Recording JavaScript Profile" className="full_image" /> Decode JavaScript Profile Data using sourcemap (Optional) If your scripts is minified, you can use sourcemap to decode profile data. <img src="https://lf-lynx.tiktok-cdns.com/obj/lynx-artifacts-oss-sg/plugin/static/sourcemap-decode-latest.gif" alt="Decode JavaScript Profile" className="full_image" /> </Steps> FAQ No JavaScript profile data after recording trace Make sure you have selected the correct script engine before starting recording.On iOS, ensure both Lynx DevTool and PrimJS Debugging are enabled. No scripting resource found after clicking SourceMap Decode Ensure you start trace recording before opening the Lynx page so that the script resource name can be captured.
* : Recorder is a tool designed for the Lynx framework to facilitate the recording and replay of page runtime states. Its core functionality involves precisely capturing the complete state of a page at a specific moment and serializing it into a portable recording file for subsequent high-fidelity replay.
* : This section guides you through performance analysis methodologies, from diagnosing rendering latency and instrumenting business logic to optimizing page fluency and memory usage, enabling comprehensive smoothness and stability improvements.
* : This document aims to help developers master how to accurately locate each execution stage in a Trace, thereby enabling effective analysis of specific performance issues.
* : When scrolling occurs, the system attempts to draw the next frame at a fixed cadence; any noticeably longer draw interval will be perceived by users as a “stutter” or “jitter.” These momentary long frames are the source of “dropped frames.” Scrolling is the most cadence-sensitive scenario, because backgrounds, text, and images are continuously moving; once the beat becomes unstable, the eye immediately notices.
* : Memory analysis helps discover leaks and abnormal usage within Lynx pages and ensures stability. You can use Trace Memory Track and IDE tools, to comprehensively monitor and troubleshoot memory-related performance issues.
* : NativeModule is the core communication bridge between JavaScript and native applications. By invoking a NativeModule, Lynx frontend pages can access and control native capabilities. This document together with code examples, details the invocation and execution flow of NativeModule within Trace.
* : This overview helps you quickly build a mental model and understand common workflows for performance monitoring. It explains how the Performance API and Timing Flag work together to create a closed loop from marking to analysis: Mark → Collect → Report → Analyze.
* : Lynx Pipeline defines the complete process from triggering the rendering to displaying it on the screen. If you care about rendering performance of certain key components, you can set the component’s \_\_lynx\_timing\_flag property to mark its Lynx Pipeline and monitor its performance. When the flagged Lynx Pipeline finishes and the screen is refreshed, a PipelineEntry performance event is generated. You can obtain it via PerformanceObserver.
* [Compatibility](https://lynxjs.org/guide/compatibility.md): This article explains how to ensure version compatibility between Bundle and Lynx Engine, and how to handle challenges that come with Lynx Engine version evolution.
* [JavaScript Runtime](https://lynxjs.org/guide/scripting-runtime/index.md)
* [Main Thread Runtime](https://lynxjs.org/guide/scripting-runtime/main-thread-runtime.md)
* [Native Modules](https://lynxjs.org/guide/use-native-modules.md): When developing Lynx applications, you may encounter scenarios where you need to interact with native platform APIs not covered by Lynx. Or, you might want to reuse existing native platform code in your Lynx application. Regardless of the reason, you can use Native Modules to seamlessly connect your JavaScript code with native code, allowing you to call native platform functions and APIs from your JavaScript code. The following will detail how to write a native module. The basic steps for writing a native module are as follows: Use TypeScript to declare your typed interface specification.Use your interface specification to write your Lynx application code.Follow your interface specification to write your native platform code and connect your native code to the Lynx runtime environment. Next, this guide will demonstrate these steps through an example of building a native module.
* [Custom Element](https://lynxjs.org/guide/custom-native-component.md): If the built-in elements do not meet your requirements, you can extend Lynx's capabilities by creating custom native elements. This section will guide you through creating and registering custom elements on Android, iOS and HarmonyOS platforms.
* : LynxView itself is a native view that can easily be used as a full-screen view, or be embedded within a non-full-screen native view. LynxView corresponds to the Page element. It only allows the client to set size constraints on LynxView, and you generally cannot directly modify the Page's style to set its size. The client sets different size constraints on LynxView, which translates to setting size constraints on the Page. The Lynx layout engine uses these constraints to calculate the size of the Page node and all its child nodes.
* [Using Data from Host Platform](https://lynxjs.org/guide/use-data-from-host-platform.md): Lynx allows the client to provide an initial set of data when the page loads, and then update this data at any time afterward. This initial data is called initData.
* [](https://lynxjs.org/guide/spec.md)
* [Glossary](https://lynxjs.org/guide/glossary.md): This glossary is intended to provide descriptive guidance about the meanings of technical terms commonly used in the context of Lynx development. For the latest consensus on a more formal definitions of these terms, please refer to the Lynx Living Specification. {/\* <Toc/> \*/}
* [](https://lynxjs.org/guide/interaction/storage.md)
* : This article uses the hello-world project as an example to explain the ReactLynx rendering process in detail: Demonstrate the complete execution flow from the first-frame render to component updates in ReactLynxUnderstand the event distribution and timing relationships of each key stage in the Trace viewLearn how to use the Trace tool to accurately locate performance bottlenecks in the rendering process <img src="https://lf-lynx.tiktok-cdns.com/obj/lynx-artifacts-oss-sg/plugin/static/reactlynx-overview-trace.png" alt="Trace Render Pipeline" className="full_image" />
* : Trace allows you to add custom trace events to your code, helping you track specific operations or logic flows. This is useful for profiling custom business logic, measuring durations, or marking important points in your app. For Frontend Developers: You might want to measure the execution timing of a hook or component lifecycle method to understand rendering delays or side effect durations. For example, tracking how long a useEffect hook takes;For Android/iOS Developers: You may want to profile how long it takes to load a Lynx Bundle, parse resources, or execute a specific NativeModule call. Custom trace events help you pinpoint slow operations within complex workflows; By adding custom trace events, you transform opaque code sections into visible, measurable segments in Trace’s timeline, enabling precise performance tuning.
* [Integrate Lynx development version](https://lynxjs.org/guide/start/integrate-lynx-dev-version.md): During Lynx page development, you can use the Trace and Lynx Recorder tools for debugging, analysis, and locate issues. To avoid impacting production performance, the official release version of Lynx does not include Trace and Recorder features. For developer convenience, Lynx also provides a development version (with a -dev suffix in the version number). Starting from release/3.4, Lynx provides a dev version for each release version (the dev version uses the same release version number with a -dev suffix). You can integrate the Lynx development version by following the steps below. Integrate Lynx Refer to the Lynx integration guide for detailed steps on integrating Lynx. Integrate Lynx DevTool Refer to the Lynx DevTool integration guide for detailed steps on integrating Lynx DevTool. Switch to the dev version of Lynx Update your Podfile to use the dev version of the Lynx component. Install Dependencies Run pod install to install dependencies, then open your Xcode project and rebuild. \</PlatformTabs.Tab> \<PlatformTabs.Tab platform="android"> Integrate Lynx Refer to the Lynx integration guide for detailed steps on integrating Lynx. Integrate Lynx DevTool Refer to the Lynx DevTool integration guide for detailed steps on integrating Lynx DevTool. Switch to the dev version of lynx and lynx-trace Update your build.gradle or build.gradle.kts to use the dev versions: Rebuild your application Rebuild your application to ensure all changes take effect. \</PlatformTabs.Tab> \<PlatformTabs.Tab platform="harmony"> <Steps> Integrate Lynx Refer to the Lynx integration guide for detailed steps on integrating Lynx. Integrate Lynx DevTool Refer to the Lynx DevTool integration guide for detailed steps on integrating Lynx DevTool. Switch to the dev version of lynx and lynx\_devtool Update your oh-package.json5 to use the dev version of the Lynx component. Install Dependencies Run ohpm install to install dependencies, then open your DevEco-Studio project and rebuild. Congratulations! You have completed the integration of the Lynx development version. Now, you can launch the DevTool desktop application and start debugging and performance profiling using either the LynxTrace or LynxRecorder tool.
* [Advanced DevTool Configurations](https://lynxjs.org/guide/start/integrate-lynx-devtool-advanced.md)
* [Integrating Lynx DevTool](https://lynxjs.org/guide/start/integrate-lynx-devtool.md): When encountering issues during Lynx page development, you can use DevTool for debugging. However, you need to follow these steps to integrate DevTool first. Adding Dependencies You need to add these components: the Devtool subcomponent of LynxService, LynxDevTool, and DebugRouter. Enabling DevTool DevTool provides several debugging switches. Here are three important switches: Lynx Debug is the switch that controls all DevTool debugging.Lynx DevTool controls main debugging features: element inspection and JavaScript debugging.Lynx LogBox manages the LogBox. Lynx DevTool and Lynx LogBox switches can only take effect after Lynx Debug is enabled.When debugging Lynx pages with the DevTool Desktop, Lynx DevTool needs to be enabled.LogBox helps you quickly identify and diagnose issues. You can configure these switches during Lynx Environment Initialization: \<PlatformTabs.Tab platform="android"> <Steps> Adding Dependencies You need to integrate these two components: lynx-service-devtool and lynx-devtool Registering DevTool Service DevTool Service provides some preset values to control default behaviors. You can configure them as needed. In the next chapter, we will introduce these preset values in detail. Enabling DevTool DevTool provides several debugging switches. Here are three important switches: Lynx Debug is the switch that controls all DevTool debugging.Lynx DevTool controls main debugging features: element inspection and JavaScript debugging.Lynx LogBox manages the LogBox. Lynx DevTool and Lynx LogBox switches can only take effect after Lynx Debug is enabled.When debugging Lynx pages with the DevTool Desktop, Lynx DevTool needs to be enabled.If you need to use JavaScript debugging, you also need to set the LoadQJSBridge or LoadV8Bridge preset value to true.LoadQJSBridge controls loading the PrimJS engine debugging library.LoadV8Bridge controls loading the V8 engine debugging library.LogBox helps you quickly identify and diagnose issues. You can configure these switches during Lynx Environment Initialization: \<PlatformTabs.Tab platform="harmony"> <Steps> Adding Dependencies You need to integrate these two components: @lynx/lynx\_devtool and @lynx/lynx\_devtool\_service. Registering DevTool Service Enabling DevTool DevTool provides several debugging switches. Here are three important switches: Lynx Debug is the switch that controls all DevTool debugging.Lynx DevTool controls main debugging features: element inspection and JavaScript debugging.Lynx LogBox manages the LogBox. Lynx DevTool and Lynx LogBox switches can only take effect after Lynx Debug is enabled.When debugging Lynx pages with the DevTool Desktop, Lynx DevTool needs to be enabled.LogBox helps you quickly identify and diagnose issues. You can configure these switches during Lynx Environment Initialization: Congratulations! You have completed the DevTool integration. Now, you may launch the Lynx DevTool Desktop and connect your app via USB to start debugging. <img src="https://lf-lynx.tiktok-cdns.com/obj/lynx-artifacts-oss-sg/lynx-website/assets/doc/devtool_connected_success.png" alt="Integrate Lynx DevTool Successfully" width={800} /> \<NextSteps.Root> \<NextSteps.Step href="/guide/start/integrate-lynx-devtool-advanced" title="More DevTool Switches" description="Need more advanced configurations for DevTool?" /> \</NextSteps.Root>
* [Integrate with Existing Apps](https://lynxjs.org/guide/start/integrate-with-existing-apps.md): Currently, Lynx is not suitable for building a new application from scratch. You need to integrate Lynx (engine) with your native mobile app or desktop app or web app, and load Lynx apps through Lynx views. With a few steps, you can start developing with Lynx in your application. Choose your target platform to view the specific integration steps:
* [Quick Start](https://lynxjs.org/guide/start/quick-start.md): Welcome to the Lynx documentation! We will create a Lynx project and start developing.
* [Tutorial: Product Gallery](https://lynxjs.org/guide/start/tutorial-gallery.md): We will build a product gallery page together during this tutorial. This tutorial does not assume any existing Lynx knowledge. The techniques you'll learn in the tutorial are fundamental to building any Lynx pages and applications.
* [Tutorial: Payment Details](https://lynxjs.org/guide/start/tutorial-payment-details.md): After completing the Gallery tutorial, you should have mastered the basics of Lynx. Now, let's learn some more advanced features through a payment details page, including: Building an interactive scrolling listHow to create 3D interactive animationsHow to pass data between different components
* [Tutorial: Product Detail](https://lynxjs.org/guide/start/tutorial-product-detail.md): In this tutorial, we'll implement a swiper component to teach you how to write high-performance interactive code. You'll learn: Direct Node Manipulation: You'll learn how to listen to events and update node stylesUse Main Thread Script to Reduce Latency: You'll learn how to optimize interaction performance with main thread scriptCommunication Between Main Thread and Background Thread: You'll learn how to enable communication between main thread and background thread functionsValues Across Main Thread and Background Thread Script: You'll learn about data flow when using main thread and background thread script together
### Blog
* [Lynx Roadmap 2026](https://lynxjs.org/blog/lynx-open-source-roadmap-2026.md): Lynx is moving to a faster release cadence in 2026, investing in AI-ready docs and tooling, improving desktop readiness, strengthening production infrastructure, and deepening collaboration with the open-source community.
* [Lynx 3.6: Lynx for AI, reactlynx-use, CSS for Design Engineering](https://lynxjs.org/blog/lynx-3-6.md): Lynx 3.6 is now officially released! This release introduces Lynx for AI to enhance AI-native development capabilities, introduces reactlynx-use for improved developer experience, and enhances CSS capabilities for design expressiveness. On the native side, Lynx 3.6 improves platform integration with standalone BackgroundRuntime and asynchronous TemplateBundle creation on HarmonyOS, along with Auto Layout support for LynxView on iOS.
* [Lynx 3.5: Main Thread Script, React Compiler, HarmonyOS Improvements](https://lynxjs.org/blog/lynx-3-5.md): Lynx 3.5 is now officially released! Following our stable bi-monthly release cadence, Lynx 3.5 brings several key improvements. This release adds experimental support for React Compiler, enhances main thread scripts with `stopPropagation` for better event bubbling control, enables immediate interactivity after first-frame rendering, and improves cross-thread communication. We've also expanded HarmonyOS platform support and introduced new features like the `pointer-events` CSS property.
* [Announcing Lynx for HarmonyOS](https://lynxjs.org/blog/lynx-harmony.md): Today, we are happy to share that Lynx now provides public beta support for HarmonyOS, delivering feature parity in CSS, Elements, and APIs — along with the same level of native performance and user experience.
* [Lynx 3.4: HarmonyOS Support, Trace and Recorder, Text Input Elements](https://lynxjs.org/blog/lynx-3-4.md): Lynx 3.4 is now officially released! This release features new platform support for HarmonyOS, enables Windows development, launches new developer tools *Trace* and *Recorder*, open-sources the highly requested `<input>` and `<textarea>` elements, offers even more flexible animations, supports variable fonts, and more.
* [What's new in Lynx 3.2](https://lynxjs.org/blog/lynx-3-2.md): Lynx 3.2 delivers updates across its framework, engine, and tools, including the ReactLynx testing tools, `llms.txt` support, new Grid Layout features, improvements to `<list>` and `<text>`, and more.
* [Lynx Roadmap 2025](https://lynxjs.org/blog/lynx-open-source-roadmap-2025.md): Two weeks ago, we launched Lynx as an open-source project and have since gathered valuable insights and feedback from the community. Thank you for engaging with Lynx, even as we take our first steps as a new member of the open-source cross-platform ecosystem. Today, I'm pleased to share the 2025 roadmap of Lynx.
* [Lynx: Unlock Native for More](https://lynxjs.org/blog/lynx-unlock-native-for-more.md): Today, we're excited to introduce Lynx, a family of technologies empowering developers to use their existing web skills to create truly native UIs for both mobile and web from a single codebase...
* [Lynx Blog](https://lynxjs.org/blog/index.md)
* [Lynx 3.7: Desktop Support, SVG, Skills, and ReactLynx Updates](https://lynxjs.org/blog/lynx-3-7.md): Lynx 3.7 is now officially released! This release brings official desktop platform support for macOS and Windows, introduces the new SVG element, introduces new agent skills for better observability, and updates ReactLynx with simpler External Bundle presets and shared runtime modules.
### Others
* [Native API Desktop Documentation Cleanup Ledger](https://lynxjs.org/api-desktop-spec-cleanup.md): This document records Native API alignment issues between compat desktop support and MDX Desktop-specific documentation. Do not remove entries while cleaning; mark resolved entries in place so the cleanup history remains reviewable.
* [`AGENTS.md` for Lynx](https://lynxjs.org/ai/agentsmd.md): AGENTS.md is a project-level instruction file for coding agents, similar to how README.md is for human developers.
* [Lynx for AI](https://lynxjs.org/ai/index.md): LLMs are trained on public web data, which means they often lack awareness of the latest Lynx features and best practices. The Lynx team and community are developing a suite of tools to help coding agents understand and develop Lynx more effectively.
* [Lynx DevTool MCP](https://lynxjs.org/ai/lynx-devtool-mcp.md): Lynx DevTool MCP is a Model Context Protocol (MCP) server that lets coding agents control, operate and preview Lynx pages.
* [Lynx Docs MCP](https://lynxjs.org/ai/lynx-docs-mcp.md): @lynx-js/docs-mcp-server is an MCP server providing docs for LLMs from Lynx official site, with carefully designed prompting. It lets your coding agent (such as Gemini, Claude, Cursor or Copilot) access Lynx documentation to assist you in development tasks. Therefore, we have specifically optimized llms.txt, a condensed version of the documentation site optimized for LLMs.
* [debug-info-remapping](https://lynxjs.org/ai/skills/debug-info-remapping.md): Helps agents debug main-thread runtime errors by remapping minified error messages back to their original source, making stack traces actionable.
* [lynx-devtool](https://lynxjs.org/ai/skills/lynx-devtool.md): Lets agents interact with Lynx DevTool to inspect and debug running Lynx applications on connected devices (Android, iOS, Desktop): CDP commands — Send Chrome DevTools Protocol commands for DOM inspection, CSS querying, console log retrieval, and taking screenshots.App commands — Open or close pages in the connected Lynx application.Open URLs — Launch URLs directly in Lynx for development and testing.Troubleshooting — Built-in diagnostics for connector and transport issues between the agent and DevTool.
* [lynx-typescript](https://lynxjs.org/ai/skills/lynx-typescript.md): This article discusses common TypeScript issues and solutions in Lynx development, including environment configuration, type extension, event handling, LynxUI components, and advanced ReactLynx usage.
* [reactlynx-best-practices](https://lynxjs.org/ai/skills/reactlynx-best-practices.md): Teaches agents patterns writing dual-threaded React code with ReactLynx. Includes static analysis rules and auto-fix for common issues: detect-background-only (Critical) — Ensures native API calls (lynx.getJSModule, NativeModules) only happen in background thread contexts, preventing UI blocking.proper-event-handlers — Correct event handler patterns (bindtap, catchtap) and propagation in ReactLynx.main-thread-scripts-guide — How to properly use 'main thread' directive and main-thread: event prefix for smooth animations and gesture handling.hoist-static-jsx — Performance optimization by hoisting static JSX elements outside components to avoid unnecessary re-creation.
* [lynx-trace-analysis](https://lynxjs.org/ai/skills/trace-analysis.md): Specializes in analyzing Lynx trace data to diagnose performance issues and provide actionable optimization strategies. It covers startup/loading metrics (FCP, FMP, TTI) and white screen issues, smoothness problems (scroll jank, frame drops, interaction lag), regressions, rendering pipeline stages, and native module latency.
* [lynx-trace-record](https://lynxjs.org/ai/skills/trace-record.md): Enables agents to capture Lynx performance traces for subsequent analysis, supporting features like system trace, JS profiling for in-depth performance diagnosis.
* [Documenting APIs](https://lynxjs.org/help/api.md): The Lynx documentation relies on a structured system to ensure API references are accurate and consistent.
* [Writing Blog Posts](https://lynxjs.org/help/blog.md): The Lynx website hosts a blog to share updates, tutorials, and announcements.
* [MDX Components Reference](https://lynxjs.org/help/components.md): This page serves as a reference for the custom components available in the Lynx documentation. You can import these from @lynx.
* [API Status Dashboard Guide](https://lynxjs.org/help/dashboard.md): This guide explains how to use the Lynx API Status Dashboard to explore API compatibility across different platforms.
* [Managing Interactive Examples (`<Go>`)](https://lynxjs.org/help/example.md): Interactive examples allow users to preview and edit code directly in the documentation. This guide explains how to manage these examples using the dedicated workspace and the <Go> component.
* [Contributor Guide](https://lynxjs.org/help/index.md): Welcome to the Lynx website contributor guide! This documentation project is a large-scale repository that powers the official Lynx documentation. To help you navigate and contribute effectively, we've organized the guidelines into specific topics. Whether you are writing a blog post, updating API documentation, or adding a new example, this guide will help you understand the tools and conventions we use.
* [Managing Spec](https://lynxjs.org/help/spec.md): The Lynx Living Specification serves as the definitive technical reference for the Lynx engine.
* [Multi-Subsite Architecture](https://lynxjs.org/help/subsite.md): The Lynx website operates as a collection of "mini-subsites" (e.g., Lynx, ReactLynx, Rspeedy) housed within a single repository. This architecture allows each subsite to have its own identity (logo, home page, sidebar) while sharing common documentation and infrastructure.
* [Authoring Guides](https://lynxjs.org/help/writing.md): This page outlines the standards and best practices for writing Guides on the Lynx website. Guides are narrative documentation designed to teach concepts, explain architecture, or walk users through specific tasks. For excellent examples of well-structured guides, refer to the Quick Start and Integrate with Existing Apps pages.
* [Best Practices](https://lynxjs.org/react/best-practices.md): This page covers common patterns and pitfalls when developing with ReactLynx, with a focus on Lynx's dual-thread architecture.
* [Code Splitting](https://lynxjs.org/react/code-splitting.md): Rspack supports code splitting, which allows splitting the code into other chunks. You have the full control about size and number of generated assets, which allow you to gain performance improvements in loading time.Rspack - Code Splitting
* [Data Fetching](https://lynxjs.org/react/data-fetching.md): Whether fetching static content from a remote server or interacting with a REST API, ReactLynx applications often need to retrieve data from external sources. For example, you might want to load user posts in a social media app or fetch the latest product listings in an e-commerce application. Lynx provides the Fetch API, enabling you to make network requests. You can refer to the Networking chapter for more details. The Fetch API provided by Lynx can be used together with server state management libraries from the React ecosystem, such as TanStack Query (React Query), to simplify data fetching and state management. It is important to note that Lynx's Fetch API has subtle differences compared to the Web Fetch API. You can check the Fetch API Reference - Compatibility section to learn more about these differences. As a result, you may need to adapt libraries from the React ecosystem to ensure compatibility. If you encounter any issues on Lynx Fetch API, you are welcome to submit feature requests or contribute to help Lynx better support the React ecosystem.
* [](https://lynxjs.org/react/index.md)
* [What is ReactLynx?](https://lynxjs.org/react/introduction.md): ReactLynx is the official React framework for Lynx. It allows you to develop Lynx native apps with a React mental model. With ReactLynx, you can build your UI using JSX and React components, just like you would on the web. ReactLynx turns your React code into calls to the Lynx Engine imperative API to render the native UI.
* [Rendering Process and Lifecycle](https://lynxjs.org/react/lifecycle.md): Due to Lynx's dual-thread architecture, ReactLynx's rendering process and component lifecycle differ from traditional React. This design aims to address mobile performance bottlenecks by properly distributing tasks between threads to ensure rendering performance and interaction fluidity.
* [Main Thread Script](https://lynxjs.org/react/main-thread-script.md): The Main Thread Script is a JS script that can be executed on the main thread. The most common use cases for the main thread script are smooth animations and gesture handling. It is primarily used to address the response delay issue in Lynx's multi-threaded architecture, aiming to achieve a near-native interactive experience.
* [Tutorial: Payment Details](https://lynxjs.org/react/payment-details.md): After completing the Gallery tutorial, you should have mastered the basics of Lynx. Now, let's learn some more advanced features through a payment details page, including: Building an interactive scrolling listHow to create 3D interactive animationsHow to pass data between different components
* [Performance Profiling](https://lynxjs.org/react/performance/profiling.md): ReactLynx provides built-in profiling support to help you analyze and optimize the performance of your applications. This feature allows you to trace component rendering, diffing, and state updates in production builds.
* [React Compiler](https://lynxjs.org/react/react-compiler.md): React Compiler can optimize components at compile time, eliminating the need to manually use useMemo, useCallback, and memo. You can use React Compiler in ReactLynx to enhance your application's performance.
* [ReactLynx Testing Library](https://lynxjs.org/react/reactlynx-testing-library.md): The @lynx-js/react/testing-library package provides the same set of APIs (e.g. render, fireEvent, screen, etc.) for testing the rendering result of ReactLynx, just like the popular React Testing Library, with the underlying dual-threaded architecture abstracted away by the @lynx-js/testing-environment.
* [React Router](https://lynxjs.org/react/routing/react-router.md): React Router enables "single page routing". Installation Since ReactLynx only have React v17 API now, you should install react-router v6. Routing Routes are configured by rendering <Routes> and <Route> that couple URL segments to UI elements. See React Router - Routing for details. Navigating There are no <Link> or <NavLink> components now in ReactLynx. You may use useNavigate to navigate between routes. URL Values Route Params Route params are the parsed values from a dynamic segment. In this case, :city is the dynamic segment. The parsed value for that city will be available from useParams See React Router - useParams for more details. Location Object React Router creates a custom location object with some useful information on it accessible with useLocation. See React Router - useLocation for more details.
* [TanStack Router](https://lynxjs.org/react/routing/tanstack-router.md): Modern and scalable routing for React applications. ReactLynx supports both Memory Routing and File-Based Routing, where Memory Routing is required due to browser History API limitations in Lynx, and File-Based Routing is enabled through seamless @tanstack/router-plugin/rspack integration in Rspeedy. Installation Install dependencies: Install devDependencies: Project Configuration File-based Routing: Enabled via @tanstack/router-plugin/rspack for seamless routing integration.React 18 API Compatibility: Use @lynx-js/react/compat to ensure third-party libraries work correctly. Router Configuration In the Lynx environment, the document is undefined, causing the router to incorrectly identify it as isServer: true. You need to explicitly set isServer: false to ensure proper rendering. Additionally, Memory Routing is required due to browser History API limitations in Lynx. Polyfill To ensure URLSearchParams API works correctly in the Lynx environment, add url-search-params-polyfill at the top of your entry file: File-Based TanStack Router supports file-based routing where your file structure defines your routes. Place your route components in the src/routes directory, with \_\_root.tsx serving as the root component. The @tanstack/router-plugin/rspack automatically scans the src/routes directory and generates a routeTree.gen.ts file that contains all the route definitions and type information. This generated file includes: Route imports and configurationsTypeScript interfaces for type-safe routingThe complete route tree structure See TanStack File-Based Routing for more details. Example <Go example="tanstack-router" defaultFile="src/App.tsx" img="https://lf-lynx.tiktok-cdns.com/obj/lynx-artifacts-oss-sg/plugin/static/tanstack-router-demo.jpg" defaultEntryFile="dist/main.lynx.bundle" entry="src/tanstack-router" />
* [Jotai](https://lynxjs.org/react/state-management/jotai.md)
* [Valtio](https://lynxjs.org/react/state-management/valtio.md)
* [Zustand](https://lynxjs.org/react/state-management/zustand.md)
* [Thinking in ReactLynx](https://lynxjs.org/react/thinking-in-reactlynx.md): ReactLynx follows React's programming model, but leverages the dual-threaded runtimes provided by Lynx to achieve better performance and user experience through its own idioms (or rules).
* [Static Assets](https://lynxjs.org/rspeedy/assets.md): Powered by Rsbuild, Rspeedy supports using static assets, including images, fonts, audios and videos.
* [Build Profiling](https://lynxjs.org/rspeedy/build-profiling.md): Performing a performance analysis can help you identify performance bottlenecks in your project, allowing for targeted optimization.
* [CLI](https://lynxjs.org/rspeedy/cli.md): Rspeedy comes with a lightweight CLI that includes commands such as dev and build.
* [External Bundle](https://lynxjs.org/rspeedy/external-bundle.md): External Bundle lets you build a Lynx bundle once and load it from multiple Lynx apps at runtime. Use it when you want to share ReactLynx components or common business bundles across apps. Compared with Chunk Splitting, External Bundle is for cross-application reuse, while Chunk Splitting is for splitting code inside one app. This workflow has two parts: Use @lynx-js/lynx-bundle-rslib-config to build the external bundle.Use @lynx-js/external-bundle-rsbuild-plugin to load it in the host app.
* [](https://lynxjs.org/rspeedy/index.md)
* [Output Files](https://lynxjs.org/rspeedy/output.md): This chapter will introduces the directory structure of output files and how to control the output directory of different types of files.
* [Plugin](https://lynxjs.org/rspeedy/plugin.md): Rsbuild provides a powerful plugin system that allows for user extension. Rspeedy leverages this plugin system directly. Plugins written by developers can modify the default behavior of Rspeedy/Rsbuild and add various additional features, including but not limited to: Register lifecycle hooksTransform module source codeModify Rsbuild configurationModify Rspack configuration
* [Module Resolution](https://lynxjs.org/rspeedy/resolve.md): In modern front-end development, modularity has become a key approach to managing code effectively: Simplified Module Imports:Module resolution allows you to use concise and more readable paths for importing modules, instead of cumbersome relative paths. For example, with an alias configuration, you can use @components/Button instead of ../../../src/components/Button, which significantly improves code maintainability.Environment-Aware Module Substitution:Module resolution enables you to load different versions of modules based on the environment (e.g., development and production or Lynx and browser). You can easily achieve environment-aware module substitution, ensuring that the most appropriate dependencies are used in different scenarios.
* [Runtime Profiling](https://lynxjs.org/rspeedy/runtime-profiling.md)
* [Styling](https://lynxjs.org/rspeedy/styling.md): Rspeedy supports different ways of styling your application, including: CSS Modules: Create locally scoped CSS classes to avoid naming conflicts and improve maintainability.Global CSS: Simple to use and familiar for those experienced with traditional CSS, but can lead to larger CSS bundles and difficulty managing styles as the application grows.CSS pre-processors: Popular CSS pre-processors like sass and less that extend CSS with features like variables, nested rules, and mixins.PostCSS: A tool for transforming CSS.Tailwind CSS: A utility-first CSS framework that allows for rapid custom designs by composing utility classes.
* [TypeScript](https://lynxjs.org/rspeedy/typescript.md): Powered by Rsbuild, Rspeedy supports TypeScript by default, allowing you to directly use .ts and .tsx files in your projects.
* [Upgrade Rspeedy](https://lynxjs.org/rspeedy/upgrade.md): This section explains how to upgrade the project's Rspeedy-related dependencies.
* [Use Rsdoctor](https://lynxjs.org/rspeedy/use-rsdoctor.md): Rsdoctor is a build analyzer that can visually display the build process, such as compilation time, code changes before and after compilation, module reference relationships, duplicate modules, etc. If you need to debug the build outputs or build process, you can use Rsdoctor for troubleshooting. Rsdoctor is a one-stop tool for diagnosing and analyzing the build process and build artifacts.Rsdoctor is a tool that supports Webpack and Rspack build analysis.Rsdoctor is an analysis tool that can display the time-consuming and behavioral details of the compilation.Rsdoctor is a tool that can analyze the time-consuming and compilation process of the rspack builtin:swc-loader.
* [Lynx versions](https://lynxjs.org/versions.md): In 2025, Lynx plan to publish 5 stable releases. You can find Lynx release schedule here.
* [Quick Start](https://lynxjs.org/react/start/quick-start.md): Welcome to the Lynx documentation! We will create a Lynx project and start developing.
* [Integrate with Existing Apps](https://lynxjs.org/react/start/integrate-with-existing-apps.md): Currently, Lynx is not suitable for building a new application from scratch. You need to integrate Lynx (engine) with your native mobile app or desktop app or web app, and load Lynx apps through Lynx views. With a few steps, you can start developing with Lynx in your application. Choose your target platform to view the specific integration steps:
* [Tutorial: Product Gallery](https://lynxjs.org/react/start/tutorial-gallery.md): We will build a product gallery page together during this tutorial. This tutorial does not assume any existing Lynx knowledge. The techniques you'll learn in the tutorial are fundamental to building any Lynx pages and applications.
* [Tutorial: Product Detail](https://lynxjs.org/react/start/tutorial-product-detail.md): In this tutorial, we'll implement a swiper component to teach you how to write high-performance interactive code. You'll learn: Direct Node Manipulation: You'll learn how to listen to events and update node stylesUse Main Thread Script to Reduce Latency: You'll learn how to optimize interaction performance with main thread scriptCommunication Between Main Thread and Background Thread: You'll learn how to enable communication between main thread and background thread functionsValues Across Main Thread and Background Thread Script: You'll learn about data flow when using main thread and background thread script together
* [Quick Start](https://lynxjs.org/rspeedy/start/quick-start.md): Welcome to the Lynx documentation! We will create a Lynx project and start developing.
* [Integrate with Existing Apps](https://lynxjs.org/rspeedy/start/integrate-with-existing-apps.md): Currently, Lynx is not suitable for building a new application from scratch. You need to integrate Lynx (engine) with your native mobile app or desktop app or web app, and load Lynx apps through Lynx views. With a few steps, you can start developing with Lynx in your application. Choose your target platform to view the specific integration steps:
* [Tutorial: Product Gallery](https://lynxjs.org/rspeedy/start/tutorial-gallery.md): We will build a product gallery page together during this tutorial. This tutorial does not assume any existing Lynx knowledge. The techniques you'll learn in the tutorial are fundamental to building any Lynx pages and applications.
* [Tutorial: Product Detail](https://lynxjs.org/rspeedy/start/tutorial-product-detail.md): In this tutorial, we'll implement a swiper component to teach you how to write high-performance interactive code. You'll learn: Direct Node Manipulation: You'll learn how to listen to events and update node stylesUse Main Thread Script to Reduce Latency: You'll learn how to optimize interaction performance with main thread scriptCommunication Between Main Thread and Background Thread: You'll learn how to enable communication between main thread and background thread functionsValues Across Main Thread and Background Thread Script: You'll learn about data flow when using main thread and background thread script together
* [Quick Start](https://lynxjs.org/ai/start/quick-start.md): Welcome to the Lynx documentation! We will create a Lynx project and start developing.
* [Integrate with Existing Apps](https://lynxjs.org/ai/start/integrate-with-existing-apps.md): Currently, Lynx is not suitable for building a new application from scratch. You need to integrate Lynx (engine) with your native mobile app or desktop app or web app, and load Lynx apps through Lynx views. With a few steps, you can start developing with Lynx in your application. Choose your target platform to view the specific integration steps:
* [Tutorial: Product Gallery](https://lynxjs.org/ai/start/tutorial-gallery.md): We will build a product gallery page together during this tutorial. This tutorial does not assume any existing Lynx knowledge. The techniques you'll learn in the tutorial are fundamental to building any Lynx pages and applications.
* [Tutorial: Product Detail](https://lynxjs.org/ai/start/tutorial-product-detail.md): In this tutorial, we'll implement a swiper component to teach you how to write high-performance interactive code. You'll learn: Direct Node Manipulation: You'll learn how to listen to events and update node stylesUse Main Thread Script to Reduce Latency: You'll learn how to optimize interaction performance with main thread scriptCommunication Between Main Thread and Background Thread: You'll learn how to enable communication between main thread and background thread functionsValues Across Main Thread and Background Thread Script: You'll learn about data flow when using main thread and background thread script together
## 99. Appendix: Lynx APIs
If you need the full list of all APIs of Lynx, please refer to the [Lynx APIs](https://lynxjs.org/api/llms.txt).
Document
Not stored for this site.