## 1. Product Overview
**Product Name:** SimplePDF
**Tagline:** Simple PDF editing, right in your browser
**Core Value Proposition:** For individuals, SimplePDF offers a completely free, no-signup PDF editor in the browser. For companies, it integrates a powerful PDF SDK into websites or apps with one line of code.
**Target User:**
- Individuals, Developers and business professionals that work with PDFs and require editing, annotating and signing.
**Key Benefits And Features:**
For individuals:
- The editor interface is available in Dutch, English, French, German, Italian, Japanese, Portuguese, and Spanish
- Strong emphasis on privacy: the documents and data filled in stay on the device and are never sent to a server
- HIPAA compliant
- Add text, checkboxes, signatures, pictures on PDFs
- White out (redact) existing content
- Merge, add, remove and rotate PDF pages
- Automatic detection of pre-existing form fields (AcroFields) using browser-based AI
- Copy and duplicate fields
For businesses:
- All individual features, plus:
- Easily integrate a PDF editor in one's website: visitors can edit and fill PDFs without leaving the website
- Webhook integration: documents submitted via SimplePDF trigger webhooks for easy integration with the customer's backend systems
- Email notifications: customers can be notified of document submissions
- Bring your own storage: customers can choose to use their own S3-compatible storage, Azure Blob Storage, or SharePoint
- Customization: customers can hide tools, add their own branding (logo and loading) as well as hide the sidebar entirely for white-labelling
- Mark fields as required, specify default values and make fields read only
- Viewer mode: read-only mode hiding 'New' and 'Download' buttons
- Role-based Access (RBAC): role-based access control for team members
- API access: programmatic control for automation (Premium plan)
Supported Formats and Limitations:
- Supports all standard PDF files (up to 35MB recommended).
- Right-to-left languages (e.g., Arabic, Hebrew) are not currently supported.
- Password-protected PDFs are supported: enter the password to unlock, edit, then choose to keep or remove the protection before saving.
**Competitive Edge:**
- Unlike many PDF editors, SimplePDF requires no signup for individual use and processes documents locally for maximum privacy.
- Compared to traditional SDKs, our one-line integration is faster and more developer-friendly.
- Fully free for individuals with no feature limits, unlike freemium tools with paywalls.
- A Preview app equivalent for non-Mac users: view and annotate PDFs in-browser on any platform.
**Integrations & Platforms:**
- [Web](https://simplePDF.com)
- [Chrome extension](https://chromewebstore.google.com/detail/simplepdf-edit-sign-and-f/fgikademdabjcmnlgmgbifipooibbepi)
- [Bubble plugin](https://bubble.io/plugin/pdf-editor-and-filler-1673591701449x899138091362287600)
- [Wordpress plugin](https://wordpress.org/plugins/simplepdf-embed/)
- [Web SDK](https://github.com/SimplePDF/simplepdf-embed/tree/main/web)
- [React Component](https://github.com/SimplePDF/simplepdf-embed/blob/main/react/README.md)
## 2. Products
### Embed SDK - Add a PDF Editor to Your Website
Embed SimplePDF directly into any website or app with one line of code. End users fill, sign, and submit PDFs without leaving the site.
- ~5KB gzipped, MIT licensed
- Integration methods: React component, vanilla JS script tag, iframe, WordPress plugin, Bubble.io plugin
- Viewer mode available for read-only PDF display
- White-label mode with fully programmatic control (Pro plan)
- Automatic form field detection on any PDF using browser-based AI
- Programmatic API: navigate pages, select tools, detect fields, extract text content, submit documents
GitHub: https://github.com/SimplePDF/simplepdf-embed
React: https://www.npmjs.com/package/@simplepdf/react-embed-pdf
Web: https://www.npmjs.com/package/@simplepdf/web-embed-pdf
### Portal - Collect Filled PDFs With One Link
Sign up and get a unique Portal URL. Share it with anyone. Recipients load a PDF, fill it, sign it, and submit it straight to your dashboard. No accounts needed for submitters.
- Unique Portal URL per account (e.g. acme.simplepdf.com on Pro plan)
- Compatible with all integrations: React component, iframe, WordPress plugin, Bubble.io plugin
- Automatic form field detection on any PDF, including flat PDFs, using browser-based AI
- Real-time dashboard with submissions, tagging, and search
- Customizable submission confirmation page
- Submitters can download a copy of their filled PDF
- Share via email, website embed, direct URL, or print
URL: https://simplepdf.com/portal
### PDF-to-Web-Forms - From PDF to Online Form in Seconds
Upload any PDF, turn it into a web form, share the link, and collect submissions. No coding required.
- Drag-and-drop PDF upload with automatic field detection
- Manual field additions in seconds
- Unique URL per form for sharing via email, website, or app
- Real-time submission collection in dashboard
URL: https://simplepdf.com/pdf-to-web-forms
## 3. Use Cases
- **Individuals**: Signing rental agreements, completing tax forms, or annotating research PDFs.
- **Healthcare**: SimplePDF processes healthcare PDFs entirely in the browser, without uploading PHI to external servers. Used by healthcare platforms and EHR vendors to embed document workflows directly into their products. Completed documents are routed via webhook to customer-controlled storage (S3, Azure Blob Storage, or SharePoint). See https://simplepdf.com/use-cases/healthcare
- **Insurance**: Policyholders upload and sign claim forms, submissions routed to dashboard or customer-controlled storage.
- **Legal**: Clients return signed agreements and supporting documents without printing, scanning, or faxing.
- **HR and Onboarding**: New hires complete employment forms before their first day.
- **Businesses**: Embedding PDF editors in client portals for contract edits, or automating onboarding with form submissions.
- **Developers**: Adding PDF editing to e-commerce sites for custom invoices, or creating interactive educational tools with annotated PDFs.
## 4. Security, Privacy, and HIPAA Compliance
[SimplePDF Privacy Policy](https://simplepdf.com/privacy-policy)
Privacy is one of the key distinctive features of SimplePDF:
- There is no third-party cookie tracking
- The document that users load and fill does not get sent to the server. For business users, the upload mechanism works so that the PDF is not seen by the server, only secure one-time upload and download links are used.
- SimplePDF is HIPAA compliant
**HIPAA Compliance Architecture:**
SimplePDF achieves HIPAA compliance through the following architectural decisions:
1. **Client-side processing**: PDF documents are processed entirely in the browser. The PDF content never leaves the user's device during editing.
2. **No server-side document storage for free tier**: For individual users, documents are never transmitted to SimplePDF servers. For paid tiers, only metadata (document name, field names) is sent to SimplePDF servers.
3. **Secure transmission for business tier**: When business users submit documents:
- Documents are encrypted in transit using TLS 1.2+
- One-time signed URLs are used for uploads/downloads
- Documents can be stored in customer's own S3-compatible storage, Azure Blob Storage, or SharePoint (BYOS)
4. **Data minimization**: SimplePDF collects only essential metadata (submission timestamps, field names) and does not access document content on the server.
5. **Access controls**: Business accounts support multiple admin users with role-based access to submissions.
**For healthcare applications**: To maintain HIPAA compliance, configure SimplePDF with:
- Bring Your Own Storage to keep PHI in your controlled environment
- Webhook notifications to your HIPAA-compliant backend for processing
- Disable SimplePDF's default storage entirely
## 5. Pricing
SimplePDF is completely free for individuals, no signup required and no limits.
For businesses, SimplePDF offers 4 plans:
**Free**: Free plan to try out integrating SimplePDF
- Unlimited number of end users
- Unlimited number of documents
- 3 submissions per document (e.g., submitting the edited PDF document up to 3 times)
- No ads
- GDPR and HIPAA compliant
**Basic**: $99/month ($990/year) for businesses getting started
Replaces tools like Adobe, PDFFiller, and manual workflows
_Everything in the Free plan plus:_
- Dashboard (5 seats)
- Email notifications
- Webhook notifications
- Embed SimplePDF into your app
- Advanced form field management (required fields, default values, read-only)
**Pro:** $349/month ($3,490/year) for businesses embedding PDF workflows into their product or internal tools, with customization, white-label branding, and customer-controlled storage (BYOS)
Replaces tools like DocuSign, Anvil, and manual workflows
_Everything in the Basic plan plus:_
- Dashboard (25 seats)
- Branded PDF editor (with white-labelling)
- Bring your own storage: S3-compatible storage or Azure Blob
- Role-based Access (RBAC)
**Premium:** $899/month ($8,990/year) for businesses that need API access, custom storage, priority support, and hands-on support
Replaces tools like Apryse, Nutrient, and Foxit
_Everything in the Pro plan plus:_
- Dashboard (unlimited seats)
- API access
- Bring your own storage: SharePoint
- Audit logs
- Priority support (24-hour response)
## 6. Help Center
Find step-by-step guides, FAQs, and integration tutorials to get the most out of SimplePDF:
**Articles:**
Frequently Asked Questions:
- [Is the PDF editor free to use?](https://simplepdf.com/help/faq/is-pdf-editor-free-to-use): The editor is free, without signup
- [How to edit a PDF](https://simplepdf.com/help/faq/how-to-edit-pdf)
- [How to merge PDF files](https://simplepdf.com/help/faq/how-to-merge-pdf)
- [How to delete pages](https://simplepdf.com/help/faq/how-to-delete-pages)
- [How to rotate pages](https://simplepdf.com/help/faq/how-to-rotate-pages)
- [How to add text](https://simplepdf.com/help/faq/how-to-add-text-to-pdf)
- [How to add checkboxes](https://simplepdf.com/help/faq/how-to-add-checkbox-to-pdf)
- [How to add signatures](https://simplepdf.com/help/faq/how-to-add-signature-to-pdf)
- [How to add pictures](https://simplepdf.com/help/faq/how-to-add-picture-to-pdf)
- [How to white out text](https://simplepdf.com/help/faq/how-to-add-background)
- [How to copy fields](https://simplepdf.com/help/faq/how-to-copy-fields)
- [A PDF editor, a PDF annotator or a PDF filler?](https://simplepdf.com/help/faq/is-simplepdf-a-pdf-editor-pdf-annotator-or-pdf-filler)
- [How SimplePDF can help your business](https://simplepdf.com/help/faq/how-can-simplepdf-help-your-business)
How To:
- [Customize the editor and add your own branding](https://simplepdf.com/help/how-to/customize-the-pdf-editor-and-add-branding)
- [Customize the submission confirmation](https://simplepdf.com/help/how-to/customize-the-submission-confirmation)
- [Save edited PDF submissions to Supabase](https://simplepdf.com/help/how-to/save-edited-pdf-form-submissions-to-supabase)
- [Get email notifications on PDF form submissions](https://simplepdf.com/help/how-to/get-email-notifications-for-pdf-form-submissions)
- [Configure your own S3 bucket for PDF form submissions](https://simplepdf.com/help/how-to/use-your-own-s3-bucket-storage-for-pdf-form-submissions)
- [Configure your own Azure Blob Storage for PDF form submissions](https://simplepdf.com/help/how-to/bring-your-own-azure-blob-storage-for-pdf-storage)
- [Configure Webhooks to get notified of new PDF form submissions](https://simplepdf.com/help/how-to/configure-webhooks-pdf-form-submissions)
- [Save the PDF submissions to your Bubble Database using Bubble workflows](https://simplepdf.com/help/how-to/save-submissions-in-your-bubble-database-using-bubble-workflows)
- [Connect SimplePDF with Activepieces to automate your PDF forms processing](https://simplepdf.com/help/how-to/connect-simplepdf-with-activepieces-to-automate-your-pdf-forms-processing)
- [Use the Robocorp integration to leverage AI in your IDP workflow](https://simplepdf.com/help/how-to/use-the-robocorp-integration-to-leverage-ai-in-your-intelligent-document-processing-workflow)
- [Add the embed PDF editor to a Next.js App](https://simplepdf.com/help/how-to/add-simple-pdf-editor-to-react-next-app)
- [View and edit PDF in Excalidraw](https://simplepdf.com/help/how-to/edit-pdf-with-excalidraw)
- [Add required fields on PDF forms](https://simplepdf.com/help/how-to/add-required-fields-on-pdf-forms)
## 7. For Developers
**SimplePDF provides a set of SDKs to integrate the editor with a single line of code in one's website.**
The Embed SDK is ~5KB gzipped and MIT licensed. It wraps an iframe that lazy-loads SimplePDF on demand, so users download nothing until they interact.
The Github repository that contains examples and SDKs (including the Chrome extension code) can be found here: [SimplePDF embed on Github](https://github.com/SimplePDF/simplepdf-embed)
Integrating SimplePDF with one's website does not require any accounts and is free to use without any limits.
The following features require an account:
- [Webhooks integration](https://simplepdf.com/help/how-to/configure-webhooks-pdf-form-submissions)
- Bring your own storage: [S3-compatible](https://simplepdf.com/help/how-to/use-your-own-s3-bucket-storage-for-pdf-form-submissions), [Azure Blob Storage](https://simplepdf.com/help/how-to/bring-your-own-azure-blob-storage-for-pdf-storage), or [SharePoint](https://simplepdf.com/help/how-to/connect-sharepoint-as-your-own-storage-for-pdf-submissions) (Premium plan)
- [Custom branding](https://simplepdf.com/help/how-to/customize-the-pdf-editor-and-add-branding): logo, loading, hiding fields and headless mode
- Programmatic control of the editor via the [Iframe API](https://github.com/SimplePDF/simplepdf-embed/blob/main/documentation/IFRAME.md) and [React EmbedPDF component](https://github.com/SimplePDF/simplepdf-embed/tree/main/react)
- [REST API](https://simplepdf.com/api) for programmatic operations (Premium plan)
**Integration Methods:**
- [React Component](https://www.npmjs.com/package/@simplepdf/react-embed-pdf): `@simplepdf/react-embed-pdf`
- [Vanilla JS Script Tag](https://www.npmjs.com/package/@simplepdf/web-embed-pdf): `@simplepdf/web-embed-pdf`
- [Plain Iframe](https://github.com/SimplePDF/simplepdf-embed/blob/main/documentation/IFRAME.md)
- [WordPress Plugin](https://wordpress.org/plugins/simplepdf-embed/)
- [Bubble.io Plugin](https://bubble.io/plugin/pdf-editor-and-filler-1673591701449x899138091362287600)
**Integration Examples:**
- [Iframe example](https://github.com/SimplePDF/simplepdf-embed/tree/main/examples/with-iframe)
- [Script example](https://github.com/SimplePDF/simplepdf-embed/tree/main/examples/with-script-tag)
- [Supabase example](https://github.com/SimplePDF/simplepdf-embed/tree/main/examples/with-supabase)
- [Webhooks example](https://github.com/SimplePDF/simplepdf-embed/tree/main/examples/webhooks)
- [Remix example](https://github.com/SimplePDF/simplepdf-embed/tree/main/examples/with-remix)
- [Next.JS example](https://github.com/SimplePDF/simplepdf-embed/tree/main/examples/with-next-js)
## 8. Socials
**The social media websites where SimplePDF has a presence:**
- [Discord Community](https://discord.gg/n6M8jb5GEP)
- [Facebook](https://facebook.com/simplepdfcom)
- [Github](https://github.com/SimplePDF/simplepdf-embed)
- [Instagram](https://instagram.com/simplepdf)
- [LinkedIn](https://ee.linkedin.com/company/simplepdf)
- [Reddit Community](https://reddit.com/r/simplepdf/)
- [X (Twitter)](https://x.com/simple_pdf)
- [YouTube](https://www.youtube.com/@simplePDFcom)
---
# How can SimplePDF help your business
Turning paper forms into online forms can be expensive, but the SimplePDF editor makes it easy to turn PDF forms into online forms in seconds AND getting notified every time there is a new submission from your customers or partners.
Automating and processing your paperwork and data can be this easy!
## SimplePDF makes it easy to turn paper forms (PDF) into online forms
How does the SimplePDF editor work?
The approach is very simple - the PDF form does not change (it still looks the same), yet it is enhanced with online form capabilities: you get the best of both worlds.
This way your customers can easily fill out your PDF forms straight from your website and you get to process and automate the data they have given you.
### It does not require any technical knowledge
Turning a PDF form into a online form only takes a few minutes, saving you a lot of time.
If your PDF form was already interactive, it in fact takes only seconds.
If your PDF form is not yet interactive, you only need to position the fields wherever they need to be positioned.
A name is required? Just put a text field where the name needs to be filled-in.
A picture is needed? Use the picture field.
A signature? The signature field.
You get it: there's a ready-made field for every part of your PDF form.
### SimplePDF online forms are PDF forms with super powers
Because SimplePDF editor does not change the look and feel of your PDF form, your customers will not be confused.
It will be the same PDF form as before, except that they will now use a computer or phone to fill it in and all this can be done without leaving your website.
## Save everyone's time
Before SimplePDF editor the usual flow for filling in a PDF form looked like this:
- **1.** Customers download the PDF form from your website
- **2.** They look for a way to fill the form, which can be costly both money and time wise - meaning you probably lose some clients during this step.
- **3.** They look for a way to send the filled-in form back to you (usually via email) which creates more work for you.
**Now by using SimplePDF editor, there is just one step:**
- **1.** By adding the [PDF editor to your website](/embed), your clients can fill the PDF form fast and easy without leaving your website.
The filled-in PDF form is then automatically sent to you and you get notified about it (via email and / or the other integrations)
**That's it! SimplePDF turns your existing PDF forms into online forms your customers can fill from anywhere.**
_If you have any questions, feel free to reach out to [support@simplepdf.com](mailto:support@simplepdf.com)_
---
# How to white out text on a PDF with SimplePDF
Sometimes you need to cover existing text on a PDF before adding your own content on top. SimplePDF lets you add a white background to any field, effectively whiting out whatever is underneath.
1. Navigate to the PDF editor over [here](/editor)
2. Open the document from your device
3. Select the field of your choice: all fields support adding a background
4. Click anywhere on the document to add the field
5. Click on the change background icon as visible on the picture below
6. The field now has a white background as visible on the picture
7. Make additional changes if needed
8. Click the Download button
This is useful when you need to correct pre-filled information, replace outdated text, or blank out a section before adding new content. Combine it with a text field to effectively replace existing text on any PDF.
**That's it! The text has been covered and your document is saved to your device.**
_If you have any questions, feel free to reach out to [support@simplepdf.com](mailto:support@simplepdf.com)_
---
# How to add checkboxes to PDFs with SimplePDF
Checkboxes are essential for agreements, checklists, consent forms, and any document where you need to mark a selection. SimplePDF lets you add them to any PDF in just a few clicks.
1. Navigate to the PDF editor over [here](/editor)
2. Open the document from your device
3. Select the checkbox tool
4. Click anywhere on the document to add the checkbox field
5. Click on the checkbox once or twice to get two different variations
6. Click the Download button
SimplePDF offers two checkbox styles: a checkmark and a cross. Click the checkbox once to toggle to a checkmark, and click again to switch to a cross. This gives you flexibility depending on whether you are marking items as complete, confirming agreement, or indicating a selection on a form.
You can place as many checkboxes as you need across the document, making it easy to fill out multi-item checklists or forms with several yes/no questions.
**That's it! Your checkboxes have been added and the document is saved to your device.**
_If you have any questions, feel free to reach out to [support@simplepdf.com](mailto:support@simplepdf.com)_
---
# How to add pictures to PDFs with SimplePDF
Need to add a photo, company logo, or stamp to a PDF? SimplePDF lets you insert and position images on any page of your document directly from your browser.
1. Navigate to the PDF editor over [here](/editor)
2. Open the document from your device
3. Select the picture tool
4. Click anywhere on the document to add the picture field
5. Click on the field to open up the picture picker and select the picture to add
6. Click the Download button
After inserting a picture, you can drag it to reposition it and resize it to fit the available space. This makes it easy to place ID photos in application forms, add company logos to official documents, or insert stamps and seals exactly where they need to go.
You can add multiple pictures to the same document and place them on different pages, which is useful for documents that require both a photo and a signature or multiple attachments.
**That's it! Your pictures have been added and the document is saved to your device.**
_If you have any questions, feel free to reach out to [support@simplepdf.com](mailto:support@simplepdf.com)_
---
# How to add signatures to PDFs with SimplePDF
Signing a PDF should not require printing, scanning, or installing desktop software. With SimplePDF you can draw or type your signature directly on any PDF from your browser.
1. Navigate to the PDF editor over [here](/editor)
2. Open the document from your device
3. Select the signature tool
4. Click anywhere on the document to add the signature
5. Draw your signature: note that you can click the undo and redo buttons until your signature looks perfect!
6. Click the Download button
SimplePDF supports both drawn and typed signatures. Drawing works with a mouse on desktop or touch input on mobile devices, giving you a natural signing experience. If you prefer a cleaner look, you can type your name instead.
Once placed, you can drag the signature field to reposition it on the page. This is especially useful when signing contracts, NDAs, consent forms, or any document that requires your signature in a specific location.
**That's it! Your signed PDF is ready and saved to your device.**
_If you have any questions, feel free to reach out to [support@simplepdf.com](mailto:support@simplepdf.com)_
---
# How to add text to PDFs with SimplePDF
Whether you need to fill in a form, annotate a document, or add notes to a PDF, SimplePDF lets you place text anywhere on the page directly from your browser.
1. Navigate to the PDF editor over [here](/editor)
2. Open the document from your device
3. Select the text tool
4. Click anywhere on the document to add the text field
5. Fill in the value by typing in
6. Click the Download button
Once placed, you can drag the text field to reposition it precisely where you need it. You can also resize the field to fit longer content or adjust its placement relative to existing text on the page.
If you need to add text in multiple locations, simply repeat steps 4-5 for each new text field. This is especially useful when filling out PDF forms that are not yet interactive or when annotating contracts and reports.
**That's it! Your text has been added and the document is saved to your device.**
_If you have any questions, feel free to reach out to [support@simplepdf.com](mailto:support@simplepdf.com)_
---
# How to copy fields with SimplePDF
When you need the same field in multiple places on a document, copying saves time over creating each one from scratch. SimplePDF lets you duplicate any field type and paste it anywhere, including on other pages.
1. Navigate to the PDF editor over [here](/editor)
2. Open the document from your device
3. Select the field of your choice: all fields can be copied
4. Click anywhere on the document to add the field
5. Click on the copy icon as visible on the picture below: the field is now highlighted
6. You can now copy the field anywhere on the document (including other pages) by clicking again
7. Make additional changes if needed
8. Click the Download button
This works with all field types: text, checkboxes, signatures, and pictures. It is especially handy when building forms that repeat the same field layout across multiple pages.
**That's it! Your fields have been copied and the document is saved to your device.**
_If you have any questions, feel free to reach out to [support@simplepdf.com](mailto:support@simplepdf.com)_
---
# How to delete pages with SimplePDF
PDFs often contain pages you do not need: blank pages, duplicate cover sheets, or sections that are irrelevant to your use case. SimplePDF lets you remove them in seconds.
1. Navigate to the PDF editor over [here](/editor)
2. Open the document from your device
3. On the left side of the screen, click on the ✕ button located on the left of the page you want to delete
4. Click the Download button
You can delete multiple pages in one session before downloading. This is handy when preparing documents for submission - for example, removing instruction pages from a form packet, stripping blank pages from a scanned document, or trimming a report down to only the sections you need to share.
**That's it! The unwanted pages have been removed and the document is saved to your device.**
_If you have any questions, feel free to reach out to [support@simplepdf.com](mailto:support@simplepdf.com)_
---
# How to edit PDFs with SimplePDF
SimplePDF is a browser-based PDF editor that lets you modify any PDF document without installing software. Here is how to get started:
1. Navigate to the PDF editor over [here](/editor) and select a PDF
2. Select a field and click to position it on the document
3. Fill in the field details and click download
SimplePDF gives you a full set of editing tools:
- **[Text](/help/faq/how-to-add-text-to-pdf)**: add text anywhere on the document to fill forms, annotate, or add notes
- **[Checkboxes](/help/faq/how-to-add-checkbox-to-pdf)**: mark selections with checkmarks or crosses
- **[Signatures](/help/faq/how-to-add-signature-to-pdf)**: draw or type your signature directly on the PDF
- **[Pictures](/help/faq/how-to-add-picture-to-pdf)**: insert photos, logos, or stamps
- **[Backgrounds](/help/faq/how-to-add-background)**: white out existing text before adding your own
- **[Merge](/help/faq/how-to-merge-pdf)**: combine multiple PDFs into a single document
- **[Delete pages](/help/faq/how-to-delete-pages)**: remove unwanted pages
- **[Rotate pages](/help/faq/how-to-rotate-pages)**: fix page orientation
All processing happens in your browser - your documents never leave your device.
**That's it! Select the tools you need, make your edits, and download the result.**
_If you have any questions, feel free to reach out to [support@simplepdf.com](mailto:support@simplepdf.com)_
---
# How to merge PDF files with SimplePDF
Merging PDF files with SimplePDF takes only a couple of seconds:
1. Navigate to the PDF editor over [here](/editor)
2. Open the document either from your device
3. On the left side of the screen, click the big + button located after your document pages
4. Select a new document from your device
5. The pages of the selected document are automatically added
6. Optional: re-order the pages as you see fit
7. Click the Download button
**That's it! Your PDFs have been merged into a single document and saved to your device.**
_If you have any questions, feel free to reach out to [support@simplepdf.com](mailto:support@simplepdf.com)_
---
# How to rotate pages with SimplePDF
Scanned documents and exported PDFs sometimes end up with pages in the wrong orientation. SimplePDF lets you rotate individual pages to fix this in one click.
1. Navigate to the PDF editor over [here](/editor)
2. Open the document from your device
3. On the left side of the screen, click on the button located on the left of the page you want to rotate
4. Click the Download button
Each click rotates the page 90 degrees clockwise. This is especially useful when working with scanned documents where some pages came through sideways, or when you need to switch a page between portrait and landscape orientation.
You can rotate as many pages as needed before downloading the final document.
**That's it! Your pages have been rotated and the document is saved to your device.**
_If you have any questions, feel free to reach out to [support@simplepdf.com](mailto:support@simplepdf.com)_
---
# Is the SimplePDF editor free to use?
## Yes!
[The PDF editor](/editor) is free to use for individuals and organisations without **any limits**.
You do not need to create an account to use the PDF editor.
There are no ads on SimplePDF nor any tracking.
You can read more about it in our [Privacy Policy](/privacy-policy)
## How can SimplePDF be free?
We strongly believe that basic PDF editing should be free for individuals: most people don't edit PDFs for fun, they _need_ to edit PDF for school or their everyday paperwork.
To ensure that the PDF editor remains free for individuals, we offer a powerful set of paid features for organizations that use PDFs in their daily workflow.
This covers the costs of maintaining and expanding the SimplePDF editor.
Organization-specific features, like [converting any PDF into an online form](/portal) or [embedding a PDF editor on your website](/embed), are available with our [paid plans](/pricing).
---
# Why We Built SimplePDF - The Origin Story
**A bit of everything: filler, annotator, and editor.**
## How it started
Four years ago, after countless frustrating hours searching for a way to fill out forms online (seriously, who hasn't Googled that?), I decided to take a good look at what was available.
And it didn't exactly look good.
**Most of the supposedly free tools** came with unpleasant surprises:
- The **"by the way, it's not free" case**: you spend 30 minutes filling a document, and just as you click download, a "enter your credit card" popup ruins your day.
- The **"do you like my watermark" case**: your carefully filled document now proudly boasts a watermark right in the middle of the screen.
- The **"it's free but it doesn't work" case**: you want to fill your document, but the tool is so broken that it's practically useless.
- The **"it was never free in the first place"** case: some websites let you edit for a small fee, but surprise! After 15 days, you're hit with a $50 charge.
Sure, everyone needs to earn a living, and building software isn't cheap.
**But what didn't sit right was the blatant misrepresentation of something as "free" when it wasn't**.
That's just misleading and dishonest.
## Preview from Apple, my savior
But then **I stumbled upon Preview from Apple, one of the best pieces of Software in my opinion** that does a wonderful job for most of the basic PDF operations.
It does not _edit_ existing text, but it allows to rotate, merge, add text, pictures, signatures...
**Why one of the best?** Because it's packed with features but you only discover them as you start using the software. And it's just _simple_, it's not bloated with features that only one person, every full moon, will be using (yes, some PDF editors have "emoji stamps" as a feature).
**So naturally, once I had discovered Preview, I started using it.**
And the more I used it, the more the simplicity grew on me. I took a second look to see what was _out there_, and Preview was still the _simplest_ and _best_ in my mind _simple_ PDF filler.
**Then it hit me: I'm fortunate to have a Mac**, but what about those without one? **What about Windows users**, or **Linux users?**
(_I know that there are plenty of tools on Windows and Linux, but none that are as simple as Preview_)
That was my cue: let's build something as "Preview-like" as possible: no bells and whistles, just focus on delivering the features that 90% of users will need.
The 10% remaining usually have very specific needs:
- civil engineers and architects need to measure things in PDFs (I've heard that Bluebeam is great for that)
- lawyers need to redact information or number each pages for easy reference (bates numbering)
- etc...
And I specifically did not want to cover these 10% remaining: SimplePDF was meant for the majority, with straightforward needs.
## Building SimplePDF: filler, annotator, editor
**In that order!**
I aimed to tackle the most significant pain point with PDFs: filling them. So, **I began by building a straightforward [form filler](/)...**
Until I realized that most companies (and even countries) use non-fillable PDFs - mere prints or scans of a paper form, often created using Photoshop or equivalents (shoutout to Photopea, an excellent free alternative).
**Enter the annotation part**: the ability to add text, pictures, signatures. With this, SimplePDF evolved into an [annotation tool](/).
Then came cases where I needed to submit identification documents and bills, usually expected as attachments. That's when the idea of a "merge" feature struck me as something many would find useful.
**And just like that, SimplePDF became the [all-in-one tool](/) it is today.**
**I hope this all makes sense! If you have any questions, feel free to reach out!**
---
# Is SimplePDF HIPAA compliant?
**Yes.** Healthcare organizations handle sensitive patient data every day, from intake forms to prior authorizations. When choosing a PDF editor, HIPAA compliance matters.
## Processing: always in the browser
SimplePDF processes all PDFs directly in your browser, on every plan. No document content is sent to SimplePDF servers during editing.
## Storage: depends on your plan
Without Bring Your Own Storage, completed files are stored in SimplePDF storage.
With [Bring Your Own Storage (BYOS)](/pricing), completed documents are uploaded directly from the browser to your own storage using presigned URLs. Nothing is stored by SimplePDF.
BYOS supports [S3](/help/how-to/use-your-own-s3-bucket-storage-for-pdf-form-submissions), [Azure Blob Storage](/help/how-to/bring-your-own-azure-blob-storage-for-pdf-storage), and [SharePoint](/help/how-to/connect-sharepoint-as-your-own-storage-for-pdf-submissions). It is available starting from the [Pro plan](/pricing).
## BAA
A Business Associate Agreement is available upon request. Contact us to discuss your compliance requirements.
## Built for healthcare workflows
SimplePDF is used by healthcare organizations for common workflows like patient intake forms, referral forms, prior authorizations, and insurance claims. You can [embed the editor](/embed) directly into your EHR or patient portal.
Learn more on our [healthcare use case page](/use-cases/healthcare).
**That's it! SimplePDF processes documents in the browser, and with BYOS, completed files go straight to your own storage.**
_If you have any questions, feel free to reach out to [support@simplepdf.com](mailto:support@simplepdf.com)_
---
# How to add required fields to PDF forms with SimplePDF
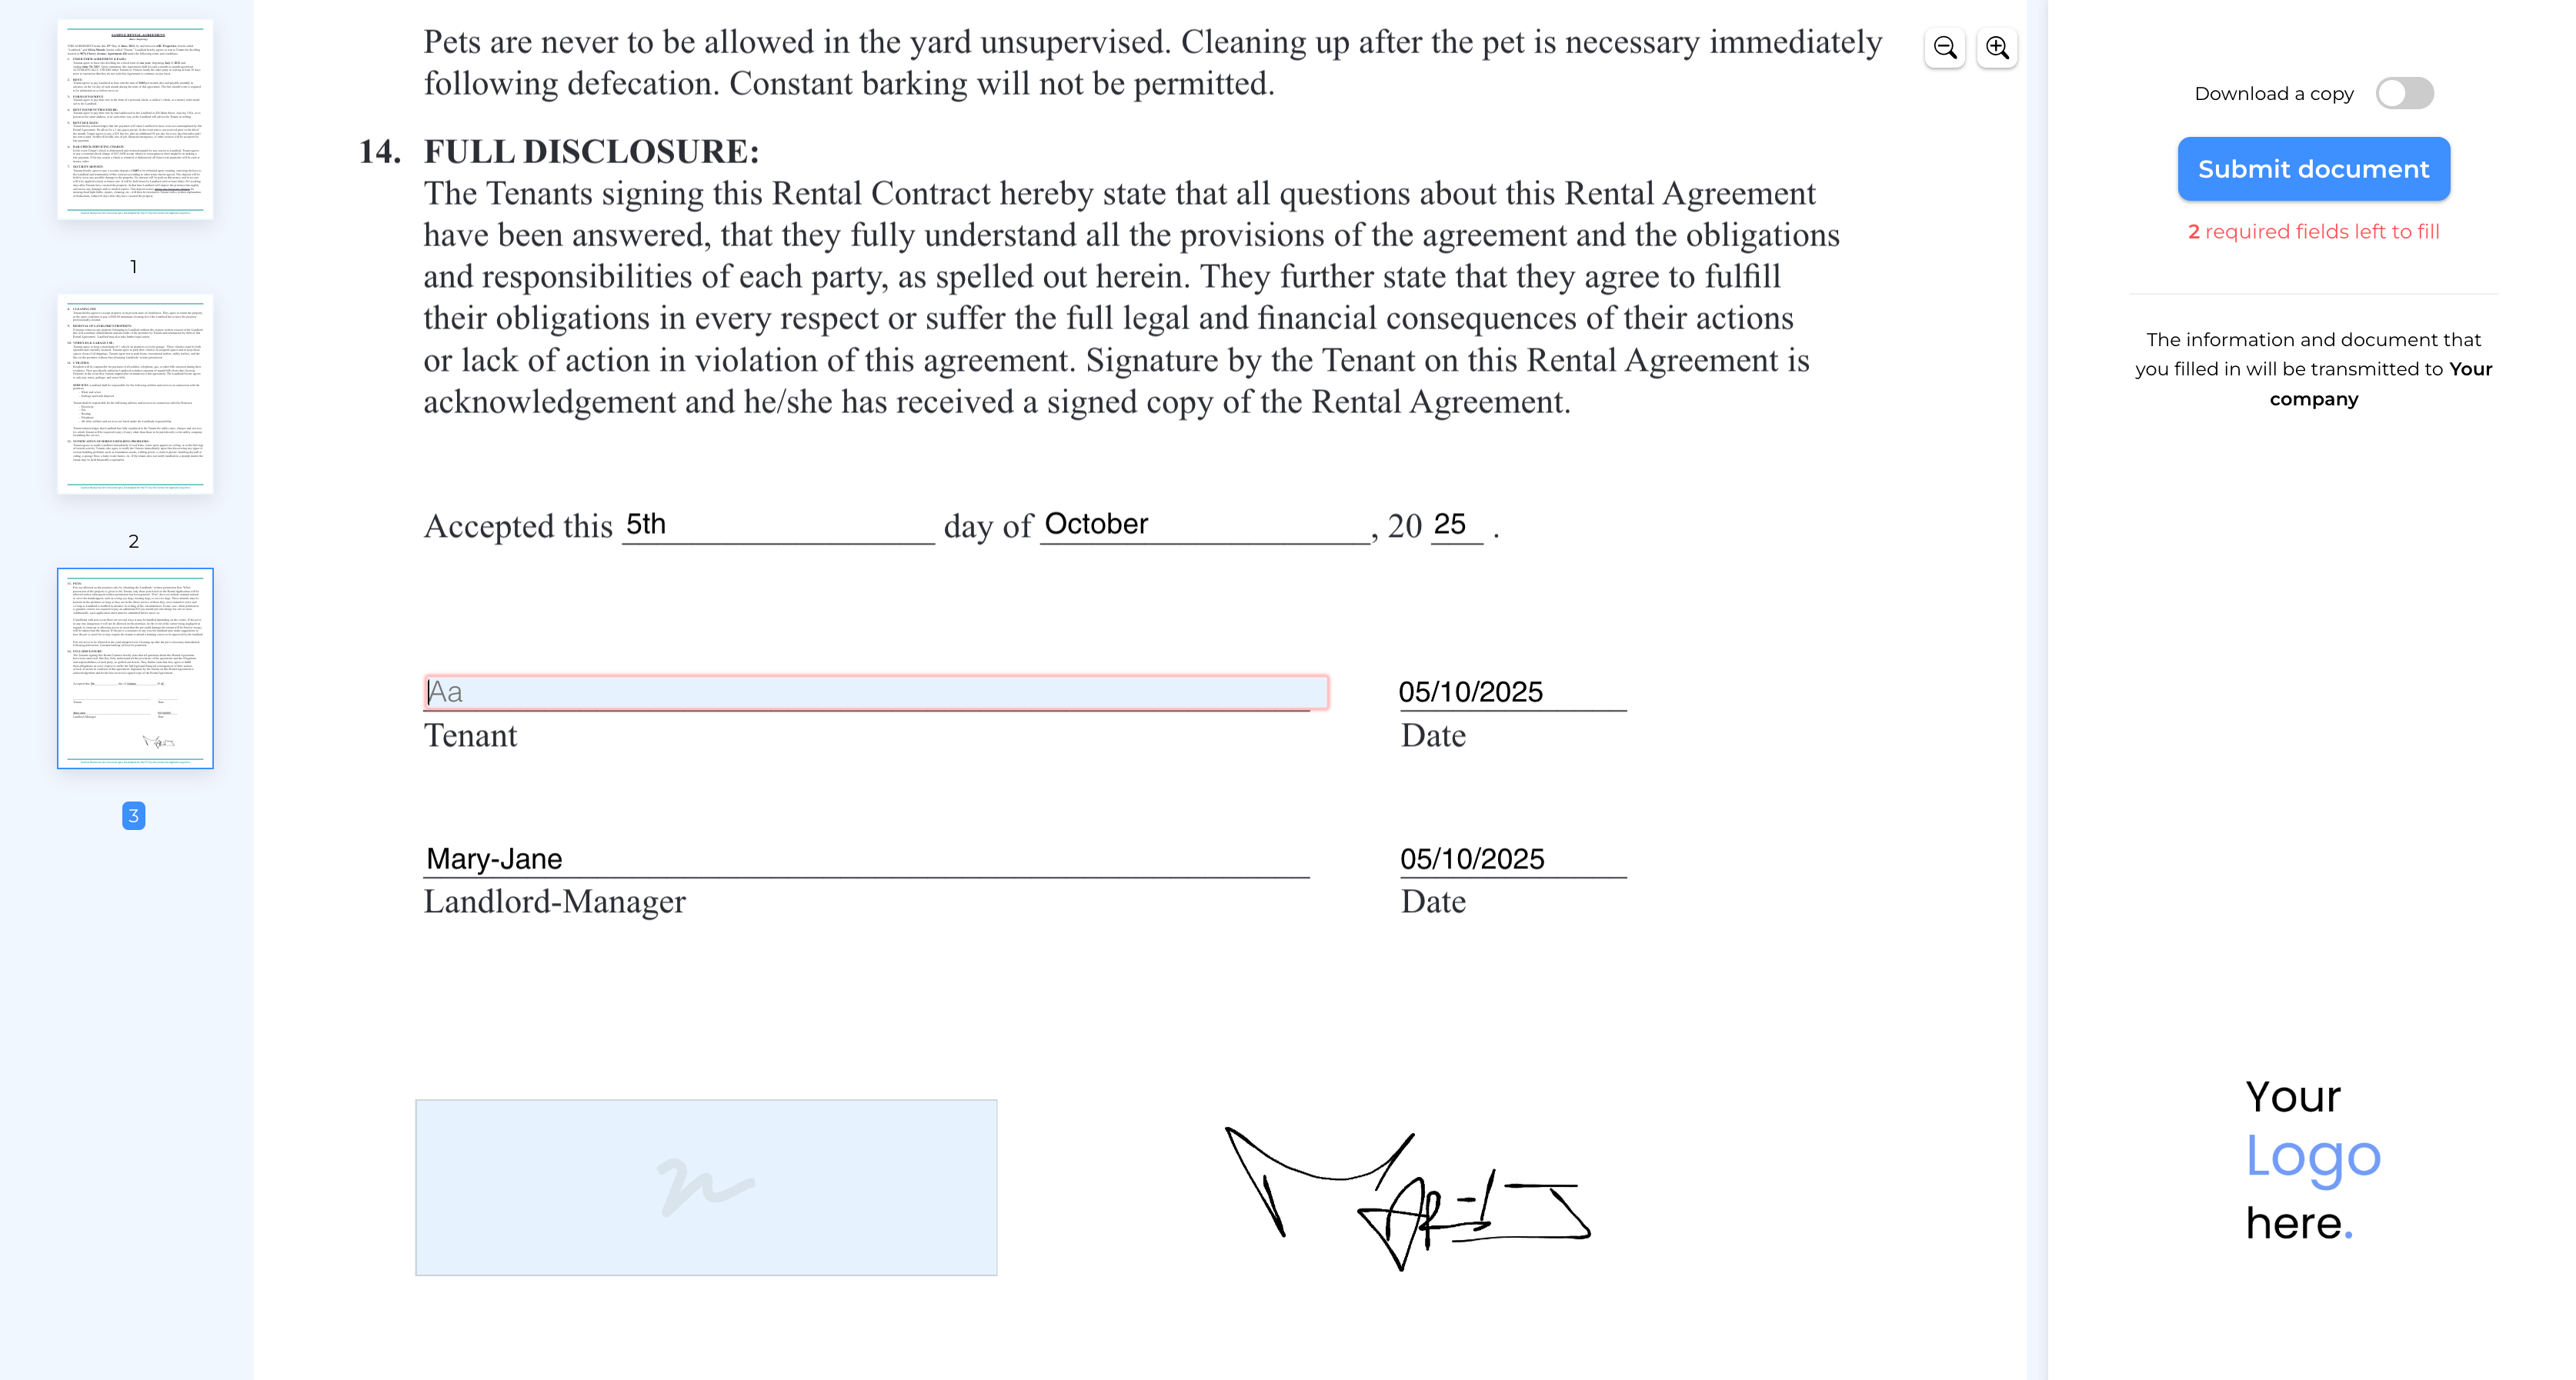
You have **PDF forms** but your users are **not filling every field** and you are now getting **incomplete submissions**, requiring unnecessary back-and-forth.
Look no further for a solution: you landed in the right place! **Adding required fields in SimplePDF is very easy**.
## Configuring document fields in SimplePDF
### Required fields
1. Log in in to your account
2. Edit a specific document or create a new one in the `Your forms`
3. Click on the `Fields` tab and look for the field to mark as required
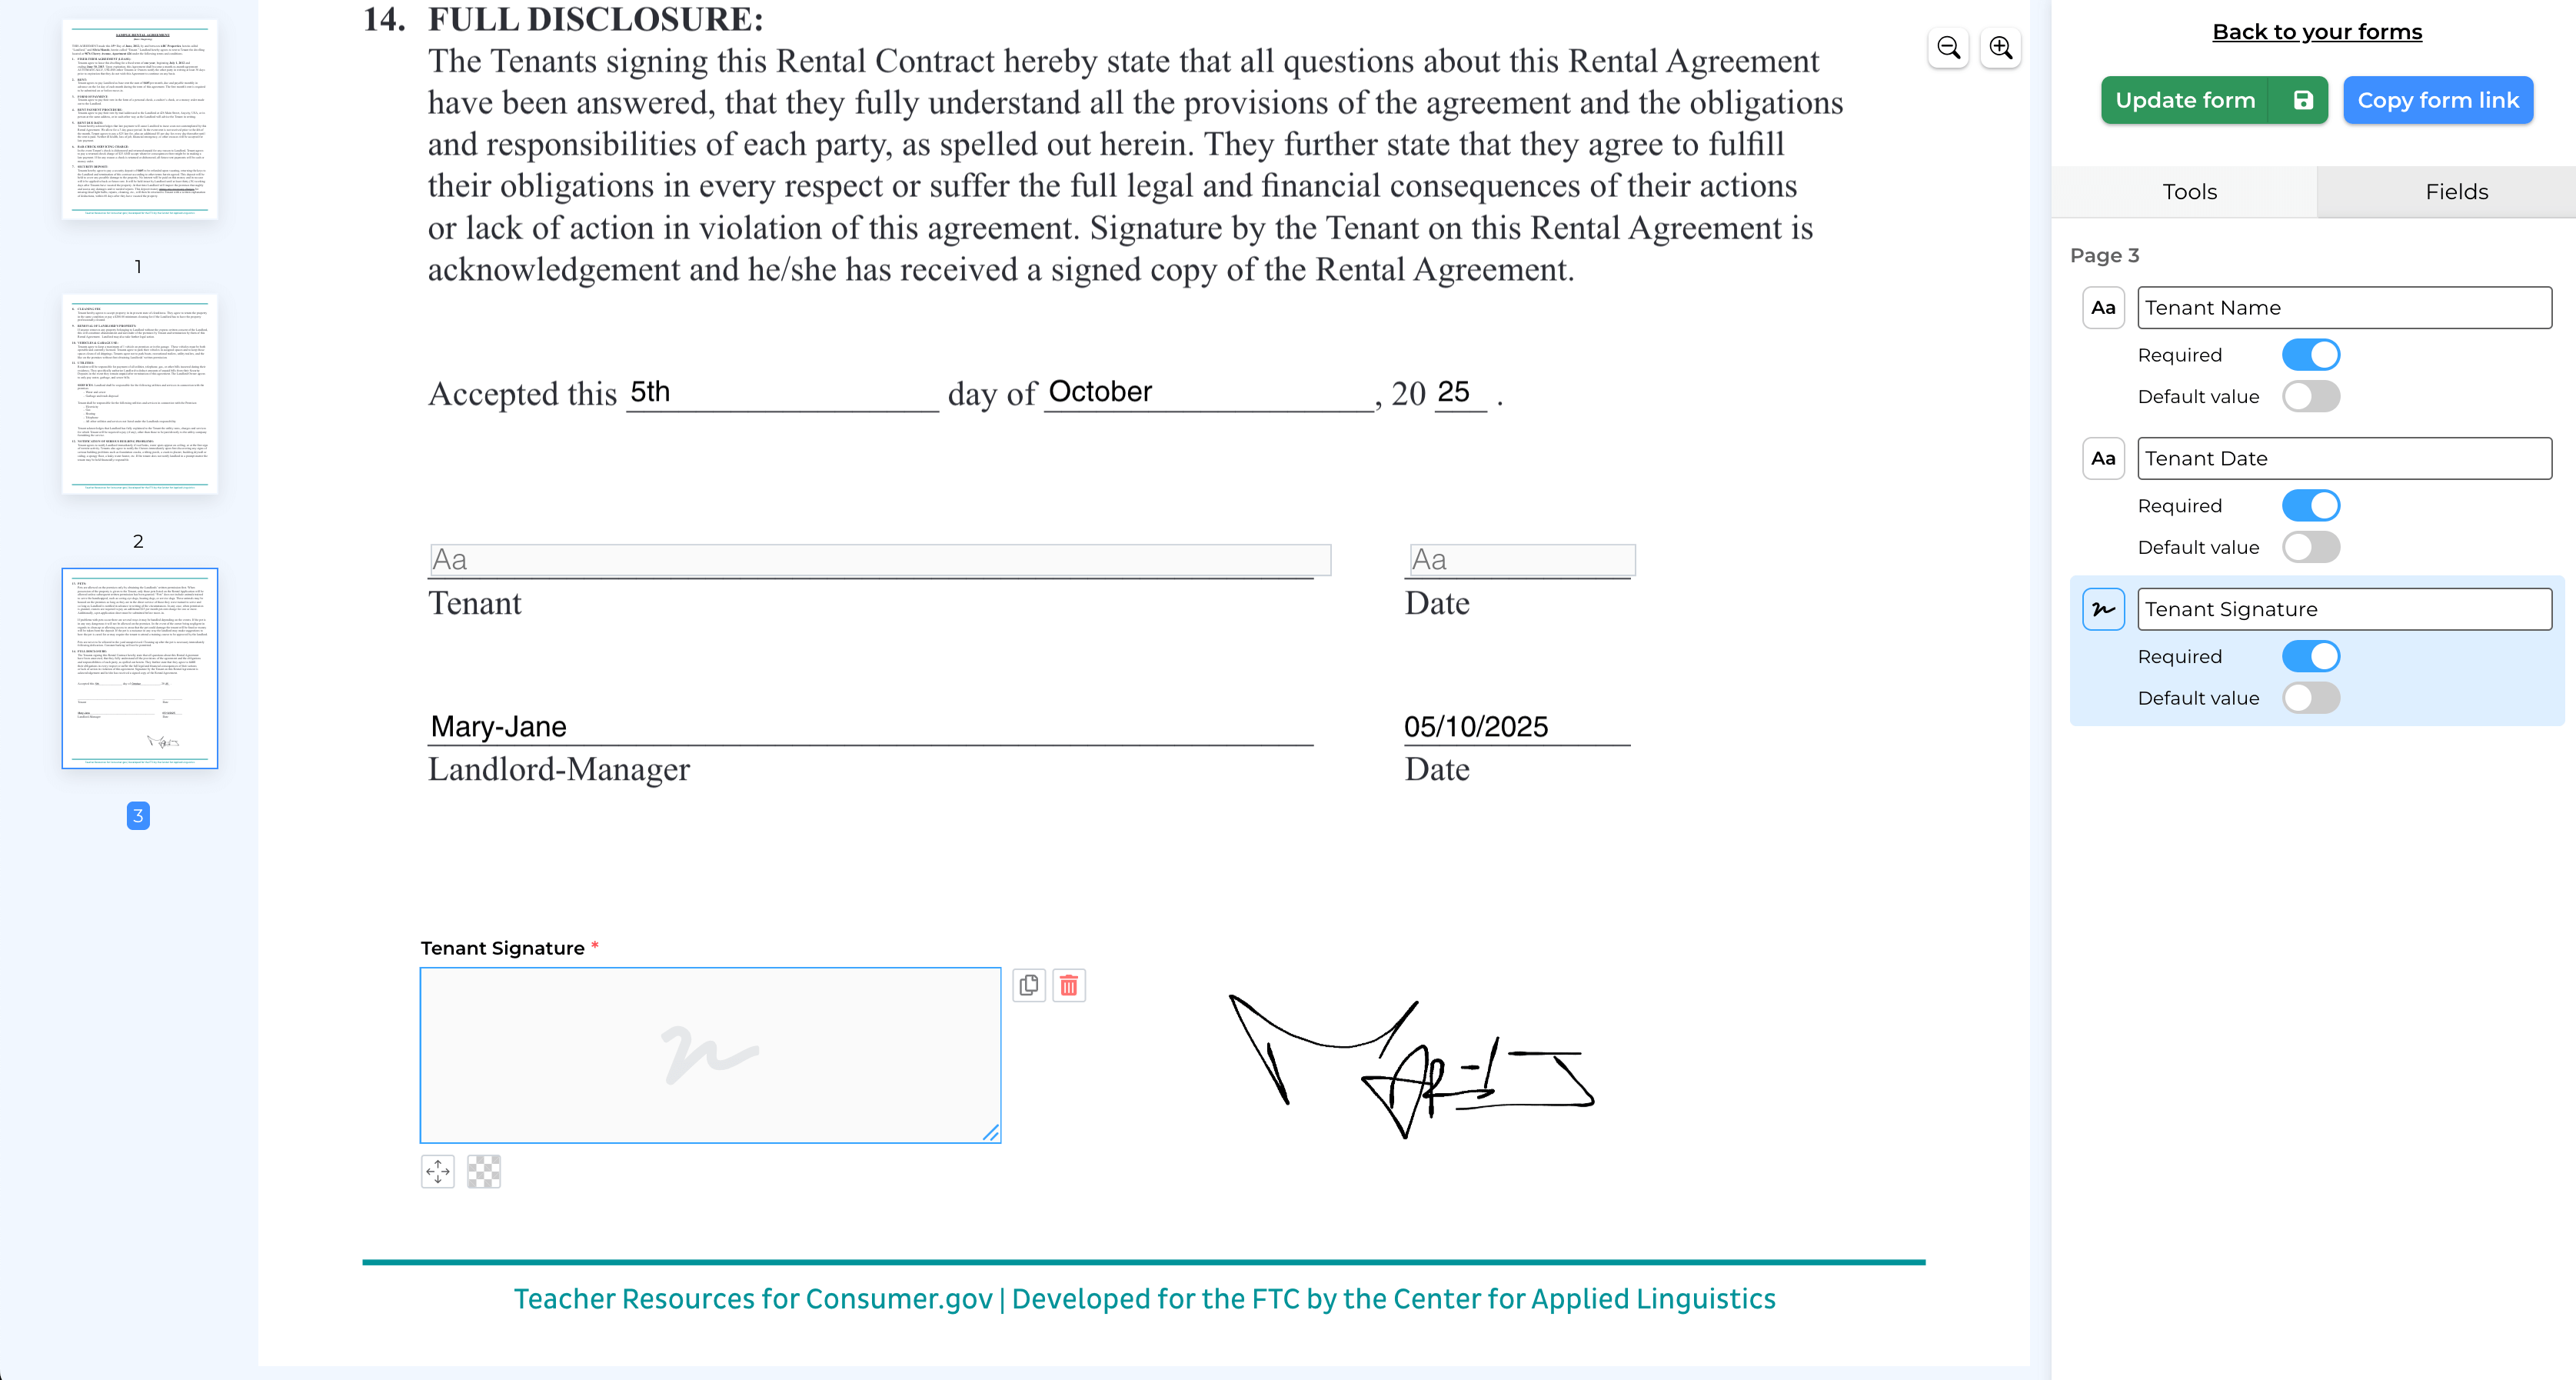
4. Click the `Update form` button
5. That's it! **The field is now required** and your users will be required to fill it in before submitting!
_An example of a required field_
### Fields with default values
Fields can have a default value: just toggle `Default value` after having filled the field. When loading the form, the value for that field will be pre-filled with a default value.
#### Read only fields
Fields with default value can be marked as `read only`: useful when you want to prefill information that does not need filling but yet needs to be present on the document.
**That's it! Your form fields are now configured with the right requirements for complete submissions.**
_If you have any questions, feel free to reach out to [support@simplepdf.com](mailto:support@simplepdf.com)_
---
# How to add the SimplePDF editor to your Next.js App
[Next.js](https://nextjs.org/) has become a standard for developing React applications. In fact, SimplePDF is powered by Next.js!
So what better choice than Next.js to show you how to embed the SimplePDF editor into your own app.
You can skip this tutorial and get straight to the code that is available in the [SimplePDF embed Github repository](https://github.com/SimplePDF/simplepdf-embed/tree/main/examples/with-next-js).
## Step 1: Setting up our project
_If you already have a Next.js or React app running, you can go straight to the [Step 2: Adding SimplePDF Embed dependency to our project](#Adding-simplePDF-embed-dependency-to-our-project) or [Step 3: Adding the SimplePDF editor to our Next.js app](#Adding-the-simple-pdf-editor-to-our-next-js-app)_
**Let's start by using the Next.js CLI tool to interactively set up our project.**
Run the following command in your terminal of choice and follow the steps.
```
npx create-next-app@latest
# or
yarn create next-app
# or
pnpm create next-app
```
1. Let's choose a name for our project:
```
? What is your project named? › simple-pdf-react-embed-example
```
2. At SimplePDF we really like Typescript, so we'll say "yes!" to the next step.
_This is not a requirement, so no worries if you're not familiar with Typescript!_
```
? Would you like to use TypeScript with this project? › No / Yes
```
3. Let's also use [ESLint](https://eslint.org/)
_Likewise, ESLint is not a requirement, so if you're not familiar with it, just say no_
```
Would you like to use ESLint with this project? › No / Yes
```
4. Time for our computer to do some work: fetching and installing the necessary dependencies
_We're using yarn, so if you use npm for example, the message will be slightly different_
```
info No lockfile found.
[1/4] 🔍 Resolving packages...
[2/4] 🚚 Fetching packages...
[#####################################-------------------------------------------------------] 105/263
```
5. Once successful, you should be greeted with this message:
```
Success! Created simple-pdf-react-embed-example at /Users/bendersej/workspace/widget-simplepdf/react/simple-pdf-react-embed-example
```
6. Let's navigate to the folder
```
cd simple-pdf-react-embed-example/
```
7. And start our project!
```
yarn dev
# or
npm dev
```
8. If everything went well, you should now see the following:
```
$ next dev
ready - started server on 0.0.0.0:3000, url: http://localhost:3000
event - compiled client and server successfully in 529 ms (165 modules)
```
Our server is up and running at the following URL: [http://localhost:3000](http://localhost:3000)
**This is what you should see**
_There might be some small differences depending on when you're following this tutorial_
## Step 2: Adding SimplePDF Embed dependency to our project
_Prerequisite: a React (Next.js) app running locally - if you followed the previous step, you're all good!_
Confirming that we are at the right location: running the following command
```
ls
```
should list these files:
```
README.md next.config.js package.json public tsconfig.json yarn.lock
next-env.d.ts node_modules pages styles yarn-error.log
```
**Let's start by adding [@simplepdf/react-embed-pdf](https://github.com/SimplePDF/simplepdf-embed/blob/main/react/README.md) to our project**
1. Install `@simplepdf/react-embed-pdf`
```
yarn add @simplepdf/react-embed-pdf
# or
npm install @simplepdf/react-embed-pdf
```
Once installed, you should see the following message:
_We're using yarn, so if you use npm for example, the message will be slightly different_
```
success Saved lockfile.
success Saved 1 new dependency.
info Direct dependencies
└─ @simplepdf/react-embed-pdf@1.3.0
info All dependencies
└─ @simplepdf/react-embed-pdf@1.3.0
✨ Done in 5.91s.
```
**Time to write some React code!**
## Step 3: Adding the SimplePDF editor to our Next.js app
In this step we will learn how to add the SimplePDF editor component: **this component will allow us to open any PDFs from within our application.**
**Let's start by opening the code of our app in our code editor of choice** - at SimplePDF we really like VScode
1. Let's clean up the room a bit by removing everything inside `main` and update the page title:
_The code should now look like this:_
```
const inter = Inter({ subsets: ['latin'] })
export default function Home() {
return (
<>
)
}
```
And our browser should display the following page: nothing!

2. Let's import the `EmbedPDF` component at the top of our file:
```
```
3. And add it to our code:
_Note that you only need one child inside `EmbedPDF`. It can be any HTML element: `a`, `div`, `button`..._
```
Open SimplePDF!
```
The entire code should look as follows:
```
const inter = Inter({ subsets: ['latin'] })
export default function Home() {
return (
<>
Open SimplePDF!
)
}
```
And our browser should display the following: a tiny "Open SimplePDF!" button!
## Step 4: What's next?
SimplePDF Embed is really powerful and there's more for you to discover:
- Open a specific document by specifying the URL of that document
- Receive events whenever the document is loaded and the submission is sent
- Add your own branding
You can learn more about all of this in the [documentation on Github](https://github.com/SimplePDF/simplepdf-embed/blob/main/react/README.md).
**We hope that you enjoyed this tutorial!**
If you have any question or comment, feel free to let us know using the feedback button in bottom right side of your screen
---
# How to configure your own Azure Blob Storage for PDF form submissions
As an alternative to [using your S3-compatible storage](/help/how-to/use-your-own-s3-bucket-storage-for-pdf-form-submissions), you can use your Azure Blob Storage to store documents and filled documents.
You may be interested in bringing your own storage (BYOS) for various reasons, such as such as **compliance** to specific rules in your country or industry or because you wish to retain full ownership over your data.
## How the upload works
If you're interested in the overall upload mechanism and security-model, [head over here](/help/how-to/use-your-own-s3-bucket-storage-for-pdf-form-submissions#upload) where we cover this mechanism for the s3-compatible storage. The Azure Blob Storage works identically.
The gist is that the upload mechanism happens on the client, with the server only exchanging upload and download links: this ensures that your documents do not ever transit via the SimplePDF servers.
## How to configure your own Azure Blob Storage
_Configuring your own Azure Blob Storage is available with the [PRO plan](/pricing)_
### In Azure
In order to store documents on your Azure Blob Storage, we need to configure a container on your storage account to receive these documents.
1. Create (or choose) a `container`
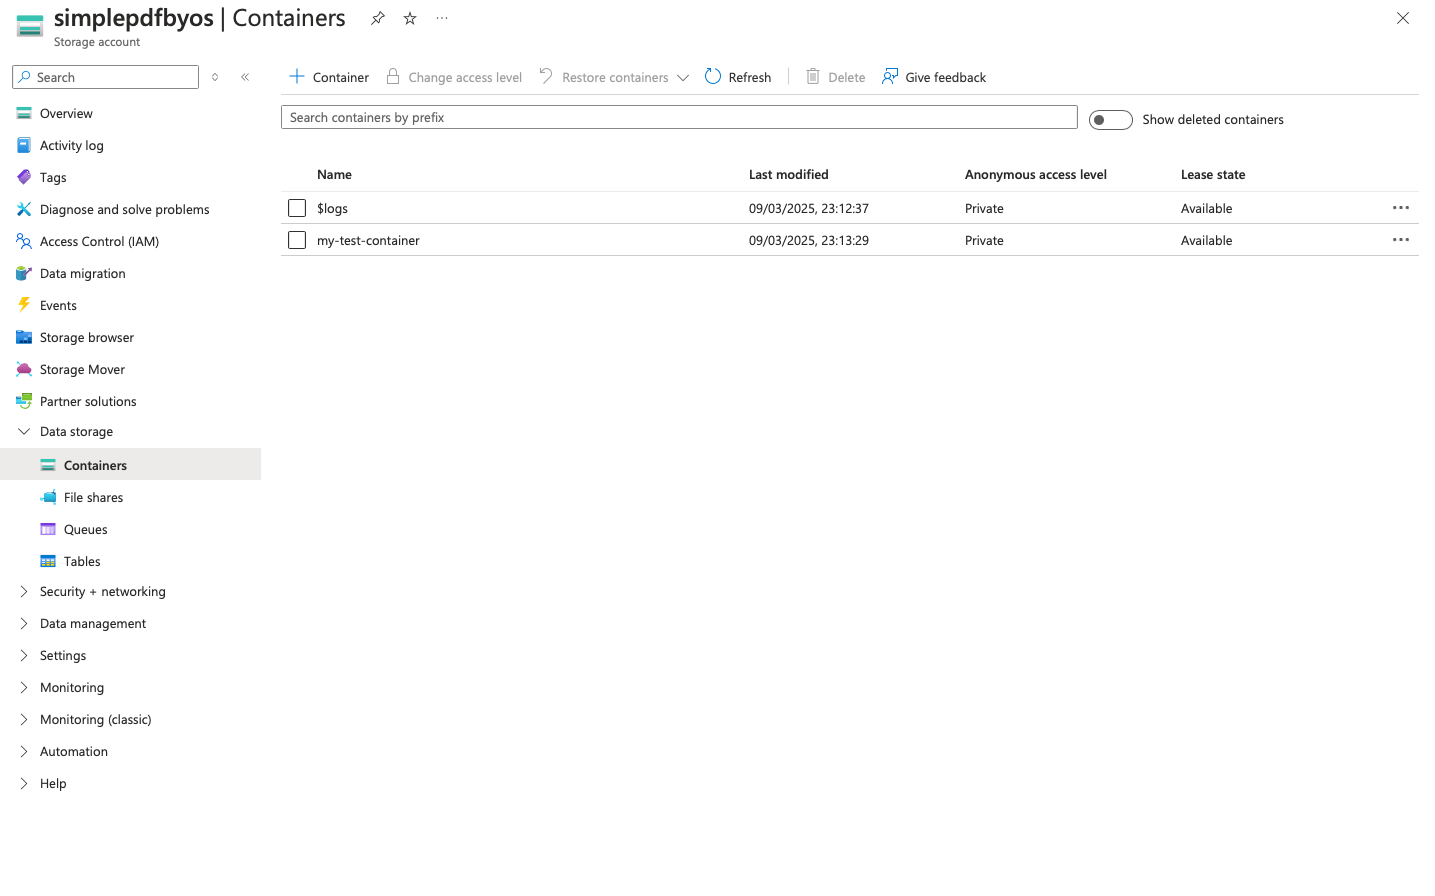
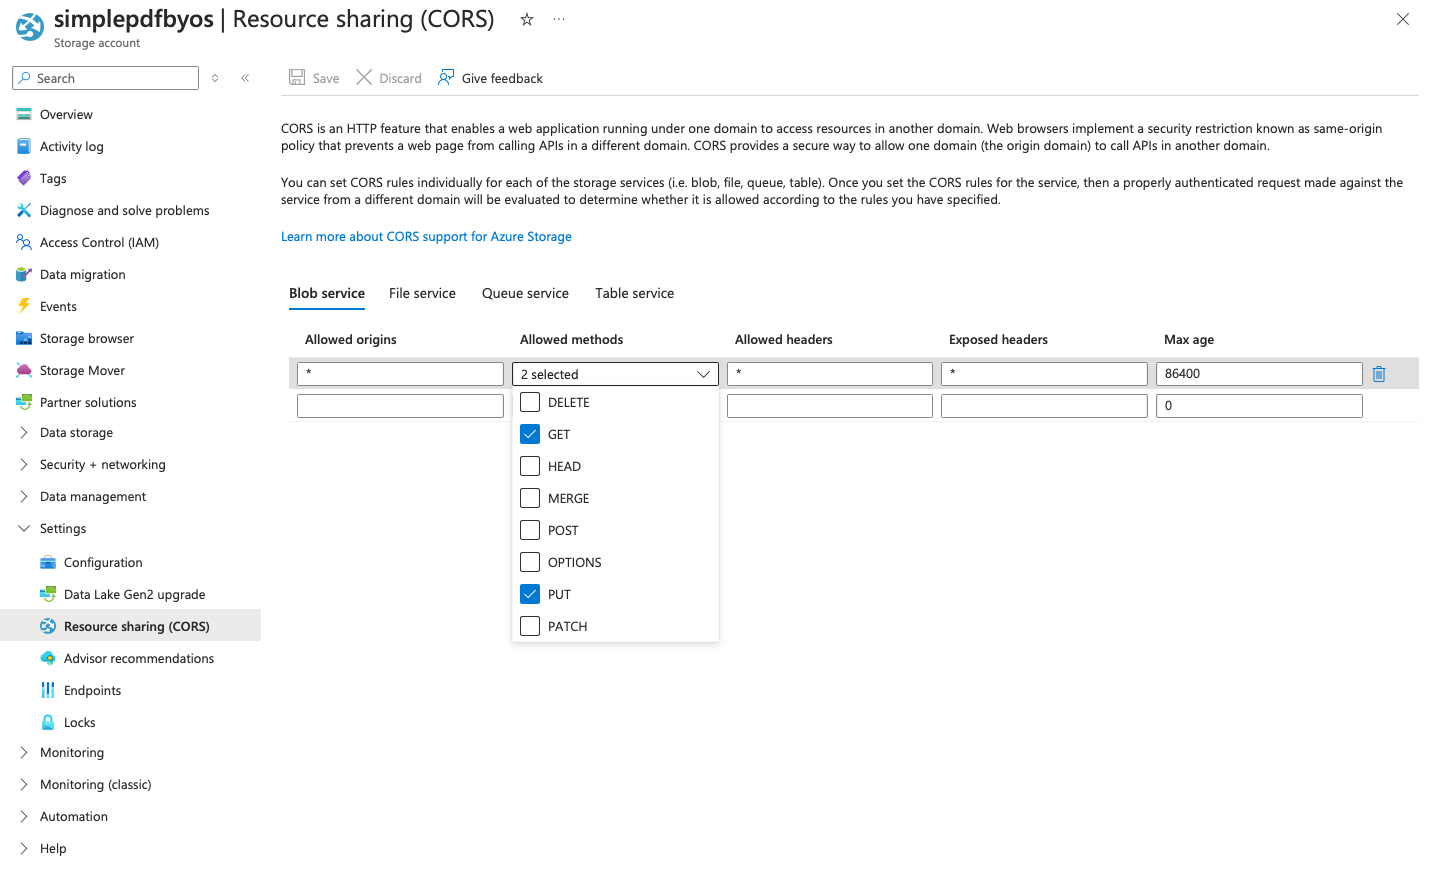
2. Update the CORS configuration to allow both `GET` and `PUT` from `*` origins.
_You can narrow it down to your own company portal if do not want to grant `*` origins: `https://your_identifier.simplepdf.com`_
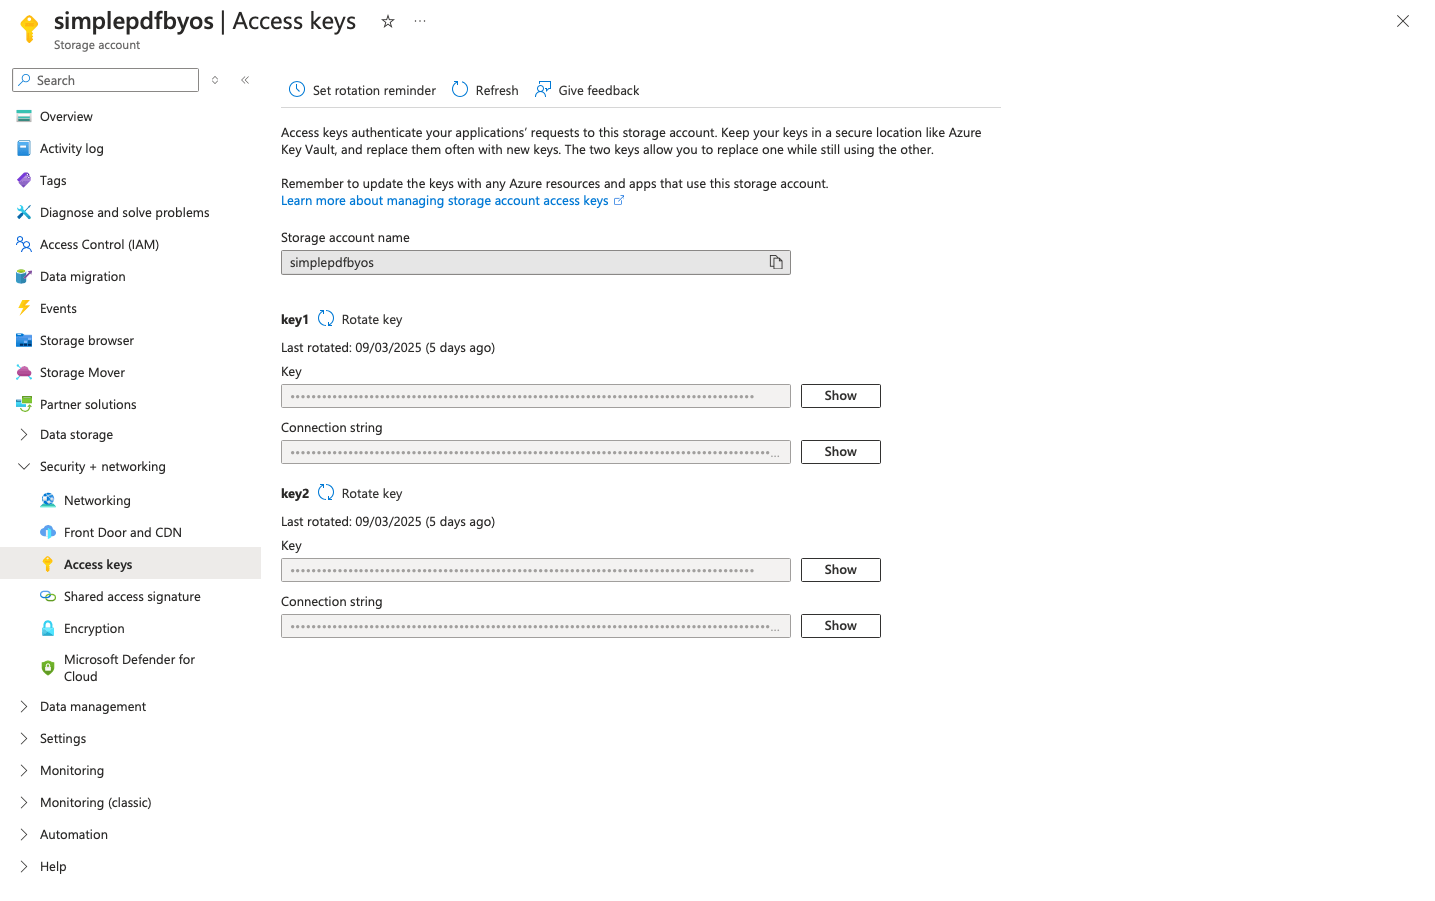
3. Depending on your preferred way of authentication, you can either use **Access Keys** or **SAS authentication**
> **Access Keys** authentication: retrieve the **Access Keys** for this container in the _Security + Networking > Access keys_ view of the storage account
> 
> **SAS Token** authentication: generate the **SAS** token to access the content of that container in the _Settings > Shared access tokens_ view of the container.
> _We recommend you specify an expiration far in the future to avoid disruption of service: SimplePDF **will not** warn you about the expiry of the token._
> Select the `read`, `write` and `delete` permissions as visible in the screenshot below.
> 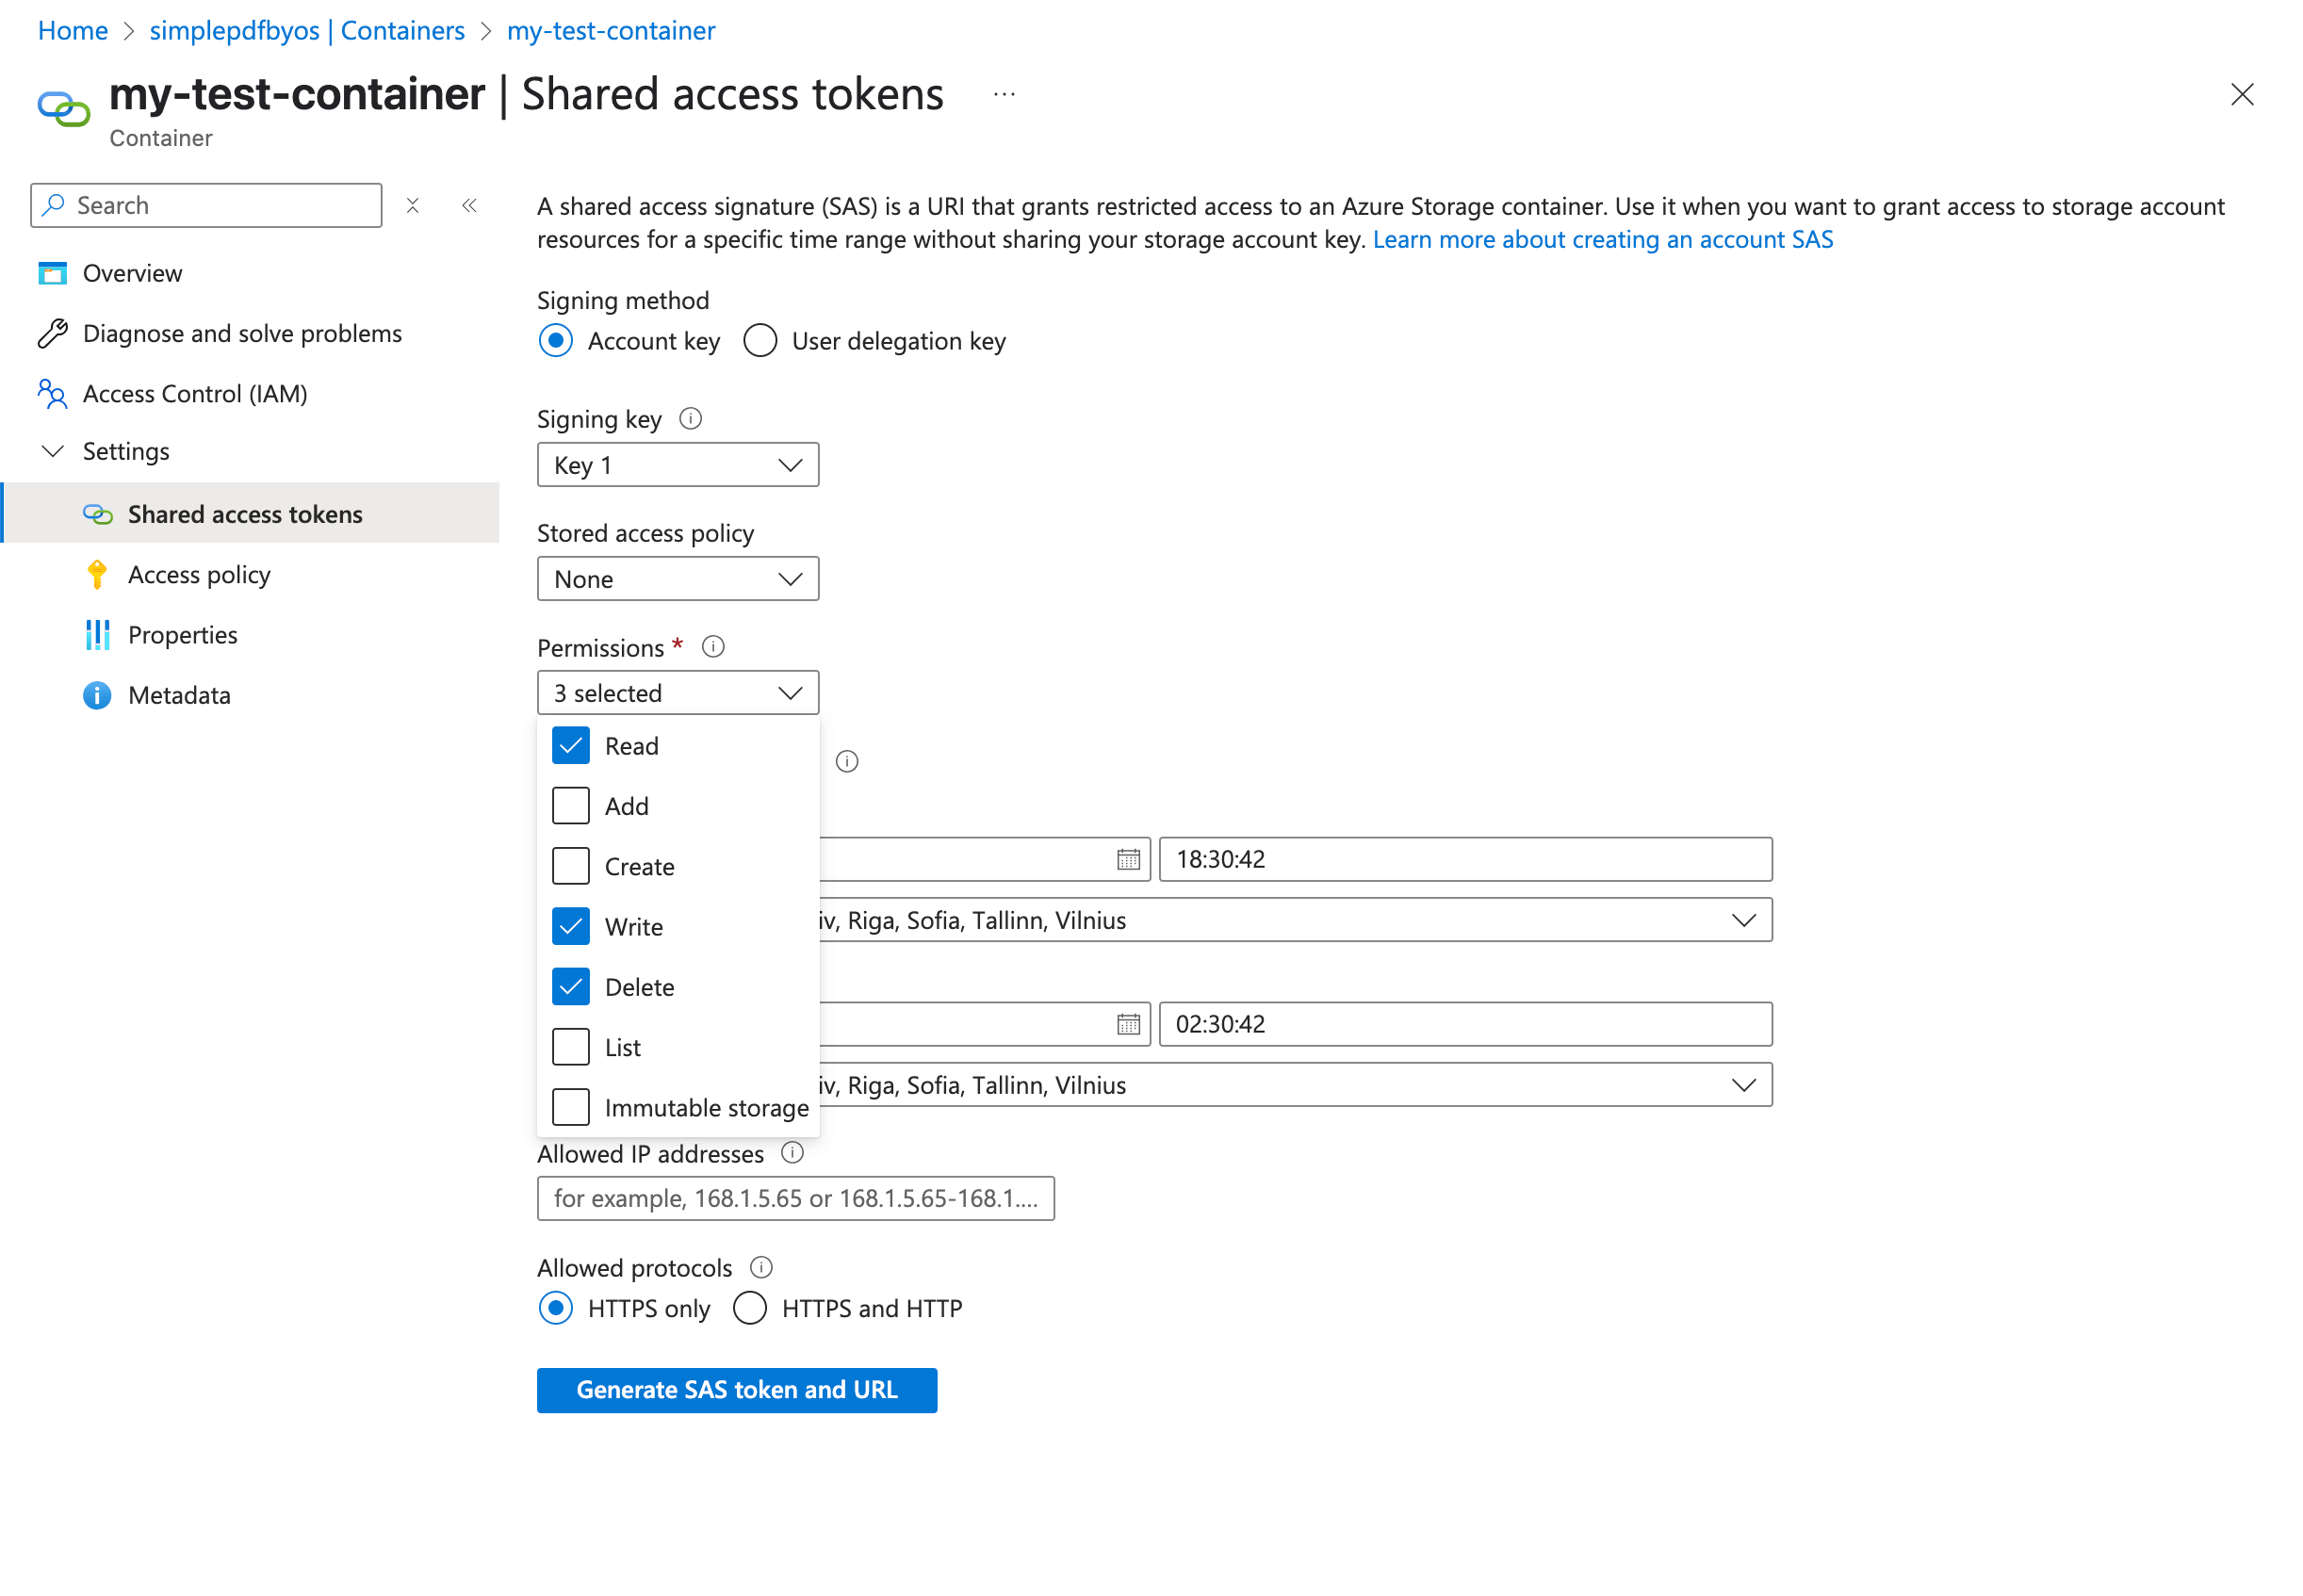
> If you wish to grant only `write` (and `delete`) access, untick the `read` permission.
### In SimplePDF
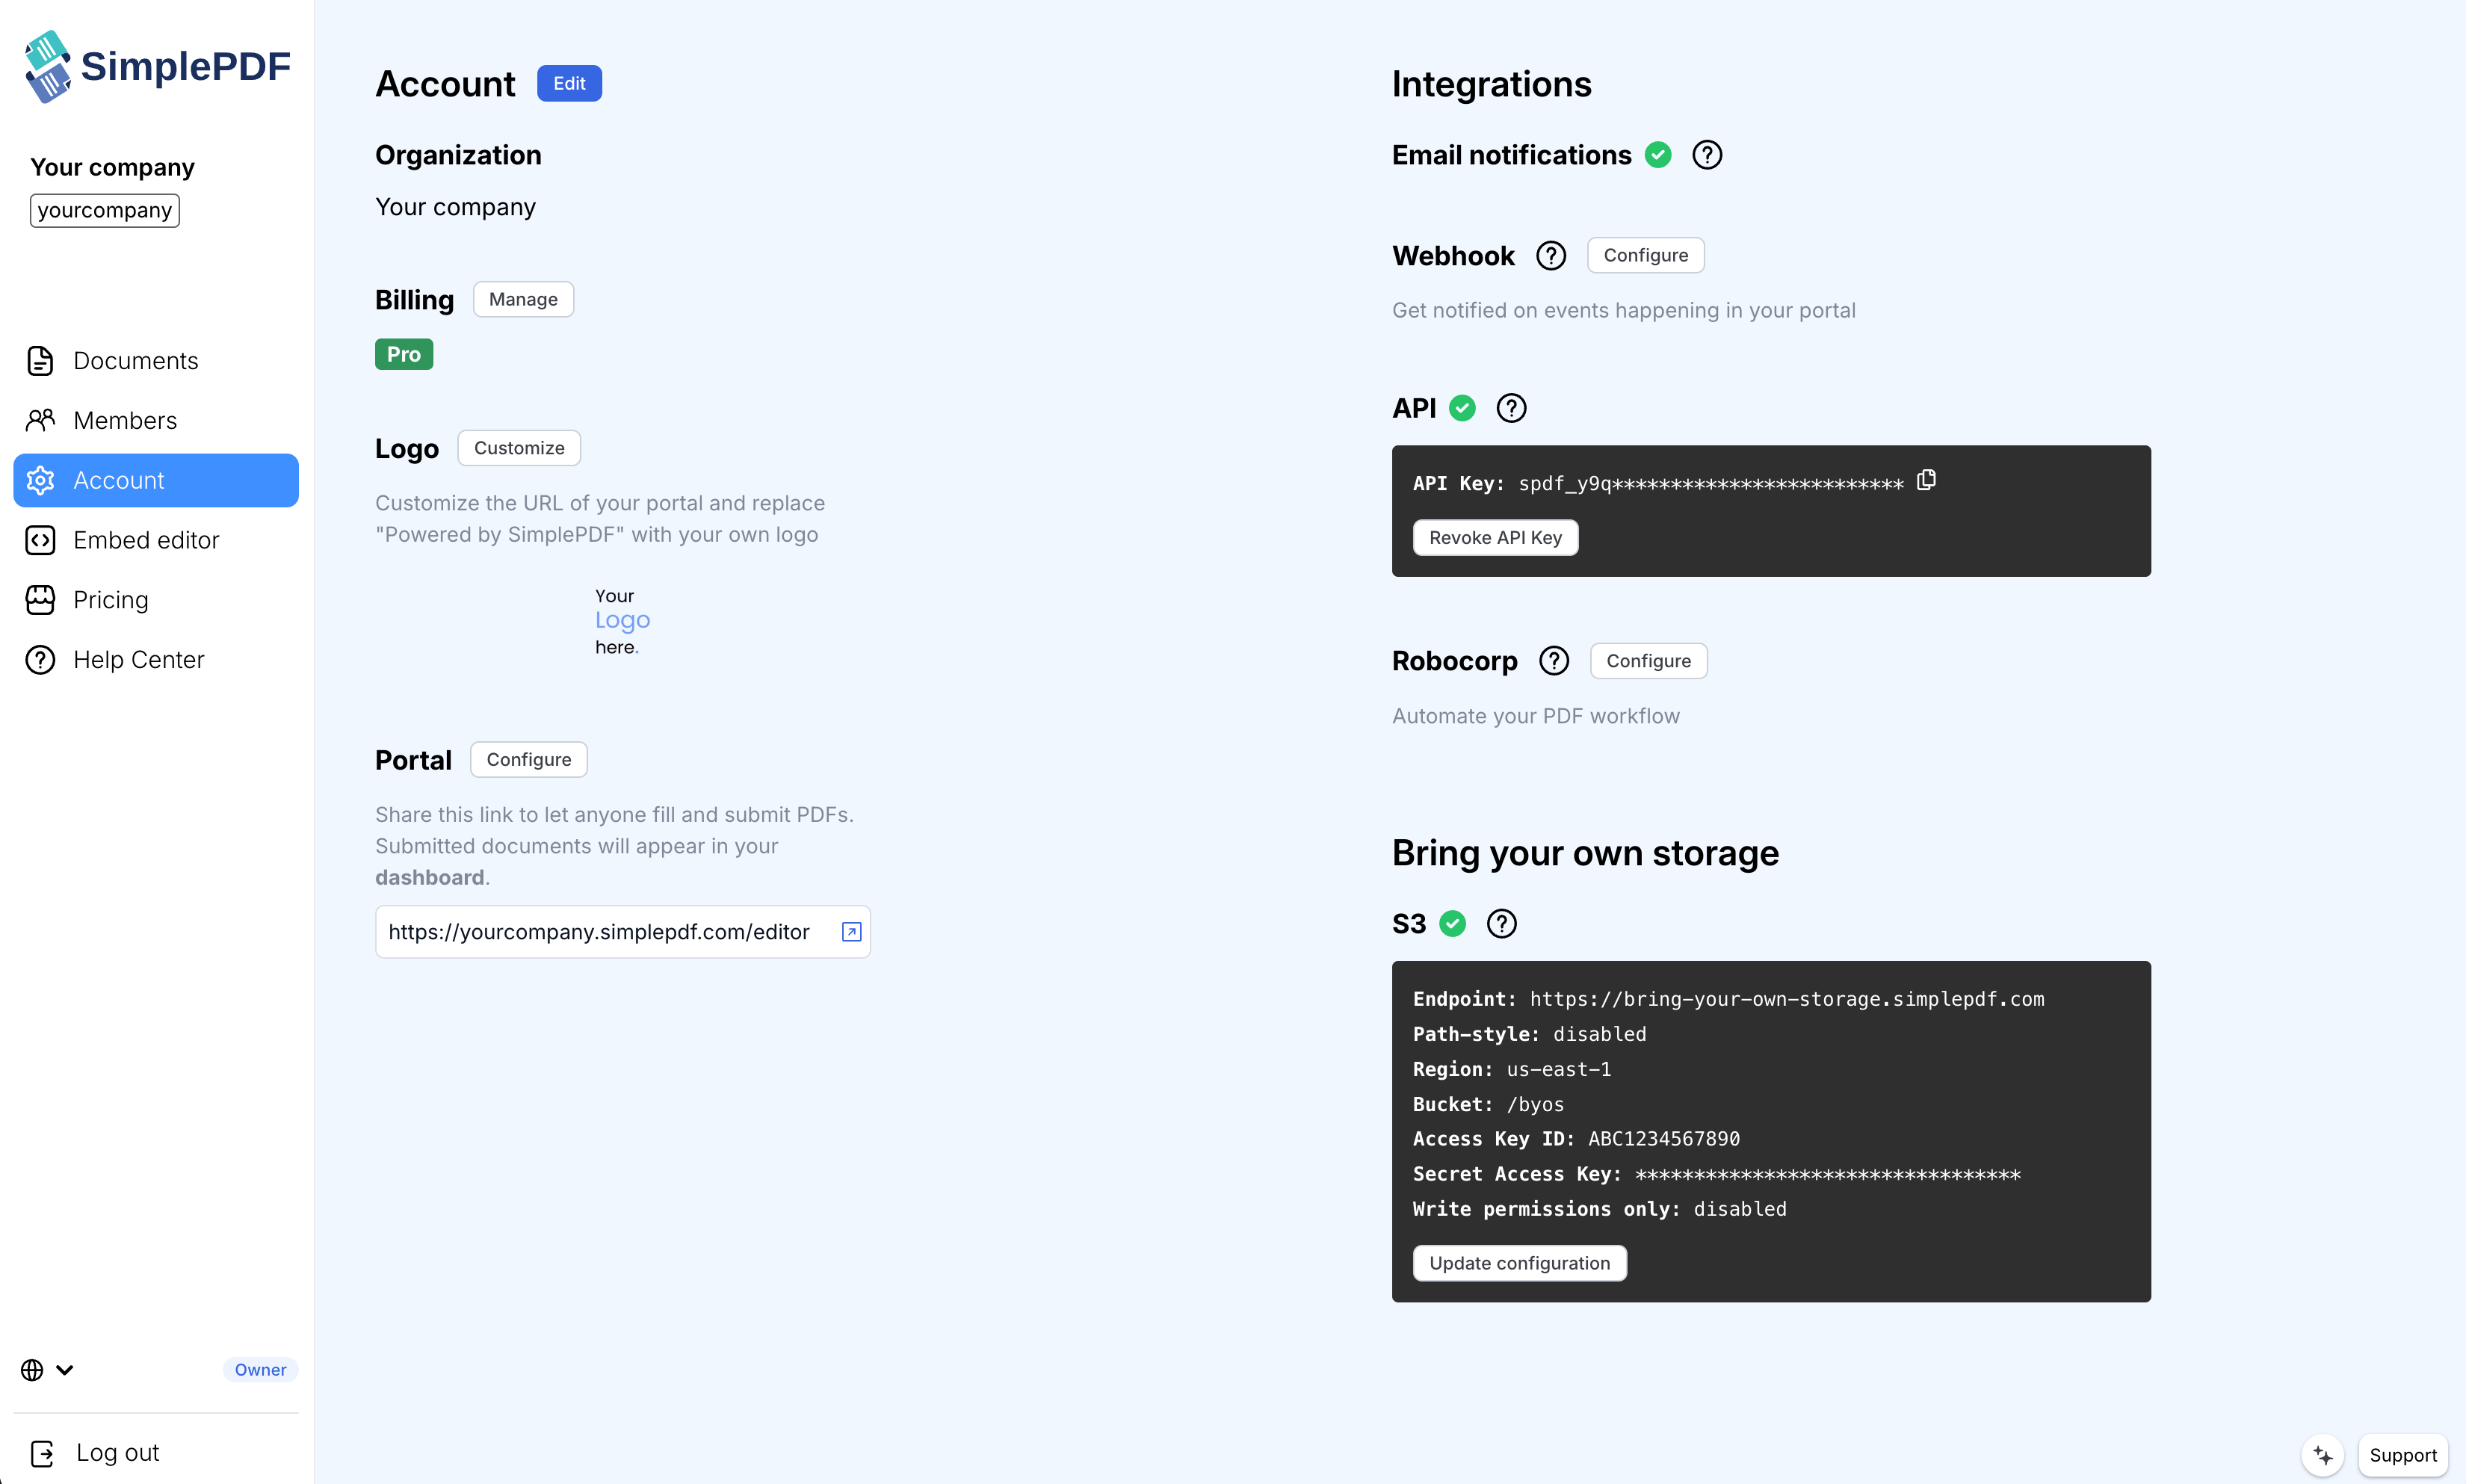
1. Log in to your account
2. Navigate to the account settings view:
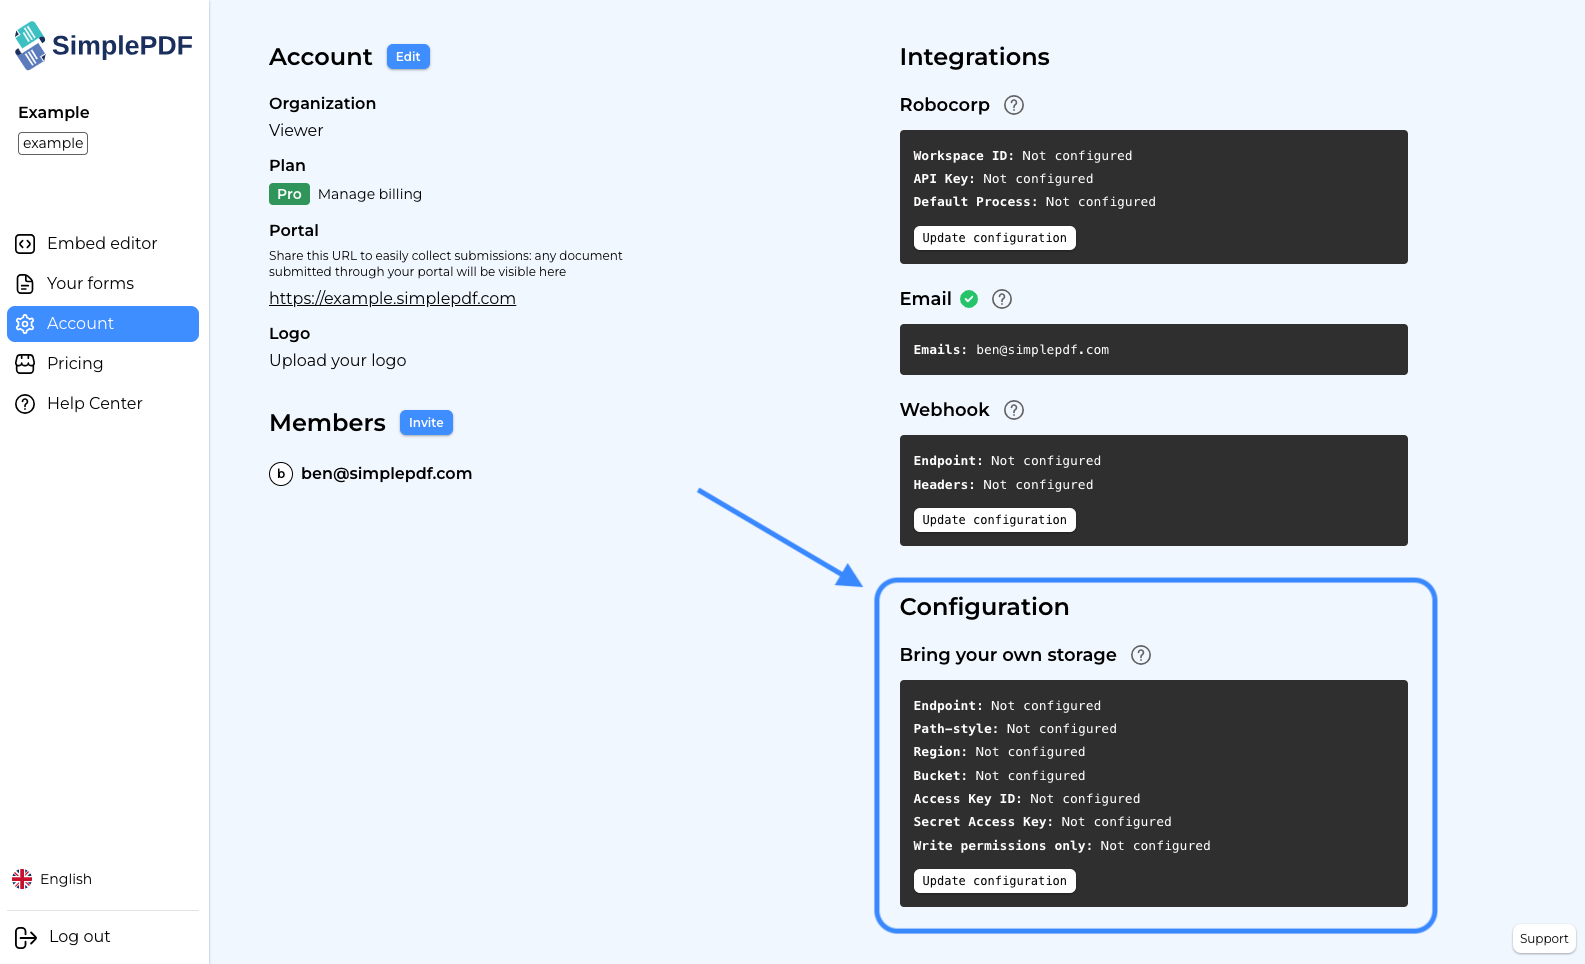
3. Click `Update configuration`
4. Select the **Credentials type** and fill in the details:
**Endpoint**: `https://.blob.core.windows.net`
**Container**: name of your container
**Account Name**: name of your account. This should match the account name value used in the endpoint above. You can find it in the Access Credentials view on Azure.
**Credentials type: Access Keys**
> **Account Key**: retrieved from the Access Key view on Azure as described in the step 3 of this article.
**Credentials type: SAS Token**
> **SAS Token**: retrieved from the Shared access tokens view on Azure as described in the step 3 of this article.
> **Write permissions only**: tick this box if you do not wish SimplePDF to be able to read the documents on your account, coupled with only defining `write` (and `delete`) permissions on your Azure Storage account, as described in the step 3 of this article.
4. Select `Azure Blob Storage` as storage type and enter your Azure Blob Storage details:
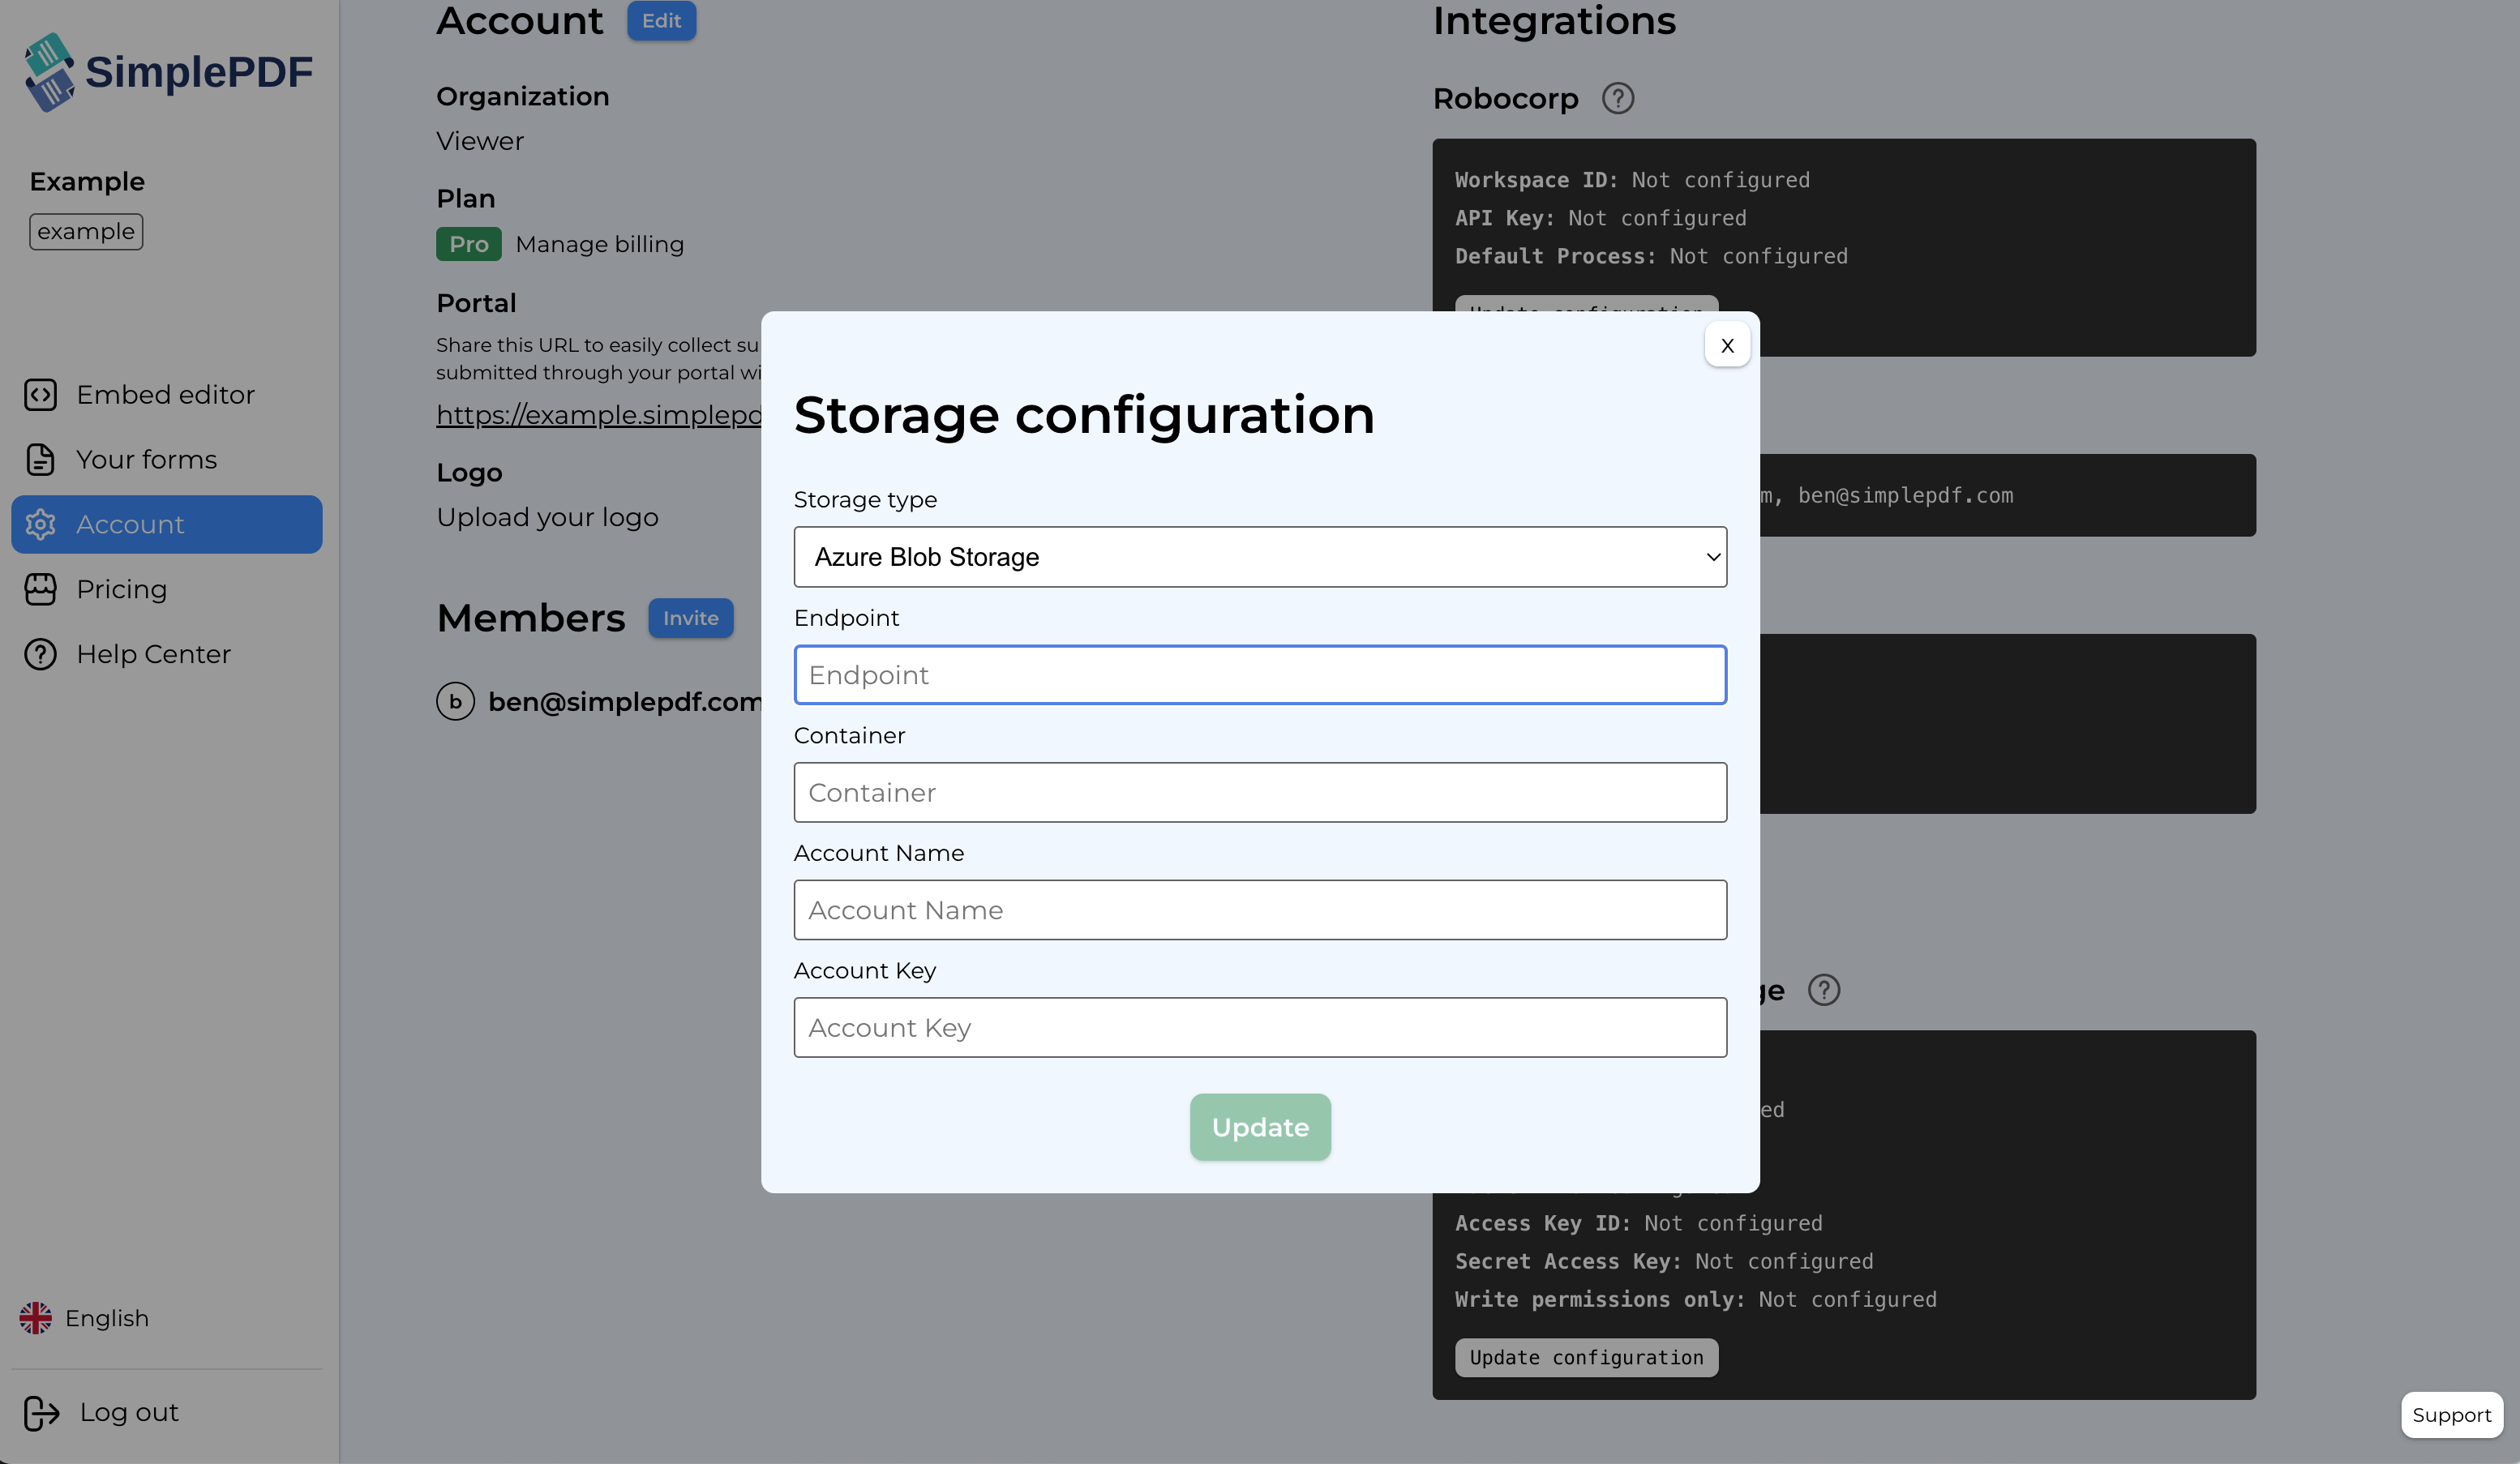
5. Click `Update`
**That's it! Your documents and submissions are now automatically stored in your own Azure Blob Storage container!**
_If you have any questions, feel free to reach out to [support@simplepdf.com](mailto:support@simplepdf.com)_
---
# How to configure webhooks to get notified of new PDF form submissions
A powerful way to send the submissions to your application or connect SimplePDF with other services such as [Zapier](https://zapier.com) or [Activepieces](https://activepieces.com) is to use webhooks.
## Webhooks?
Webhooks allow to connect applications with one another by sending data in real-time from one application to the other(s) whenever a given event happens.
**In SimplePDF, every time a PDF is submitted** via your company portal, either using [form links](https://simplepdf.com/portal) or [embed in your website](https://simplepdf.com/embed), **an event is sent out containing the document name and submission URL** among other things.
From there, the sky is the limit and you can let your imagination run free.
You could for example save that information in a Google sheet or integrate it with [Zapier](https://zapier.com) or [Activepieces](http://activepieces.com) and unlock even more possibilities!
## Configuring webhooks in SimplePDF
_Configuring webhooks is available with the [BASIC plan](https://simplepdf.com/pricing)_
- Log in to your account
- Navigate to the account settings view
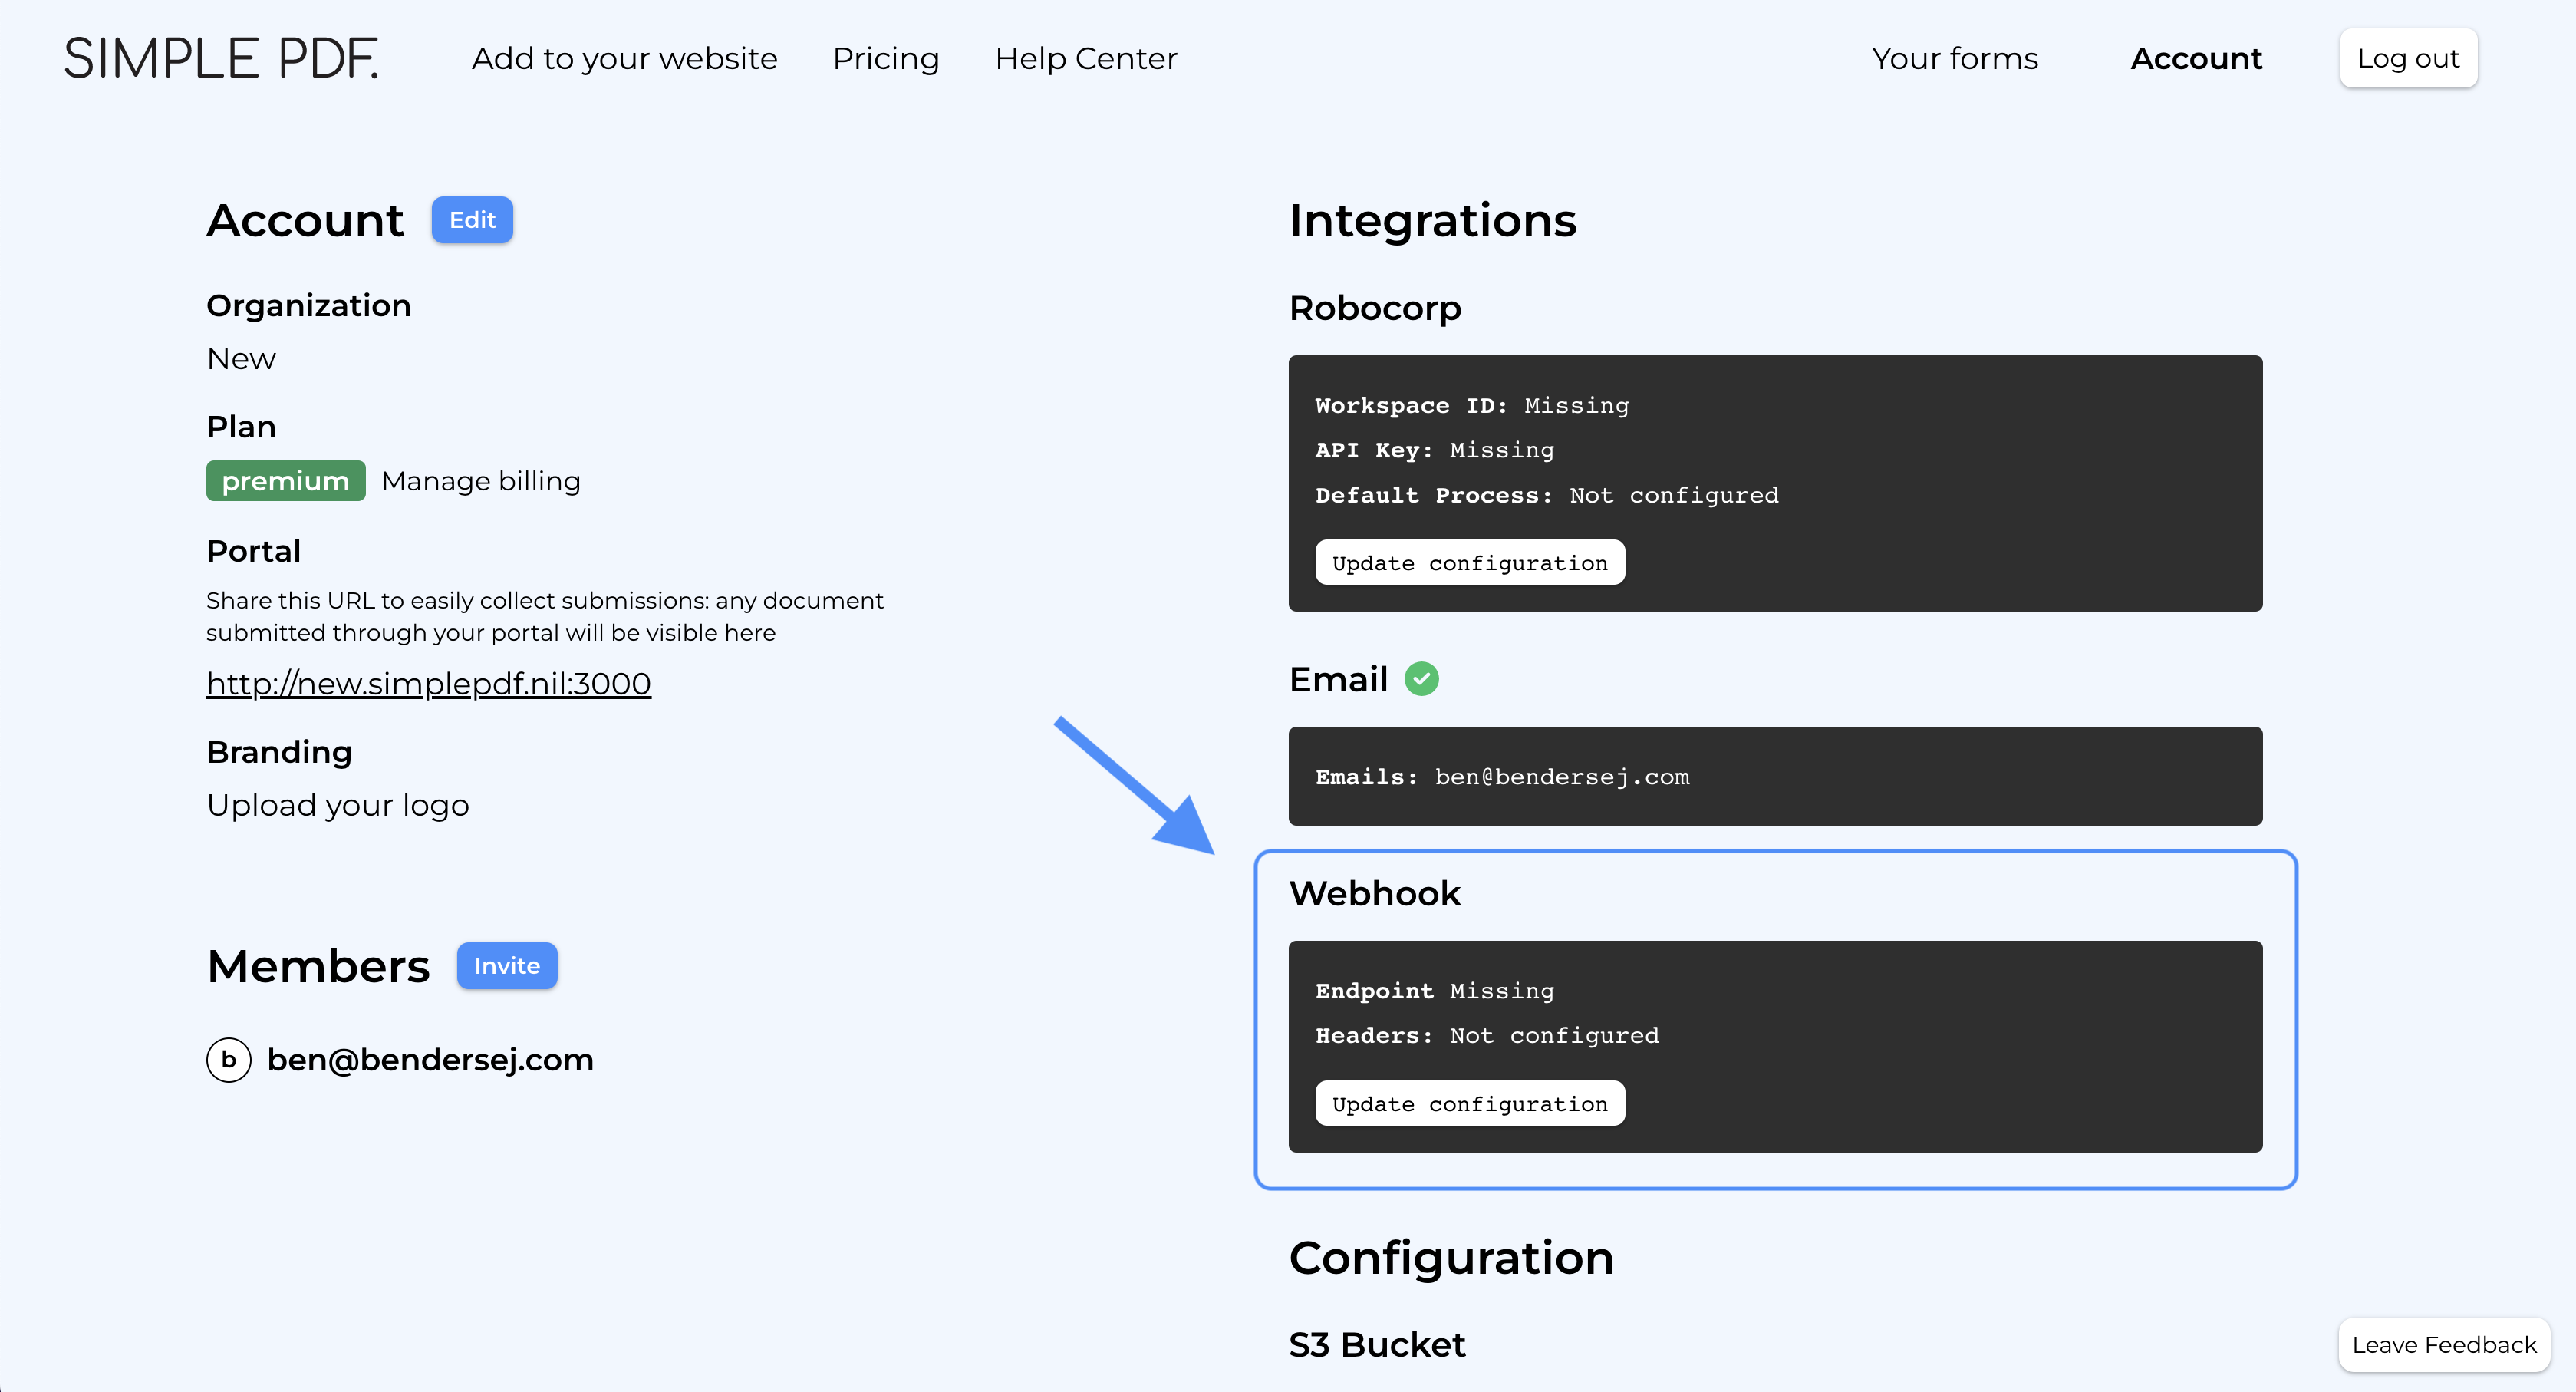
- Click `Update configuration`
- Enter the webhook URL of the service or application to which you want to send events
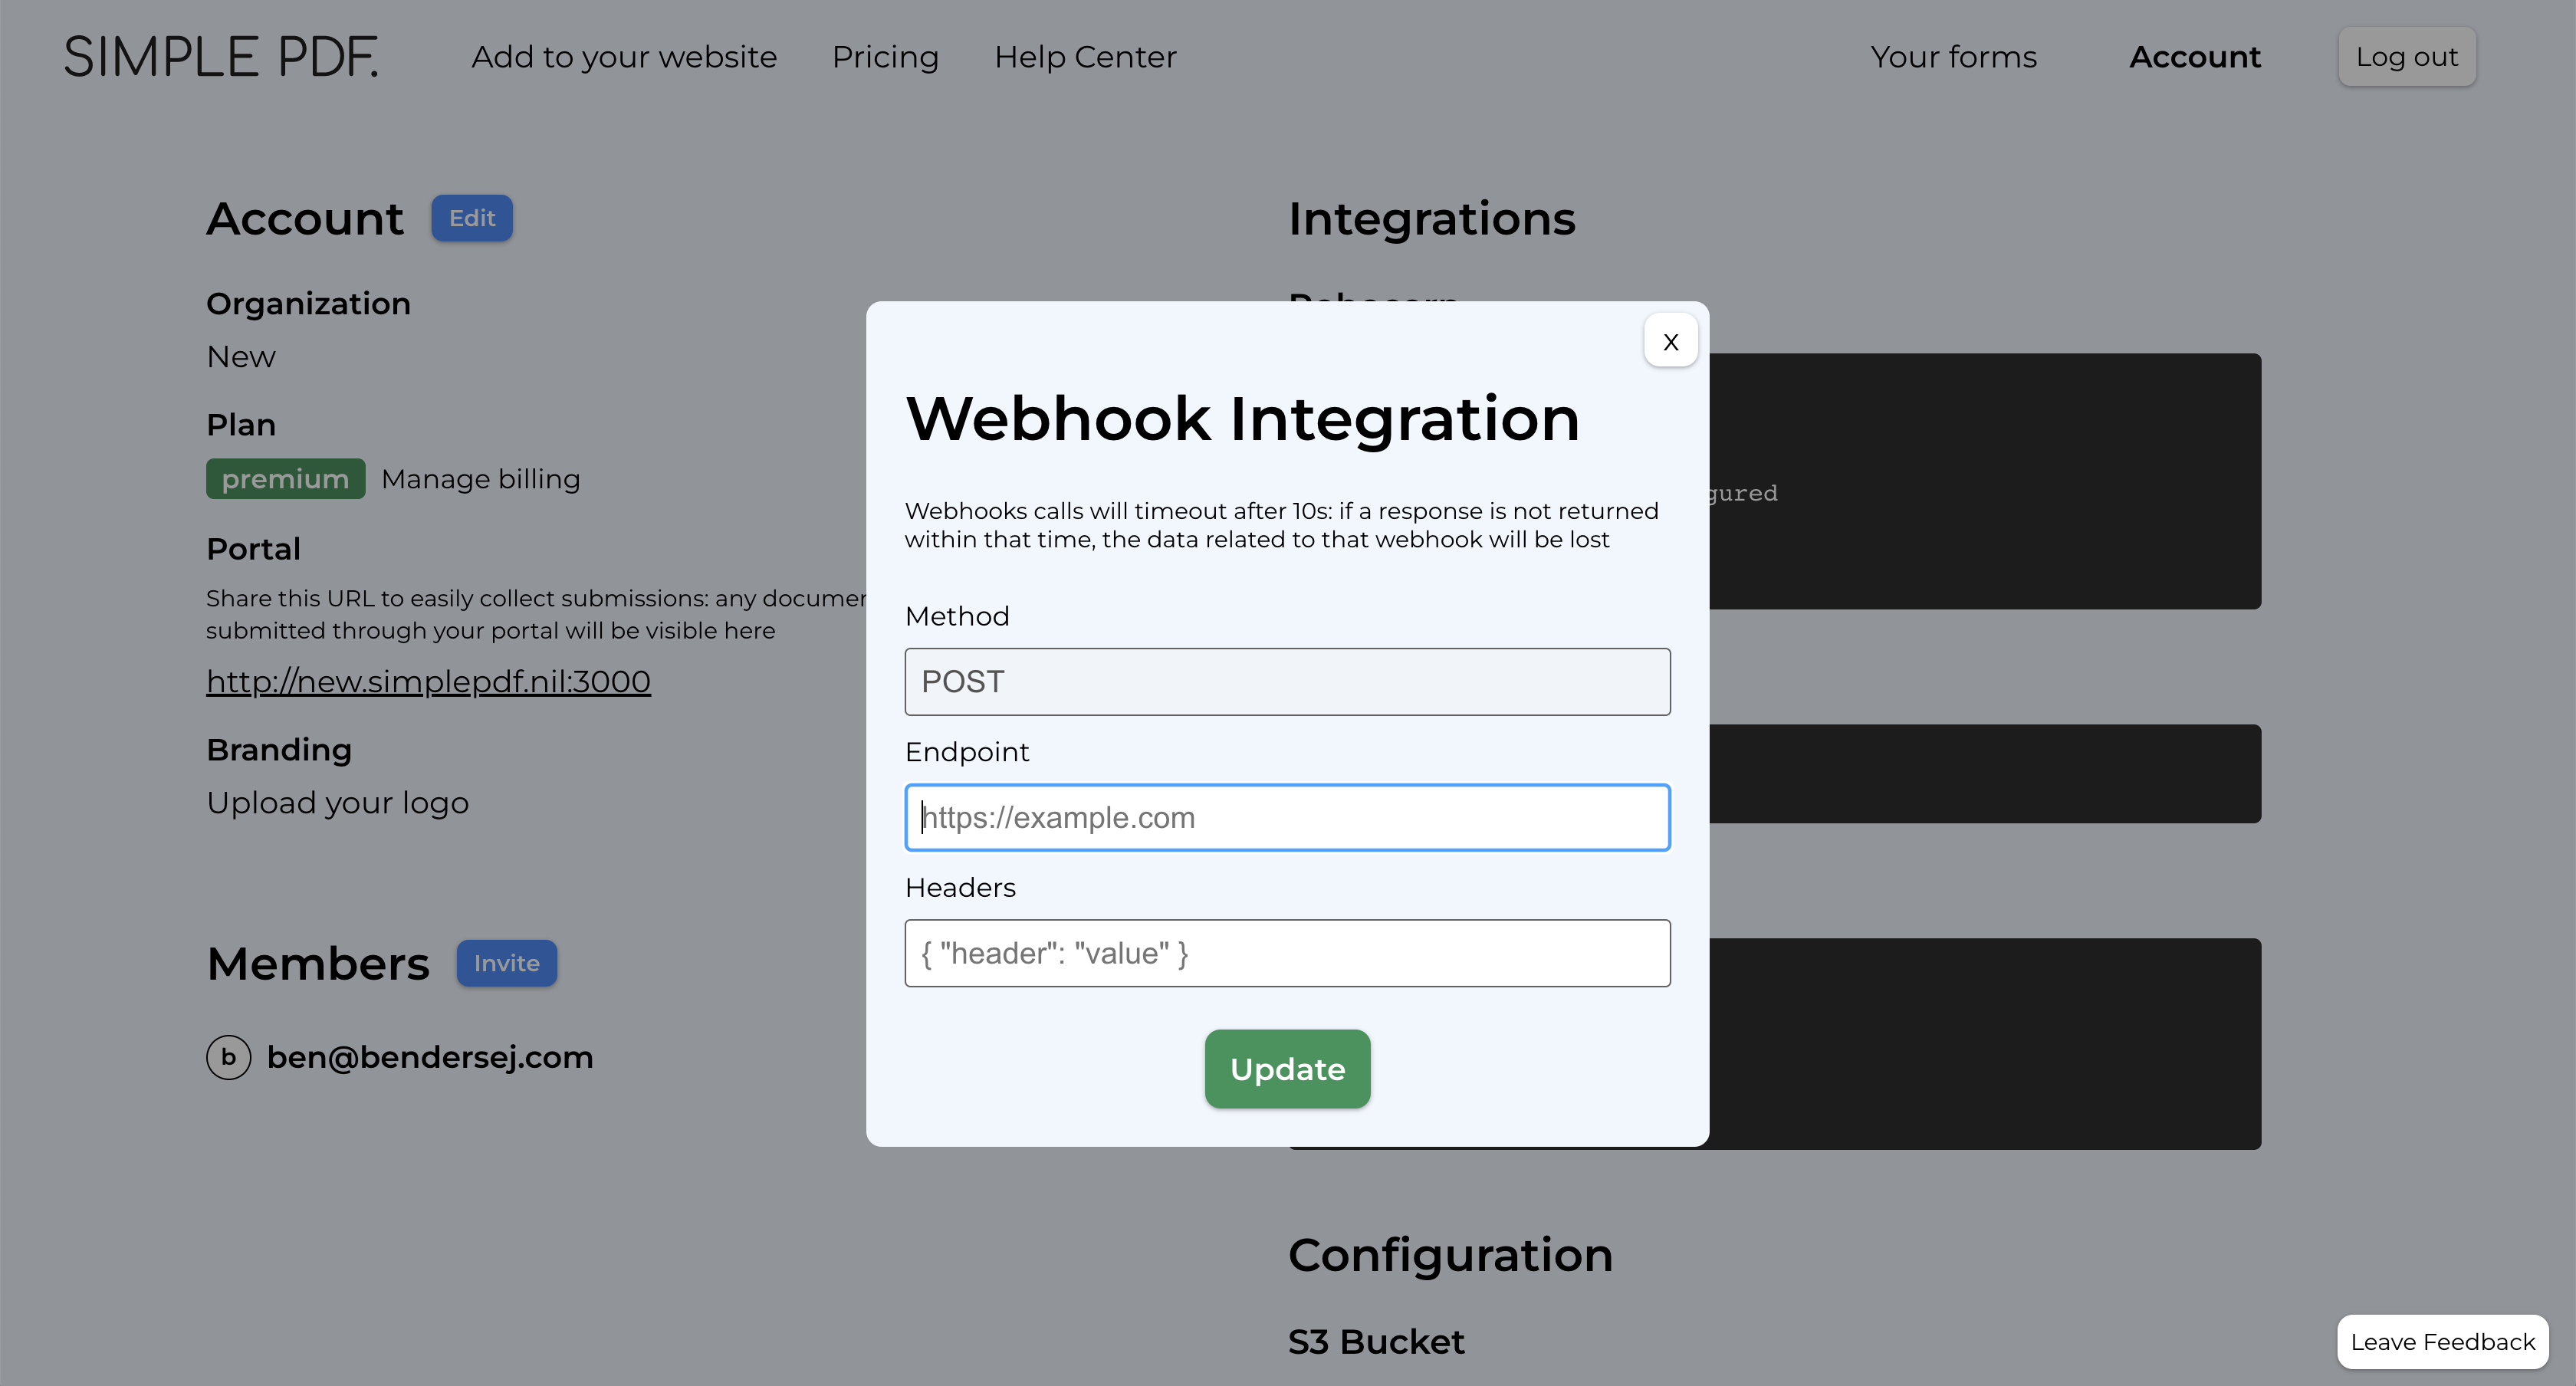
- Optional: specify the headers to send as part of the webhook
**That's it! An event will be sent everytime there's a new submission**
## Webhook events
You will find below the events that are sent by SimplePDF to the webhook you configured.
- New submission
**Payload**
```
type: "submission.created",
data: {
document: {
id: "b7615a68-9e1f-4eac-bd20-5e80632a4d9e",
name: "your_document.pdf",
},
submission: {
id: "80146d5b-a068-490f-8eb9-fe393ba11396",
submitted_at: "2023-06-04T11:54:58.995Z",
url: "short_lived_15min_url",
},
context: {
environment: "production",
customer_id: "123"
}
}
```
### About the context
When you integrate SimplePDF in your website, you may want to tie additional information to submissions.
For example, you may want to:
- Know whether the submission was initiated from a development `environment` vs a `production` one.
- Send additional details about _who_ submitted the form (such as a logged in user) that will make it easier for you to process the submission.
Learn how to specify a `context` in the [documentation of SimplePDF embed](https://github.com/SimplePDF/simplepdf-embed/blob/main/documentation/IFRAME.md#specifying-a-context)
## Playground
We like examples at SimplePDF, so what about a real-life example of how webhooks look like?
1. Modify the context below (_click to edit the content_)
2. Submit {e.preventDefault();const context = encodeURIComponent(btoa(document.getElementById('context').innerHTML));const url = `${e.currentTarget.href}?context=${context}`;window.open(url, "_blank");}}>this form
3. The webhook sent by SimplePDF will appear over here
_If you have any questions, feel free to reach out to [support@simplepdf.com](mailto:support@simplepdf.com)_
---
# How to connect SharePoint as your storage for PDF submissions
As an alternative to [S3-compatible storage](/help/how-to/use-your-own-s3-bucket-storage-for-pdf-form-submissions) or [Azure Blob Storage](/help/how-to/bring-your-own-azure-blob-storage-for-pdf-storage), you can connect your SharePoint Online document library to store documents and submissions.
You may be interested in bringing your own storage (BYOS) for various reasons, such as **compliance** to specific rules in your country or industry or because your team already uses SharePoint for document management.
## How the upload works
The upload mechanism is identical across all storage providers. If you're interested in the details and security model, [head over here](/help/how-to/use-your-own-s3-bucket-storage-for-pdf-form-submissions#upload).
The gist is that the upload happens on the client, with the server only exchanging upload and download links: your documents never transit via SimplePDF servers.
## Prerequisites
Connecting SharePoint requires:
- A SimplePDF [Premium plan](/pricing)
- A Microsoft 365 tenant with SharePoint Online
- An Entra ID (Azure AD) app registration with the right permissions
## Step 1: Register an app in Microsoft Entra ID
1. Go to [Azure Portal > App registrations](https://portal.azure.com/#view/Microsoft_AAD_RegisteredApps/ApplicationsListBlade) and click **New registration**
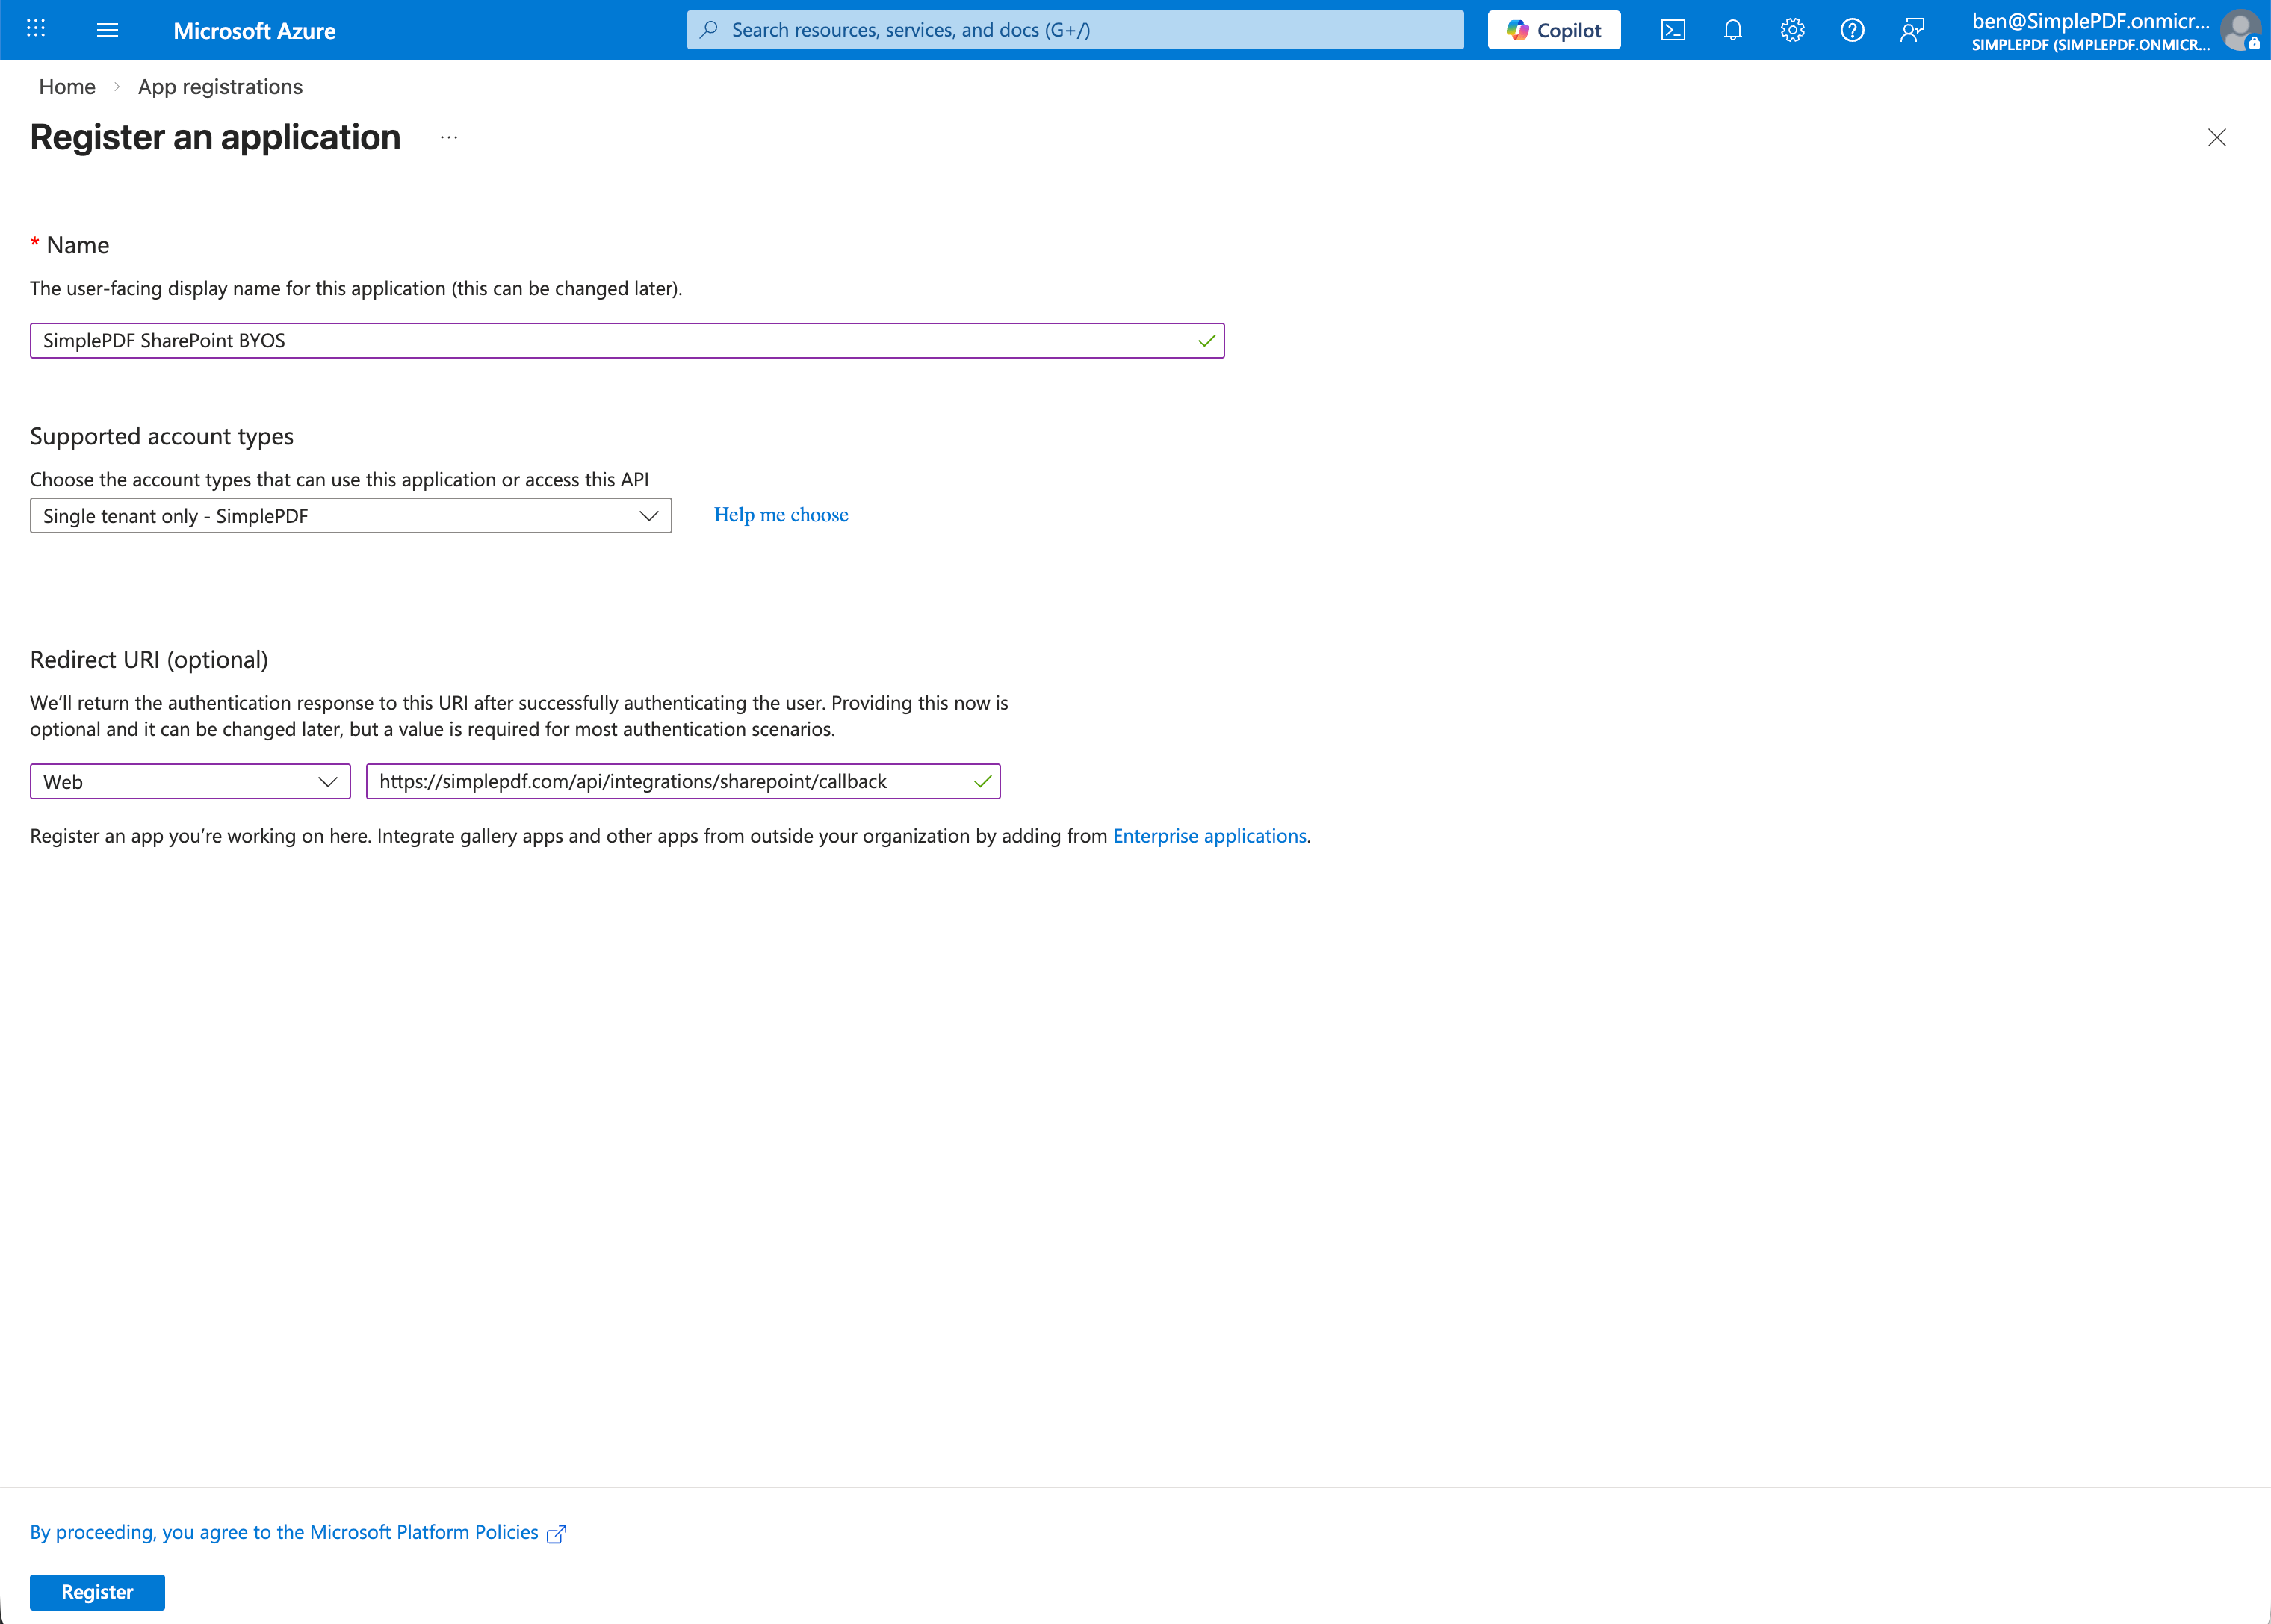
2. Fill in the registration form:
- **Name**: `SimplePDF` (or any name you prefer)
- **Supported account types**: _Accounts in this organizational directory only_ (single tenant)
- **Redirect URI**: select **Web** and enter `https://simplepdf.com/api/integrations/sharepoint/callback`
3. Click **Register**
### Create a client secret
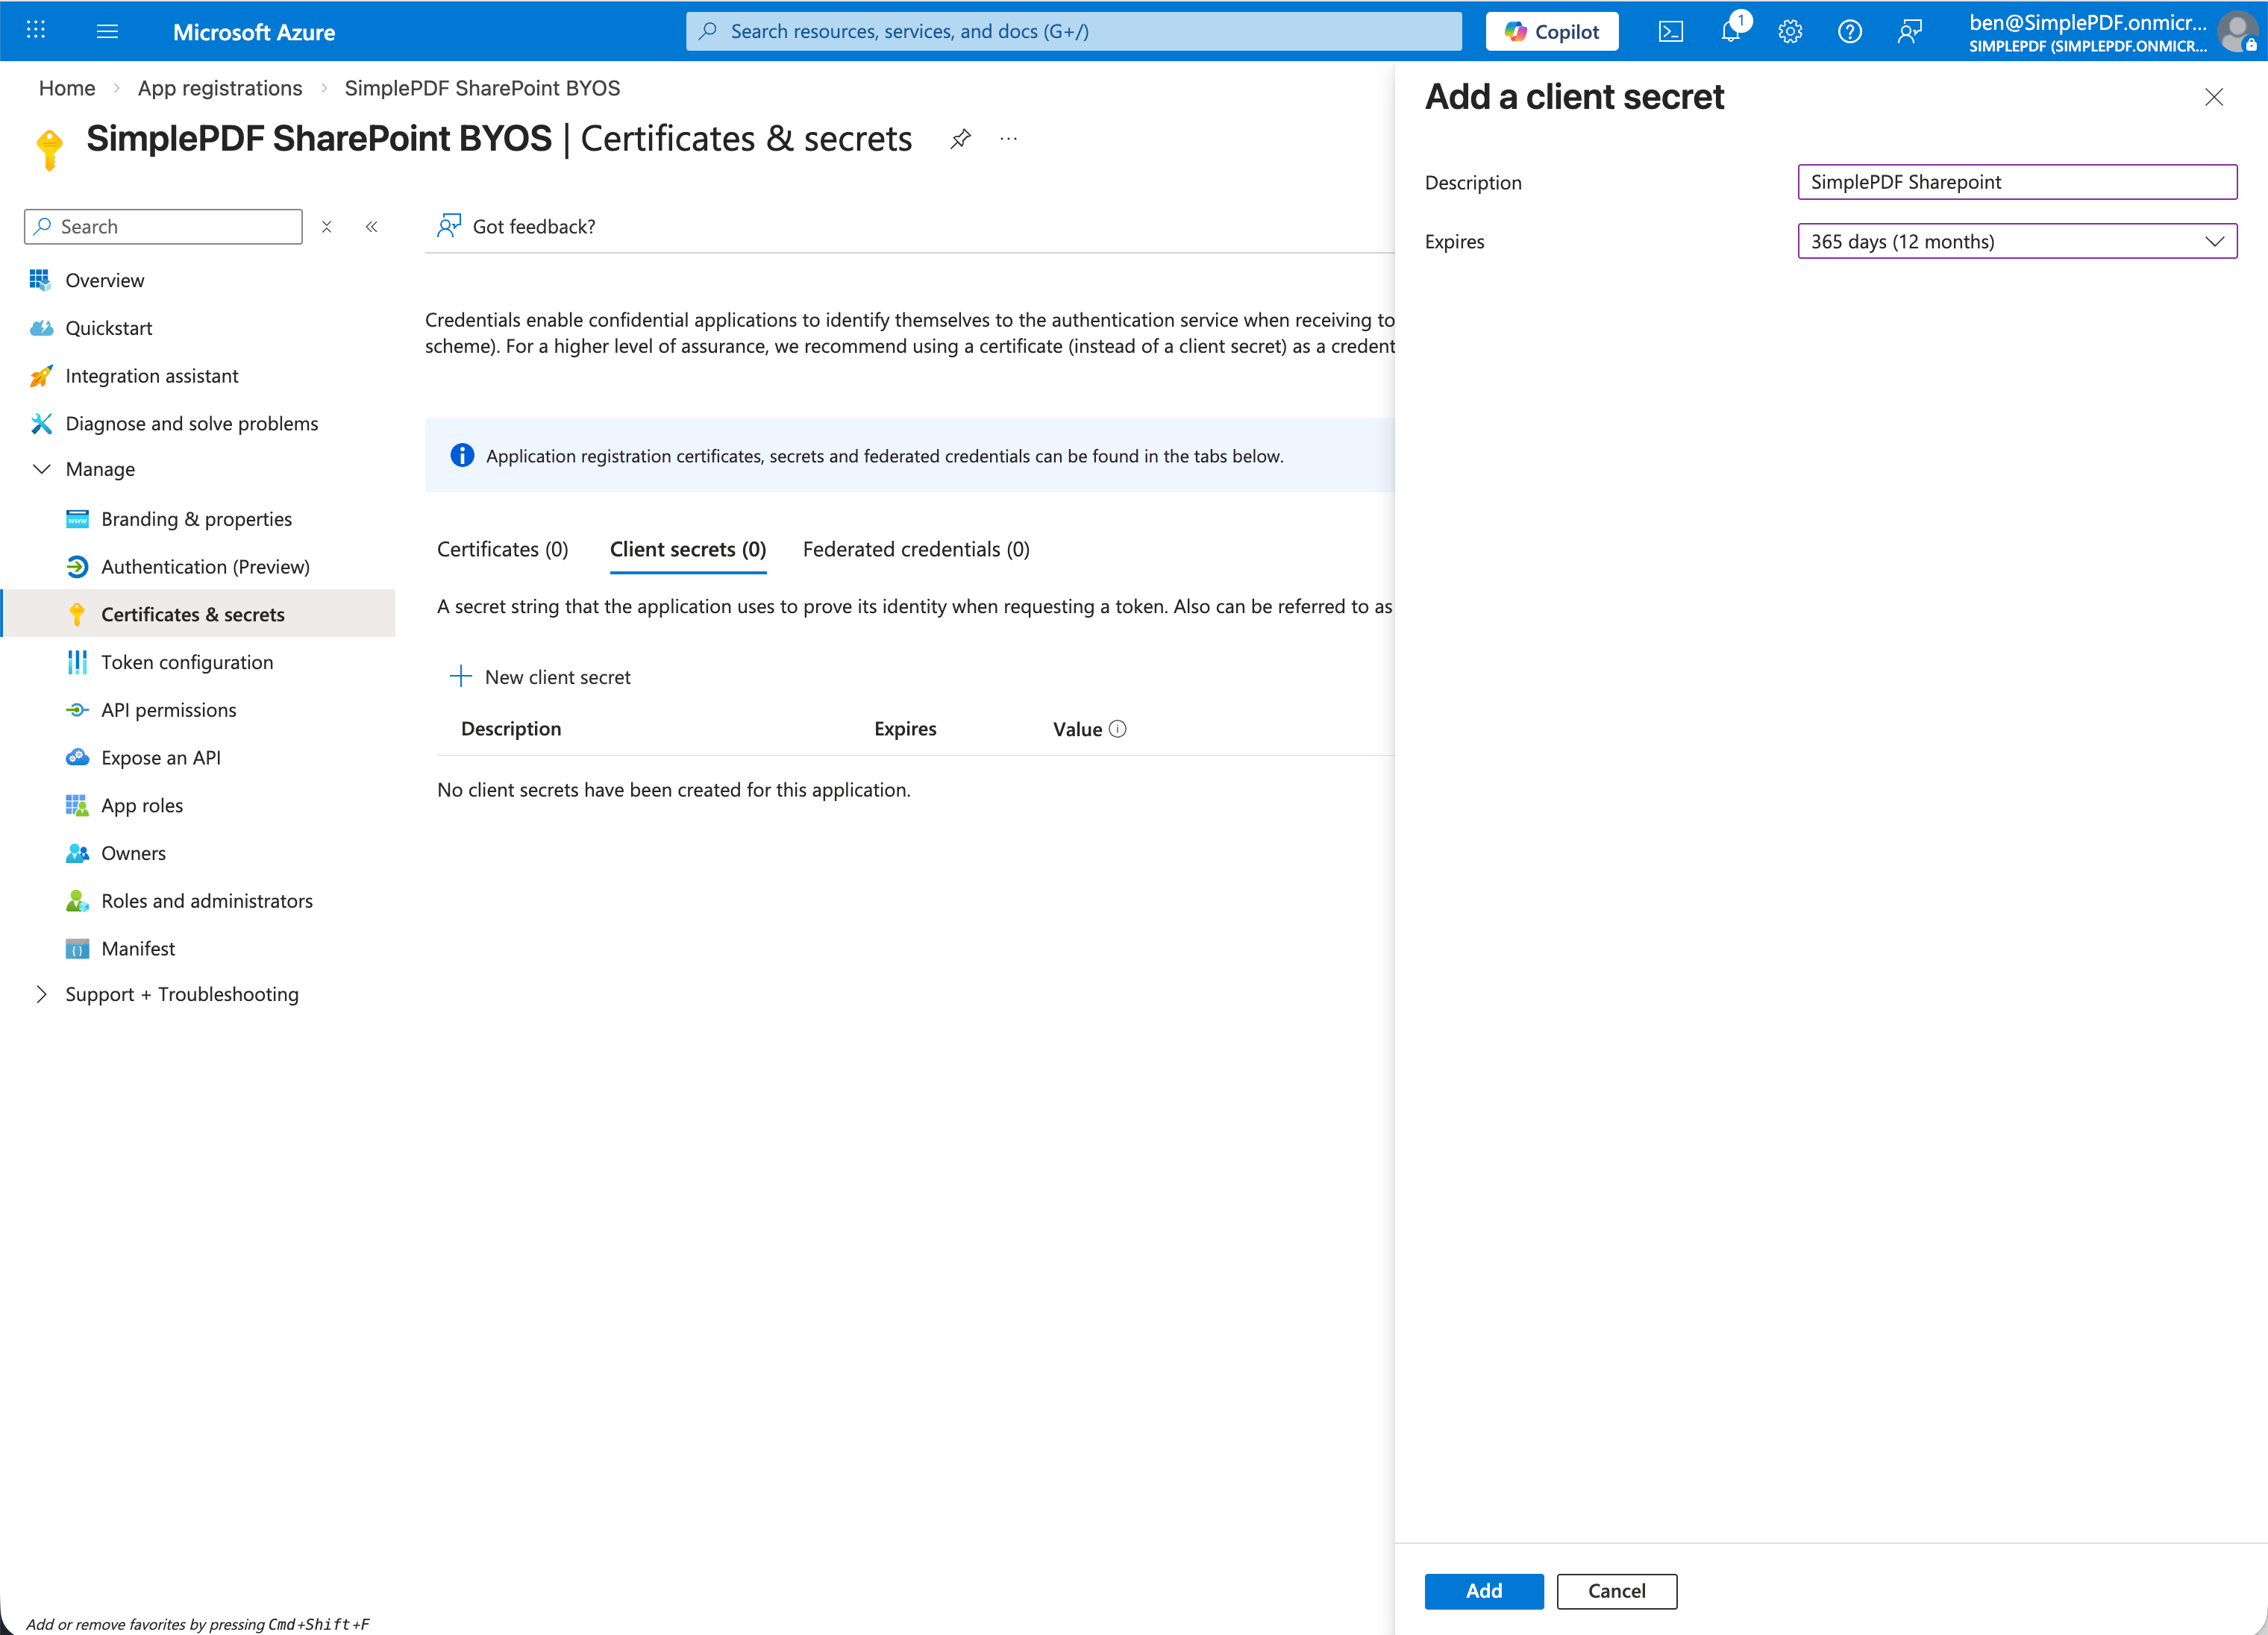
1. In your newly registered app, go to **Certificates & secrets** > **New client secret**
2. Set a description (e.g. `SimplePDF`) and choose an expiry. We recommend selecting the longest available expiry (24 months) to avoid disruption. **When the secret expires, the SharePoint connection will stop working** and you will need to create a new secret and re-authenticate in SimplePDF.
3. **Copy the secret value immediately** - it won't be shown again
### Add API permissions
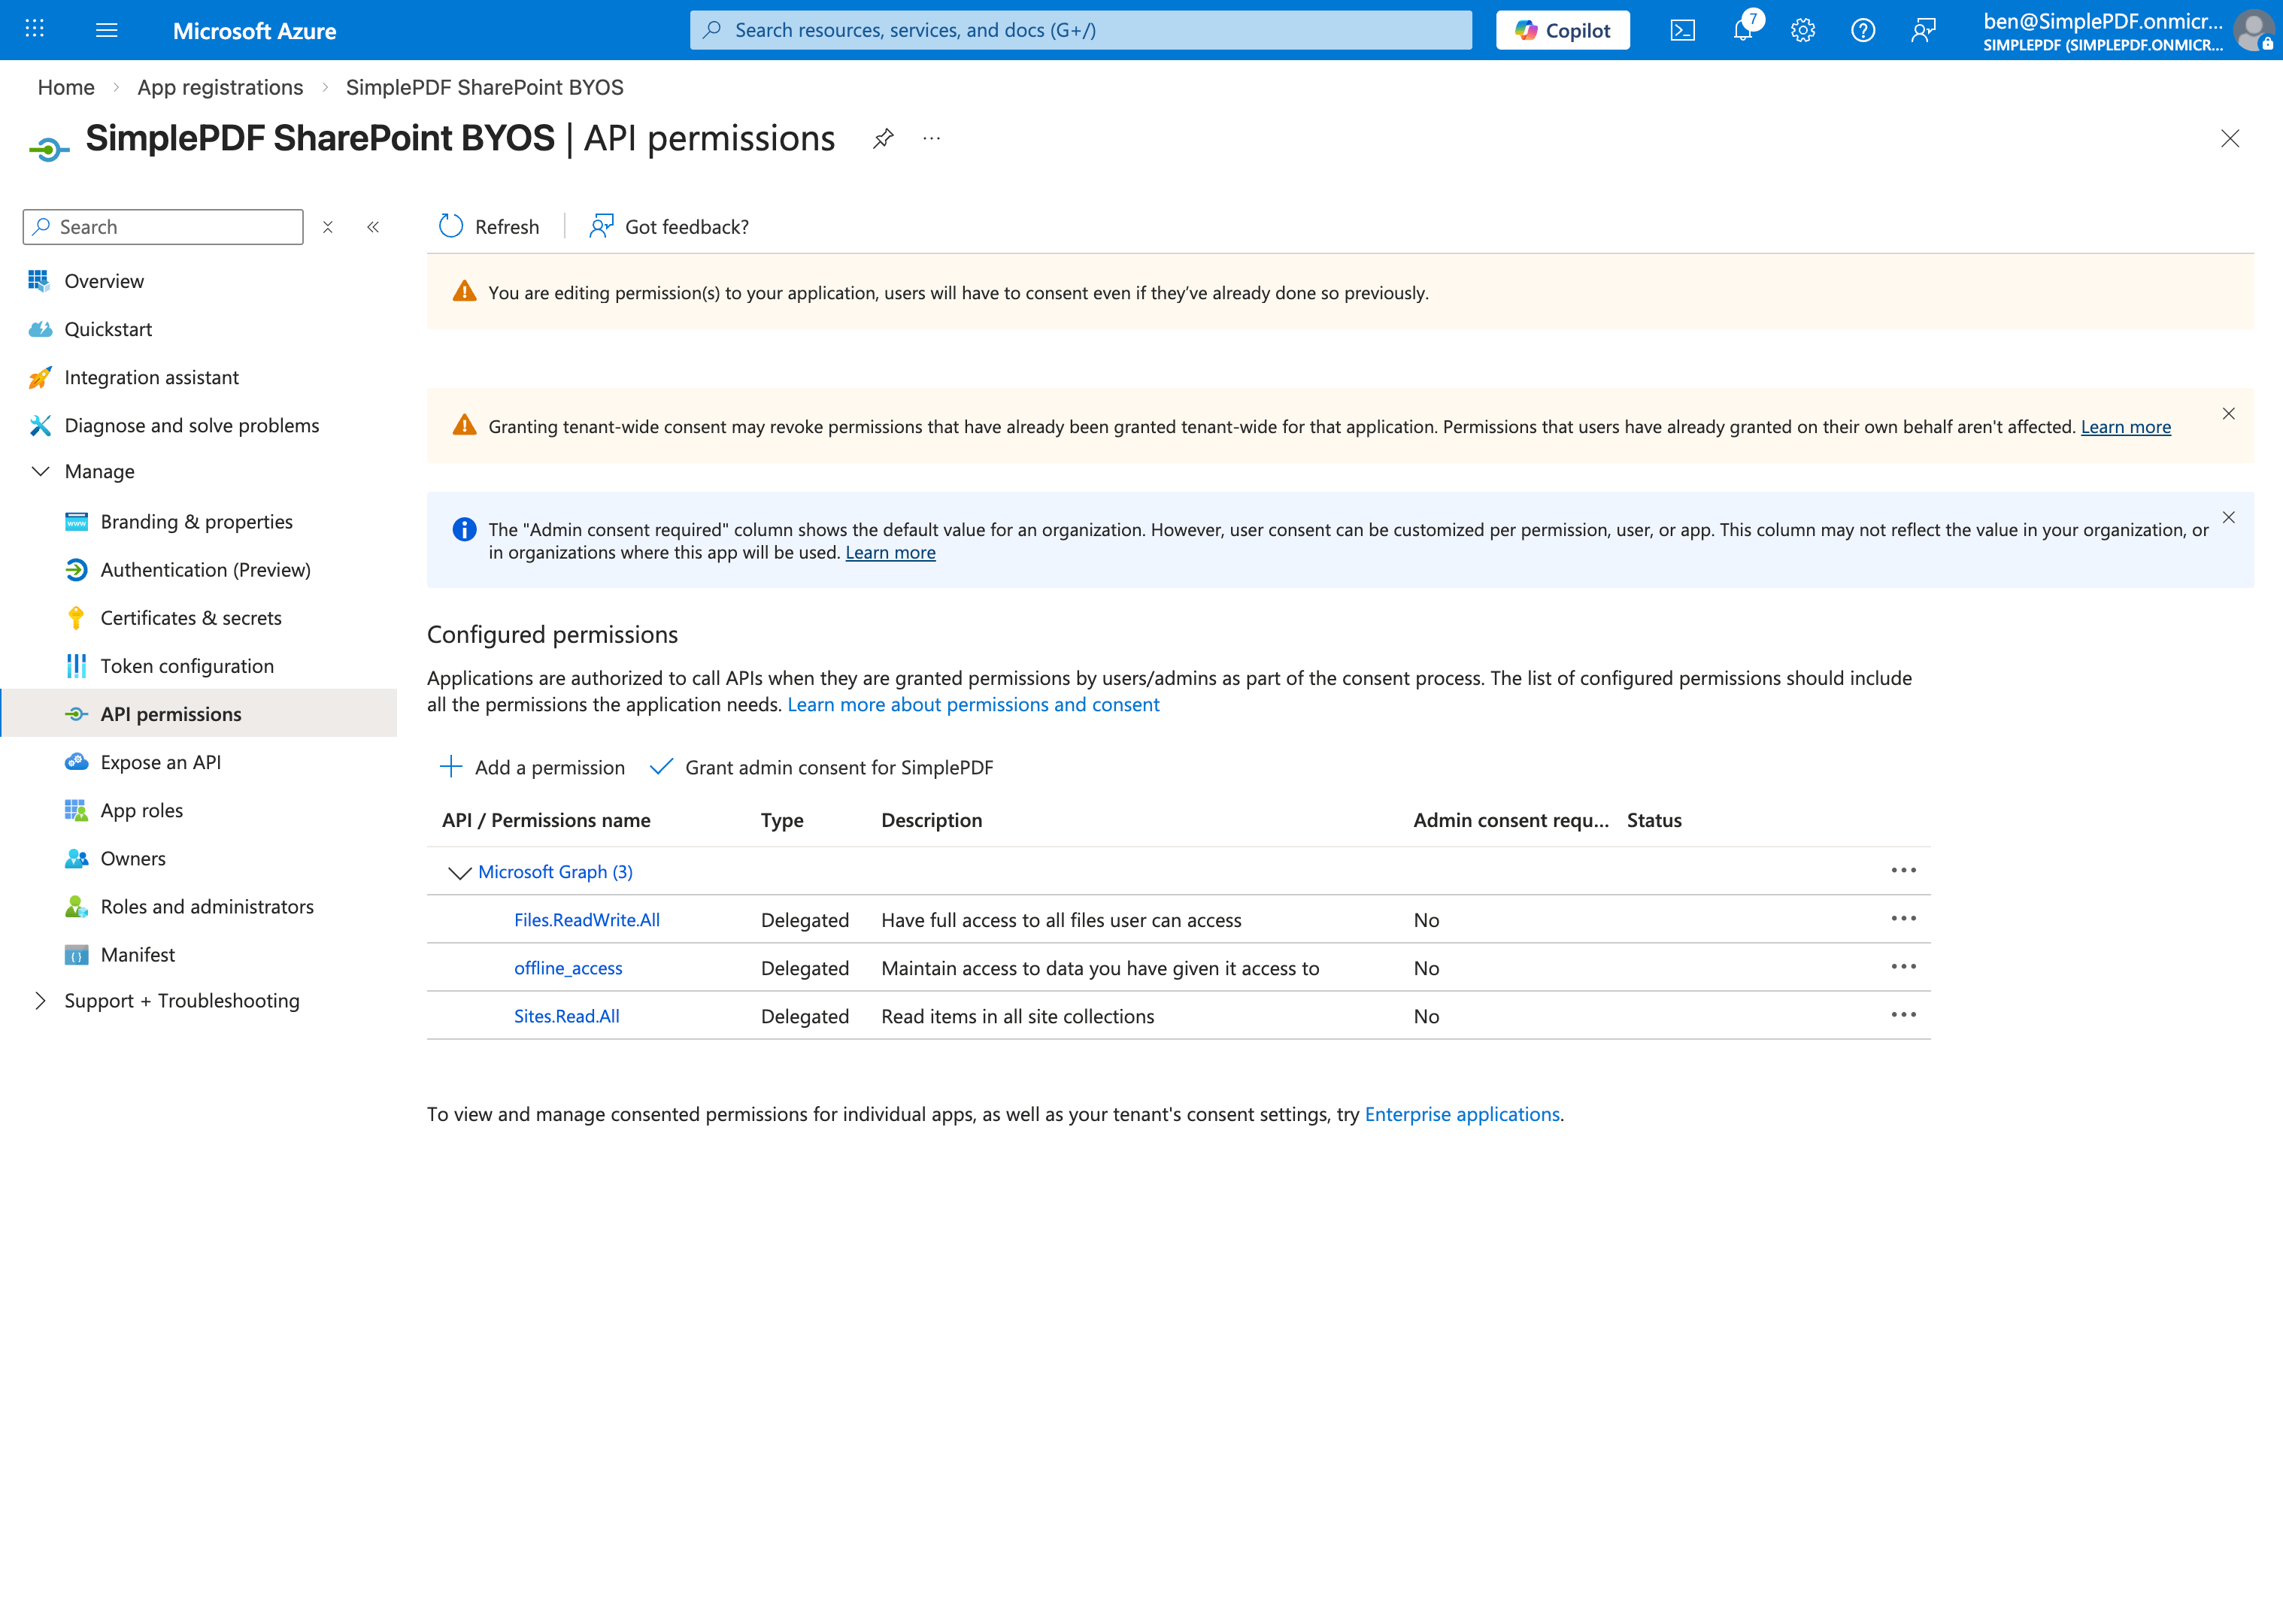
1. Go to **API permissions** > **Add a permission** > **Microsoft Graph** > **Delegated permissions**
2. Add the following permissions:
- `Sites.Read.All` - lets SimplePDF list your SharePoint sites so you can pick one
- `Files.ReadWrite.All` - lets SimplePDF upload and download documents in your selected library
- `offline_access` - keeps the connection active without re-authenticating
You do **not** need to grant admin consent. Each user consents individually during the OAuth flow.
### Note your credentials
From the app's **Overview** page, you'll need:
- **Application (client) ID**
- **Directory (tenant) ID**
Along with the **Client Secret** you copied earlier.
## Step 2: Connect SharePoint in SimplePDF
1. Log in to your SimplePDF account
2. Navigate to account settings
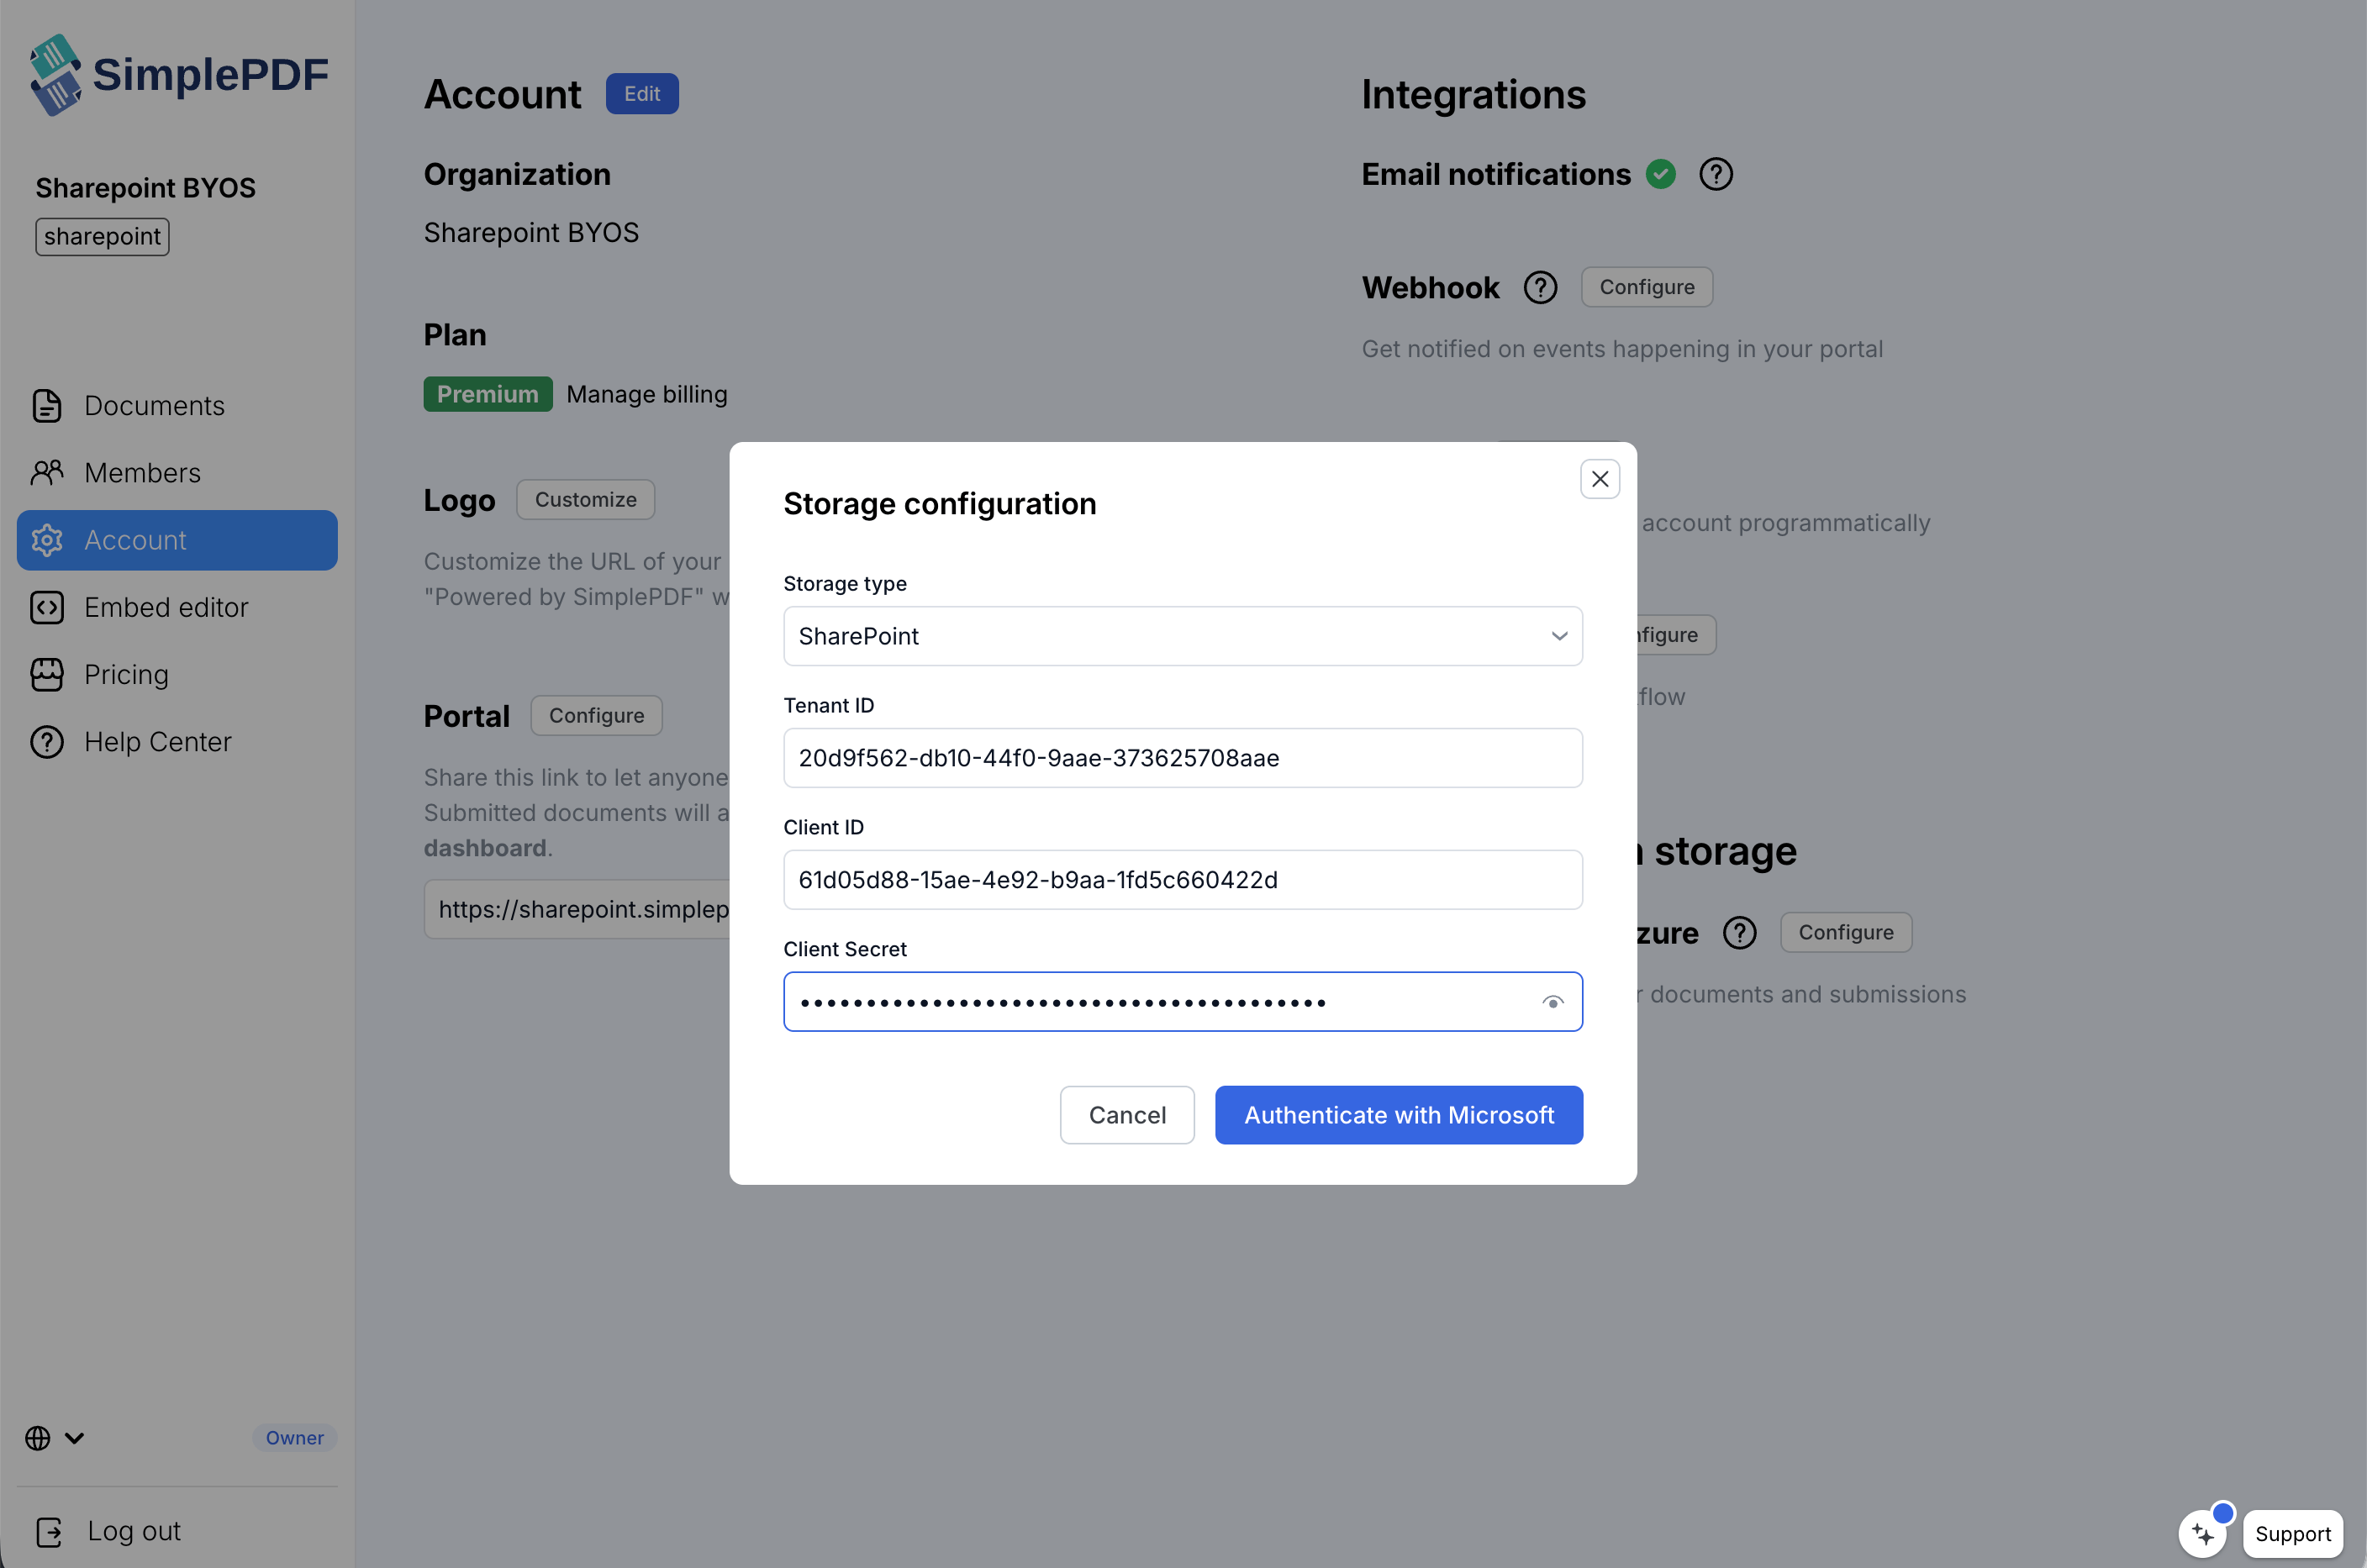
3. In the **Bring your own storage** section, click **Configure**
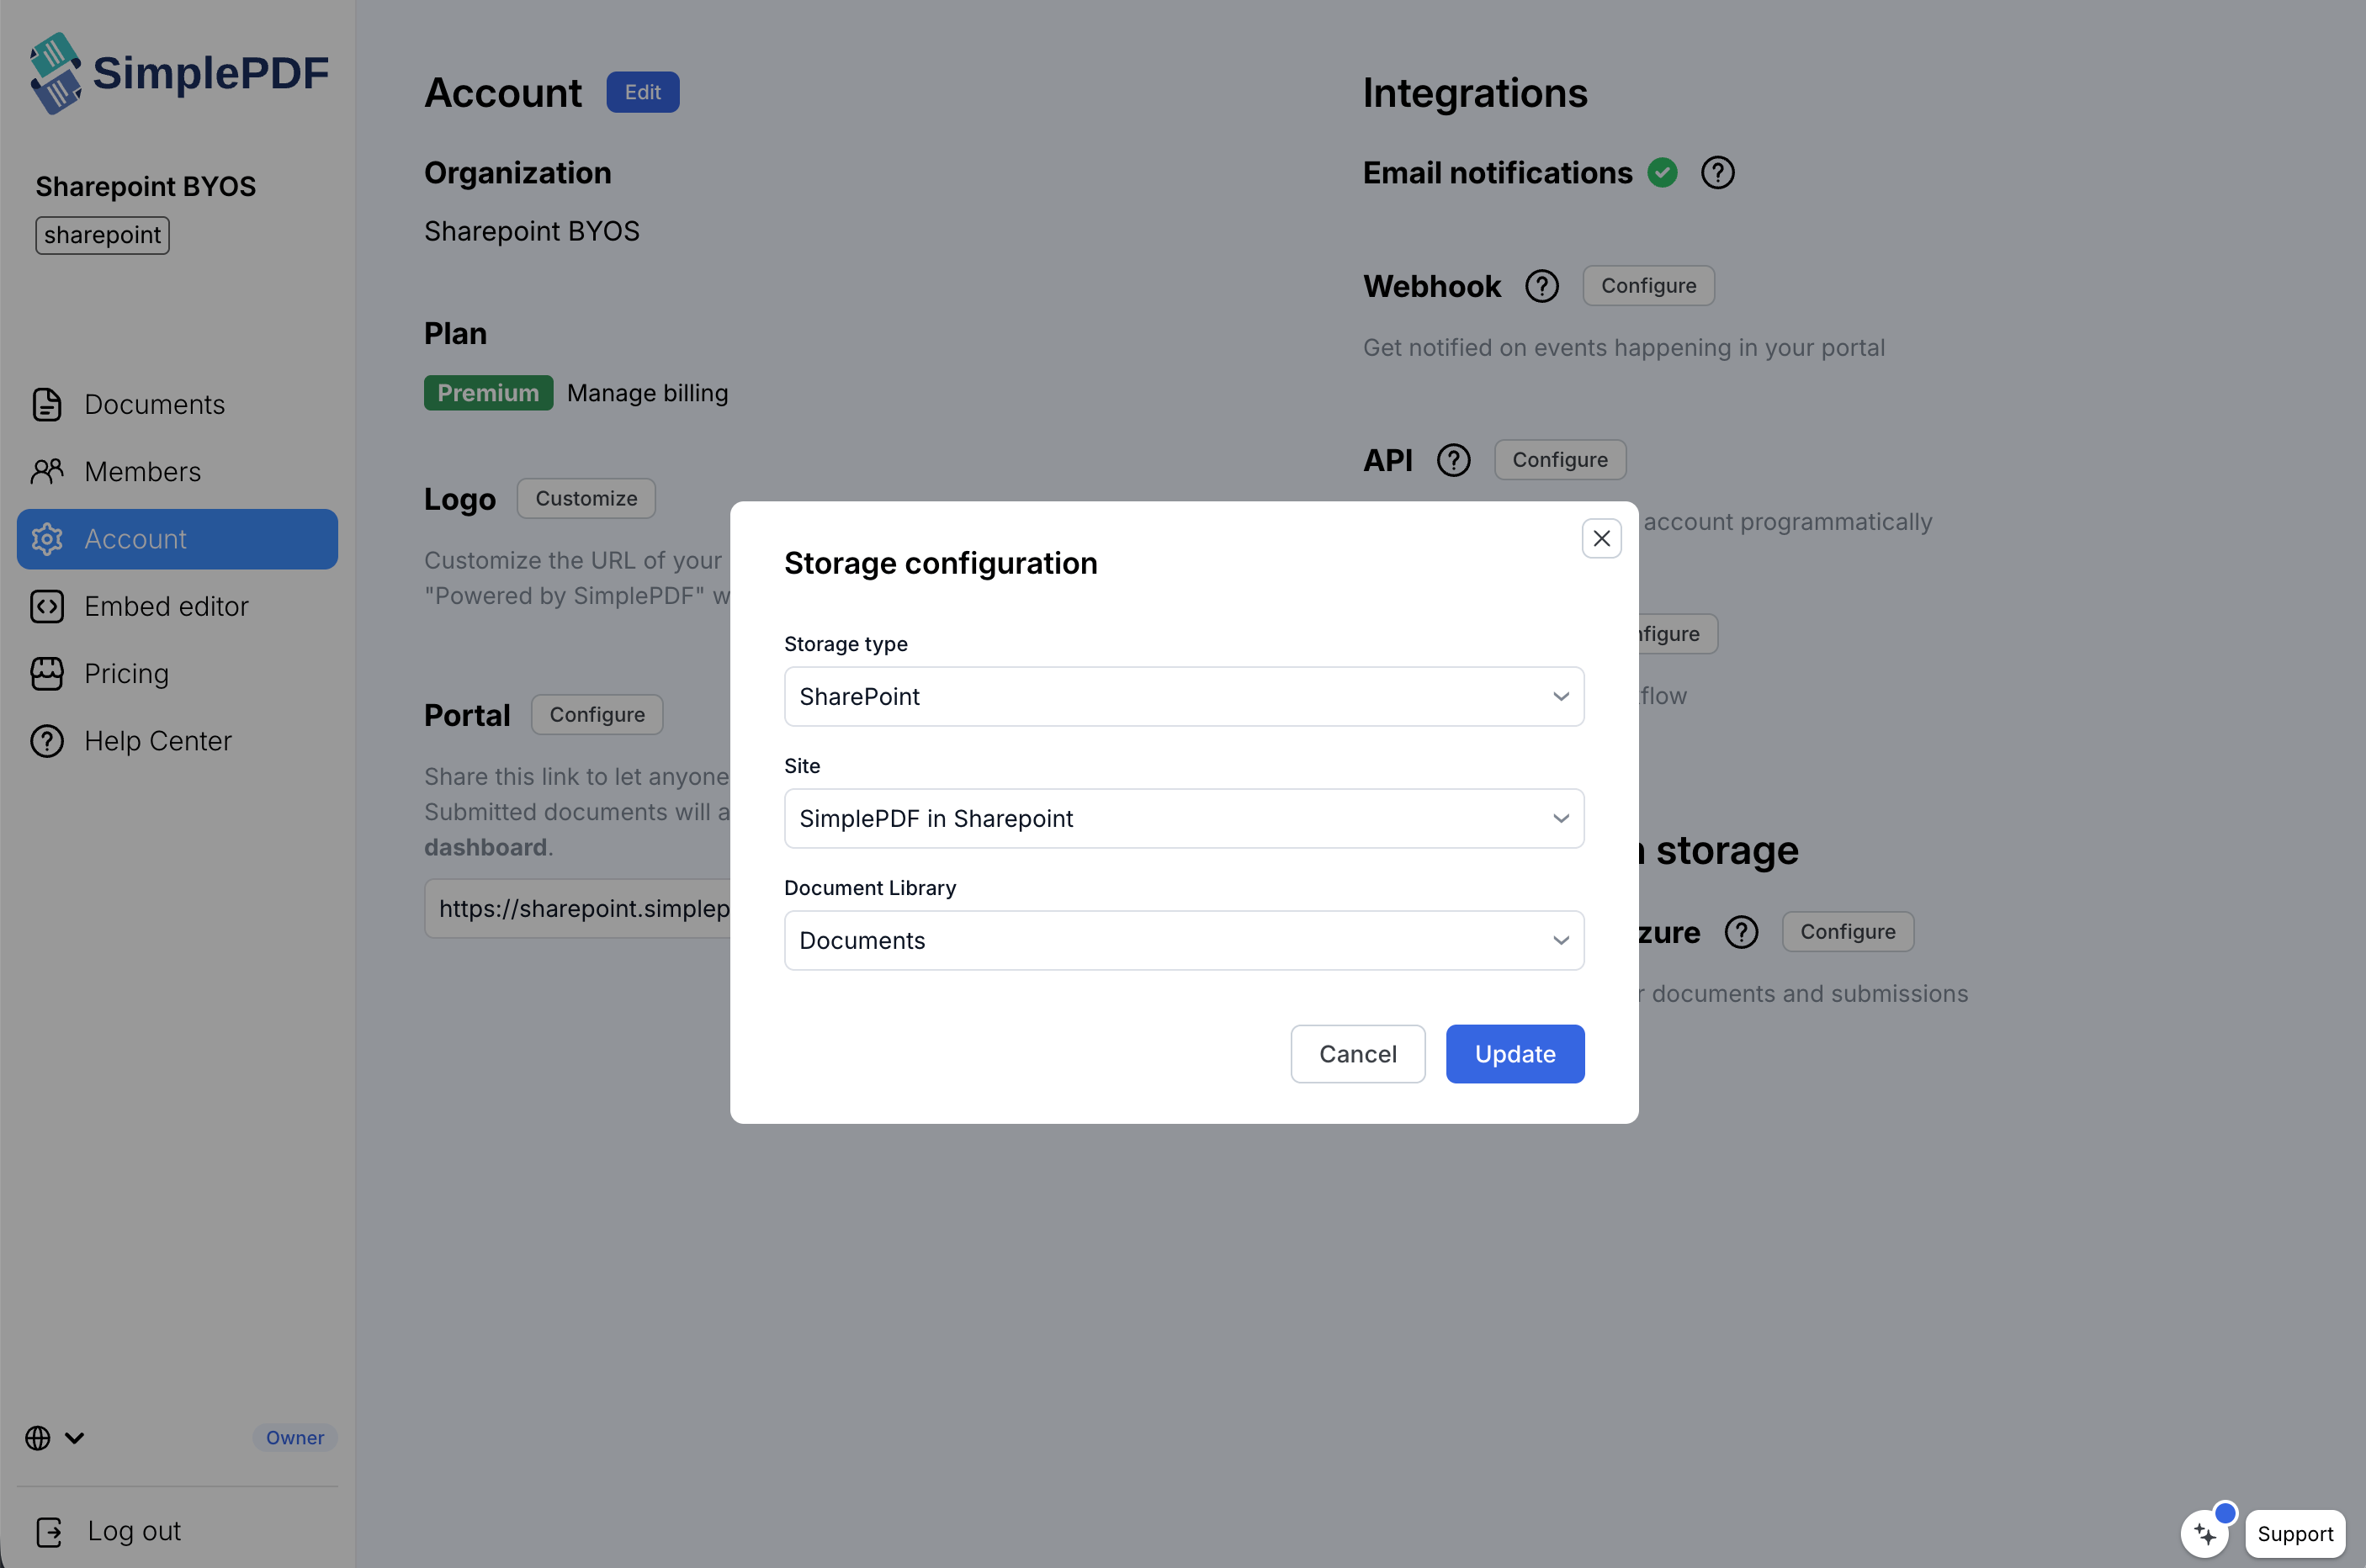
4. Select **SharePoint** from the storage type dropdown
5. Enter your three credentials: **Tenant ID**, **Client ID**, and **Client Secret**
6. Click **Authenticate with Microsoft**
7. Sign in with a user from your Microsoft 365 tenant and grant consent
## Step 3: Select a site and document library
After authenticating, you'll be redirected back to SimplePDF:
1. Select your **SharePoint site** from the dropdown
2. Select the **document library** where submissions should be stored
3. Click **Update**
SimplePDF runs a diagnostic test (upload + download) to verify the configuration. If both succeed, you're all set.
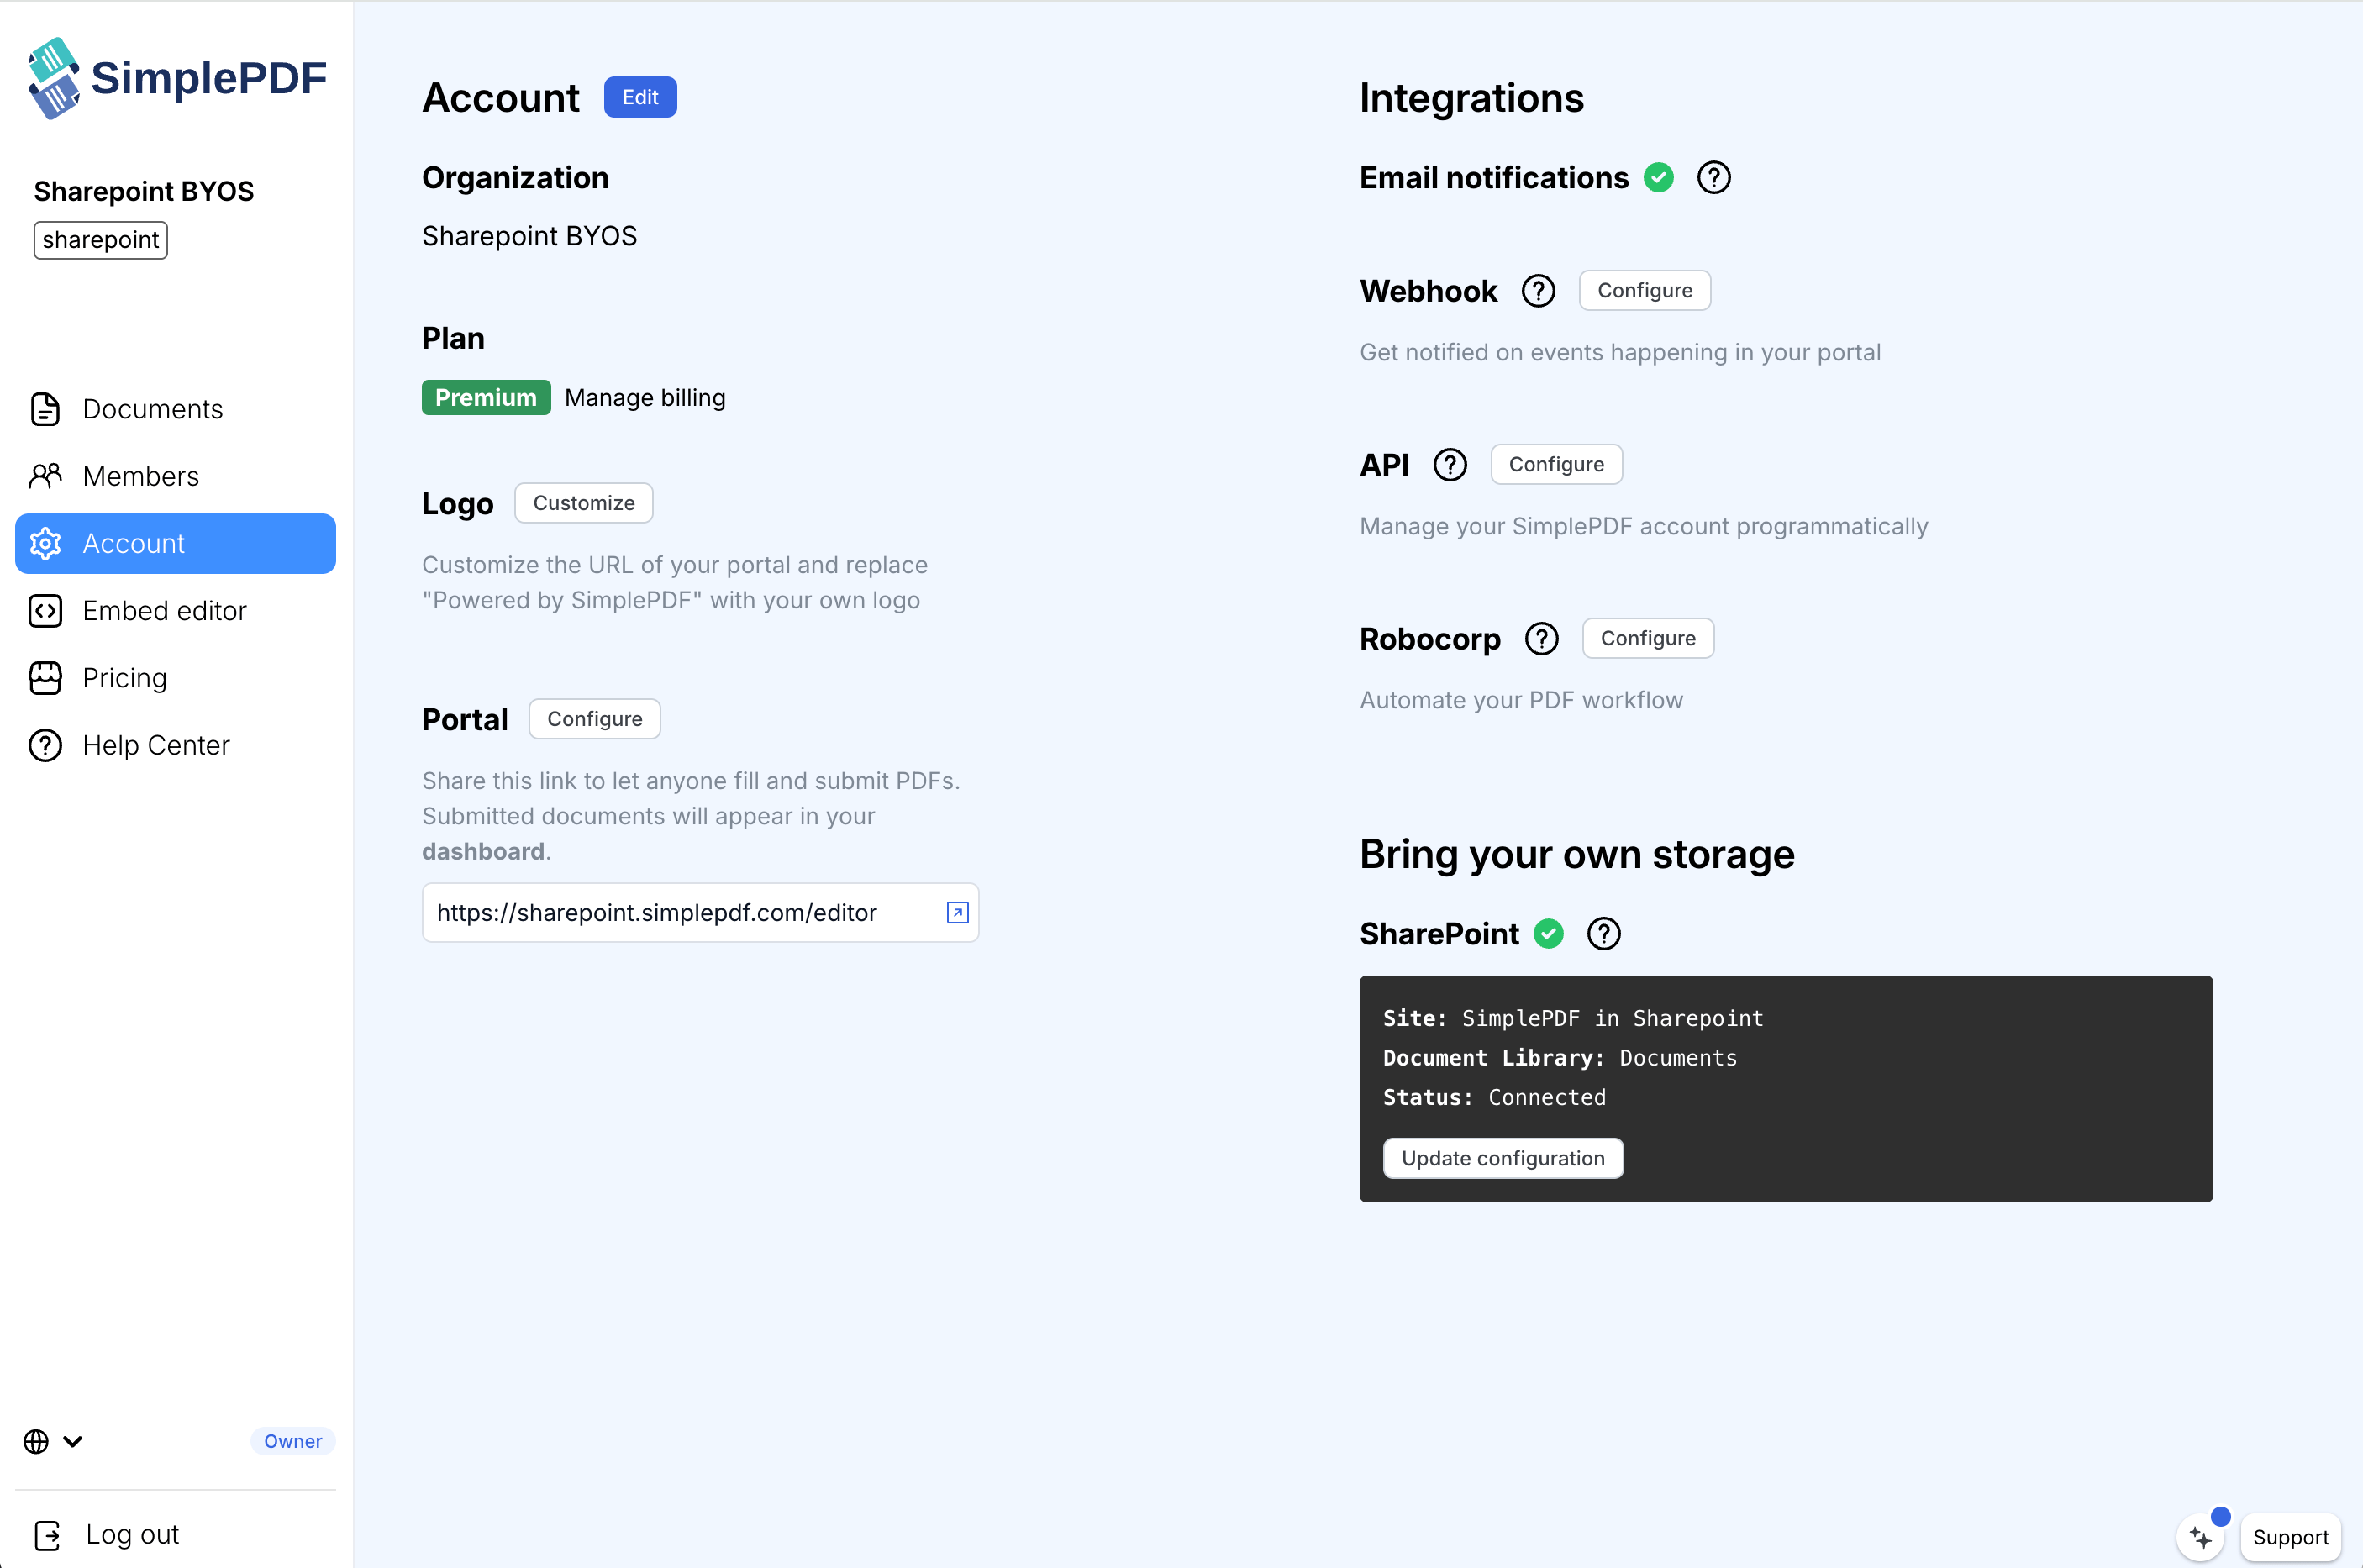
Submitted documents will be stored under the path `simple-pdf//` in your selected document library.
## Troubleshooting
**Sites dropdown is empty**: SharePoint search indexing may not be active on freshly provisioned tenants. Wait a few minutes and try again.
**Diagnostic test fails**: verify that the app has the correct API permissions (`Sites.Read.All`, `Files.ReadWrite.All`, `offline_access`) and that the user who consented has access to the selected site.
**Uploads suddenly stopped working**: your client secret may have expired. In the Azure Portal, go to your app's **Certificates & secrets** page, create a new secret, then re-authenticate in SimplePDF by clicking **Configure** on the storage section.
**"Inactive - upgrade to Premium" status**: SharePoint BYOS requires the Premium plan. S3 and Azure Blob Storage are available on the Pro plan.
**That's it! Your documents and submissions are now stored directly in your SharePoint document library.**
_If you have any questions, feel free to reach out to [support@simplepdf.com](mailto:support@simplepdf.com)_
---
# How to connect SimplePDF with Activepieces to automate your PDF forms processing
With email notifications in the [paid offering](/pricing) of SimplePDF, you can already get notified everytime your customers submit [PDF forms](/portal).
But what if you want to **connect SimplePDF** to **GoogleSheets** or **Discord** or **Pipedrive** or **[insert your favorite app]**?
You can do that thanks to the [powerful webhooks feature](/help/how-to/configure-webhooks-pdf-form-submissions) connected to [Activepieces](https://activepieces.com).
## Activepieces?
[Activepieces](https://activepieces.com) is a rapidly growing open-source Zapier alternative that allows you to connect plenty of applications using a no-code approach.
**Just like that, by connecting SimplePDF to Activepieces, you can unlock a world of possibilities.**
## An example with Google Sheets and Discord
We like examples at SimplePDF, so for this tutorial, we'll be walking you through connecting SimplePDF with Activepieces to:
1. **Trigger a flow on Activepieces every time there's a new PDF submission** in your portal, either by using [form links](/portal) or [embedding SimplePDF in your website](/embed)
2. **Add a new row in a Google Sheet** containing some informations about the submission: the _document name_, the _time of the submission_ and of course, the _link to see the submission_
3. **Send a message on a Discord channel**
### The final result
No need to scroll to the bottom of the article to see how it looks 👀 👇
_[SimplePDF form](https://dundermifflin.simplepdf.com/form/d8d57ec7-f3e9-4fc9-8cc5-4a92c02d30d0), [Google Sheet](https://docs.google.com/spreadsheets/d/1-XMxucyO4Yxe0FoE79HfF66ZGHq42D6Qfii73Yug1Oc) and [Discord channel](https://discord.com/channels/1049358940481273856/1078953886905290792) visible in the video_
## Step-by-step guide to set it up
### 1. Setting up the Activepieces flow
1. Log into your Activepieces account (or [create one](https://www.activepieces.com/plans)).
2. Create a new flow.
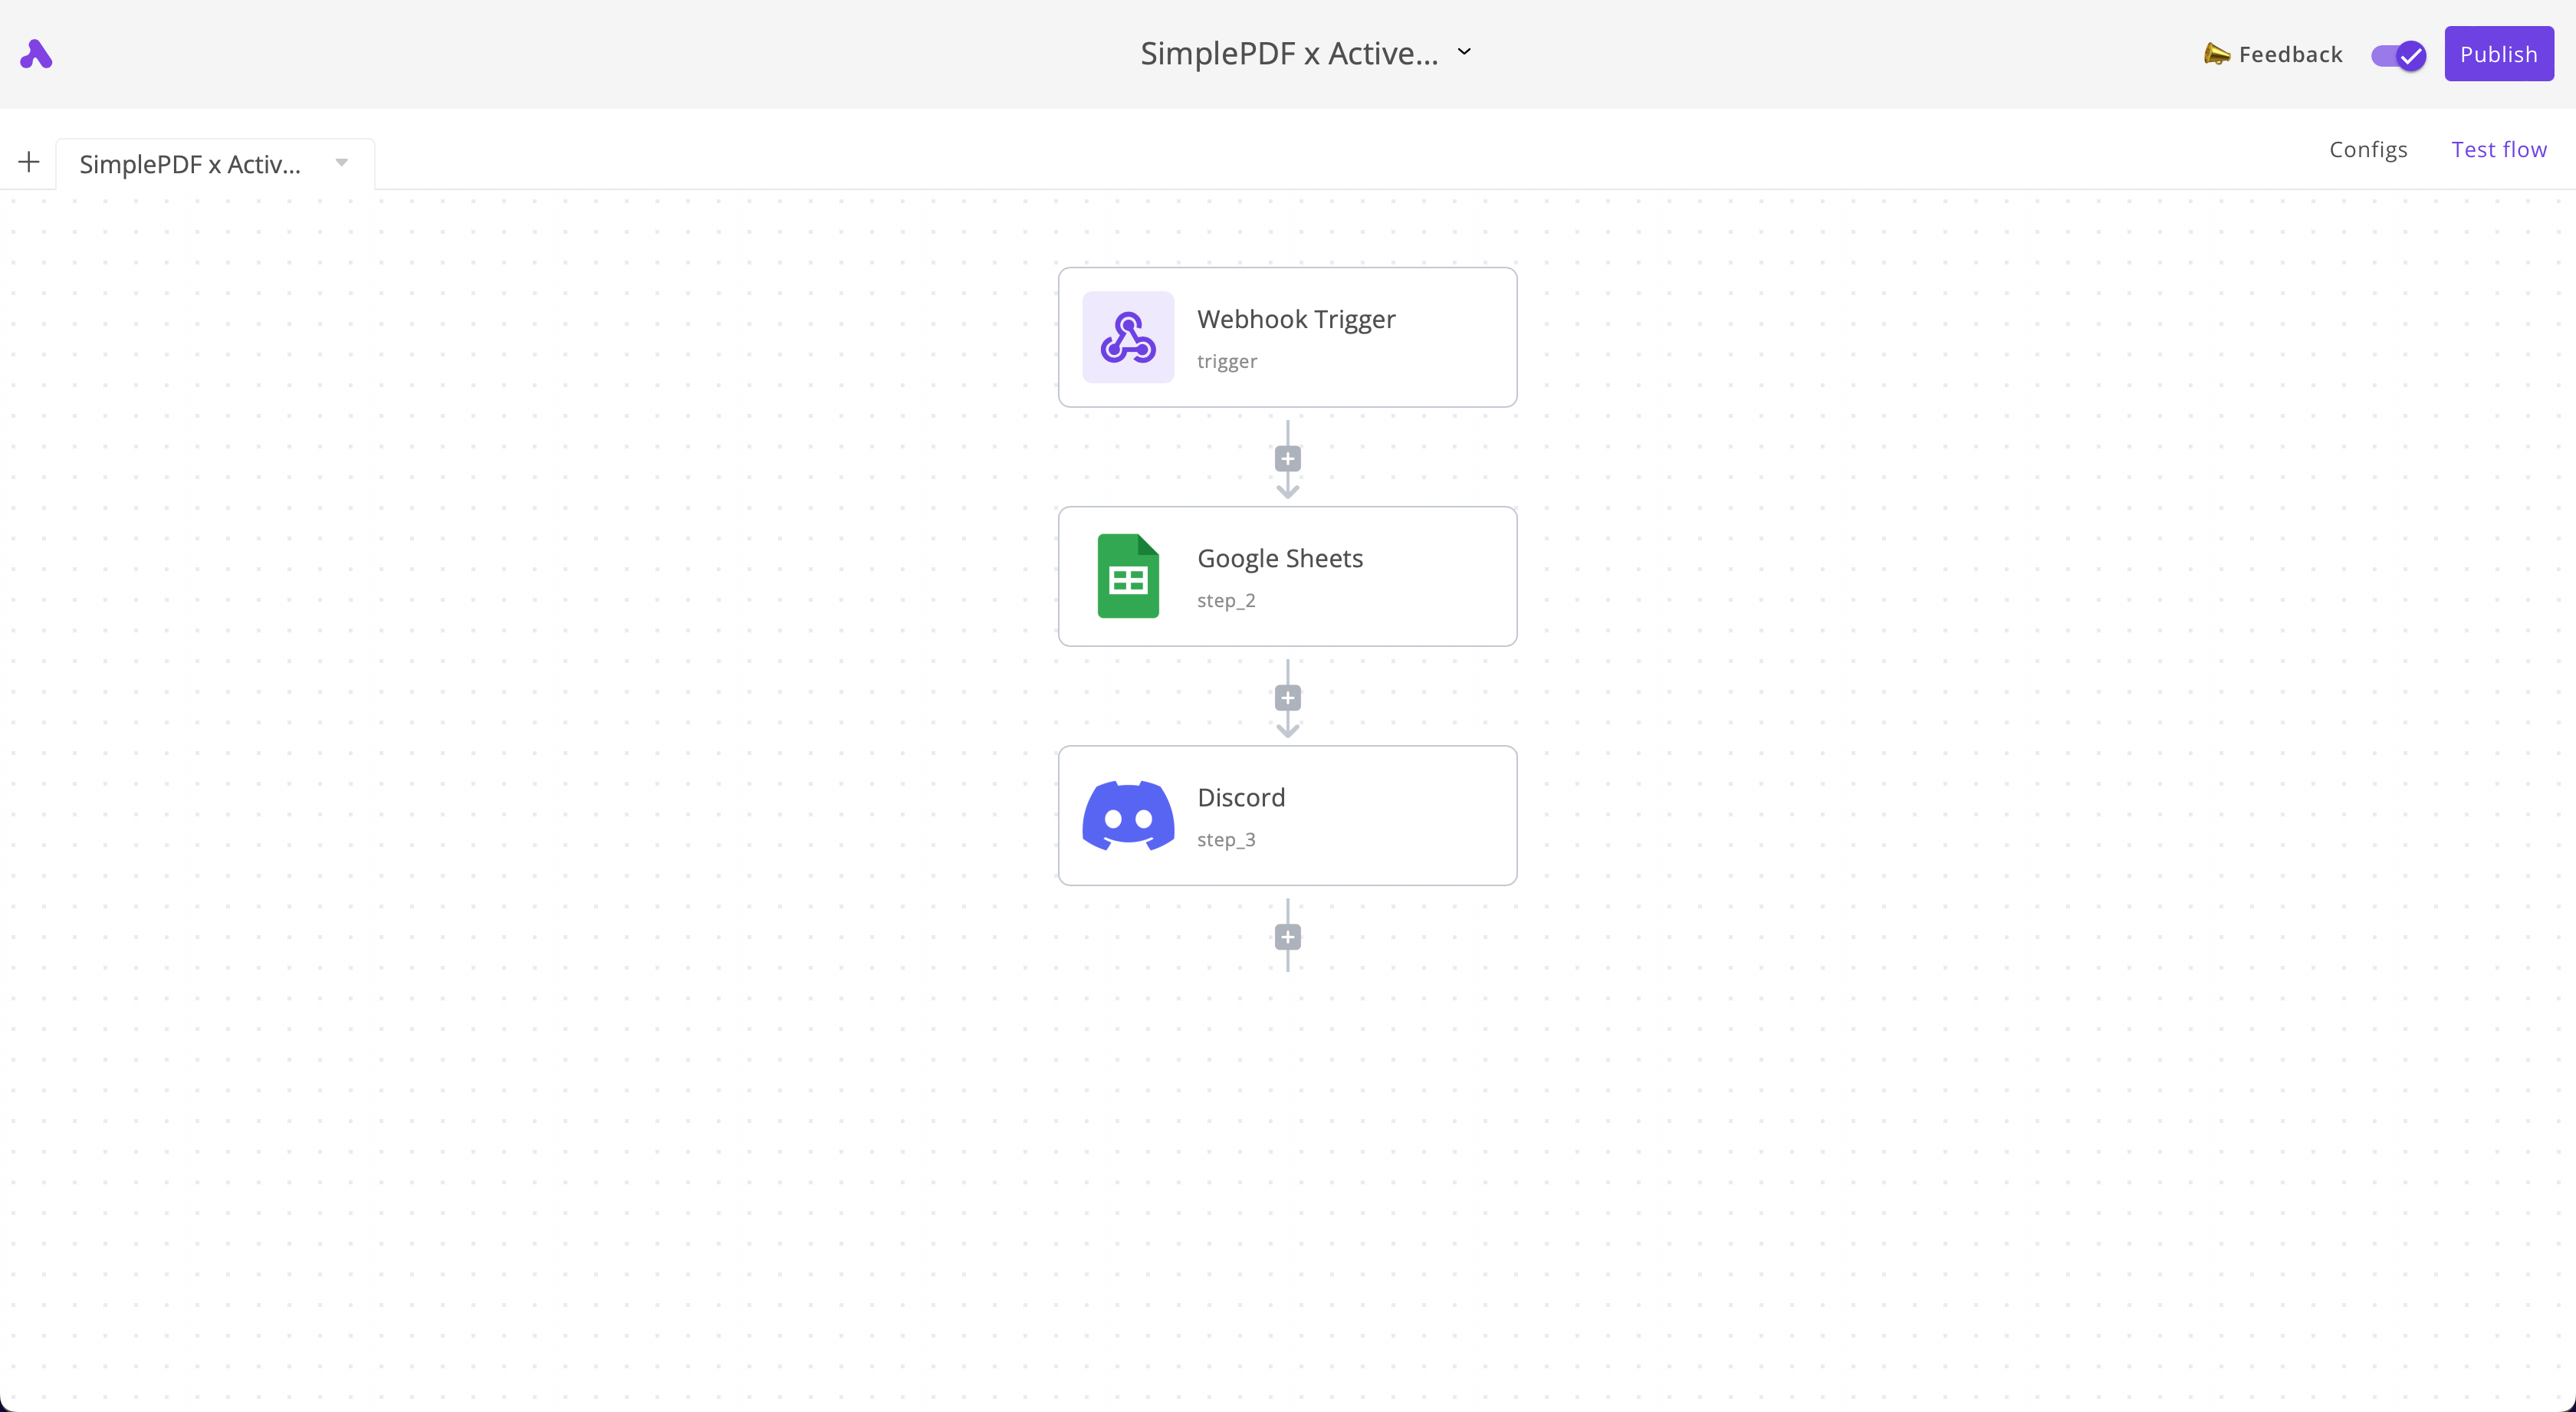
3. Create three steps in that order:
- **Webhook trigger**: it will be receiving the incoming webhook notifications from SimplePDF
- **Google Sheets**: a new row will be added for each new PDF submission
- **Discord**: we will get a notification in Discord for each new PDF submission
Your flow should looks as follows:
### 2. Configuring the 1st step of the flow: Webhook trigger
1. Click on the **Webhook trigger** and copy the webhook URL
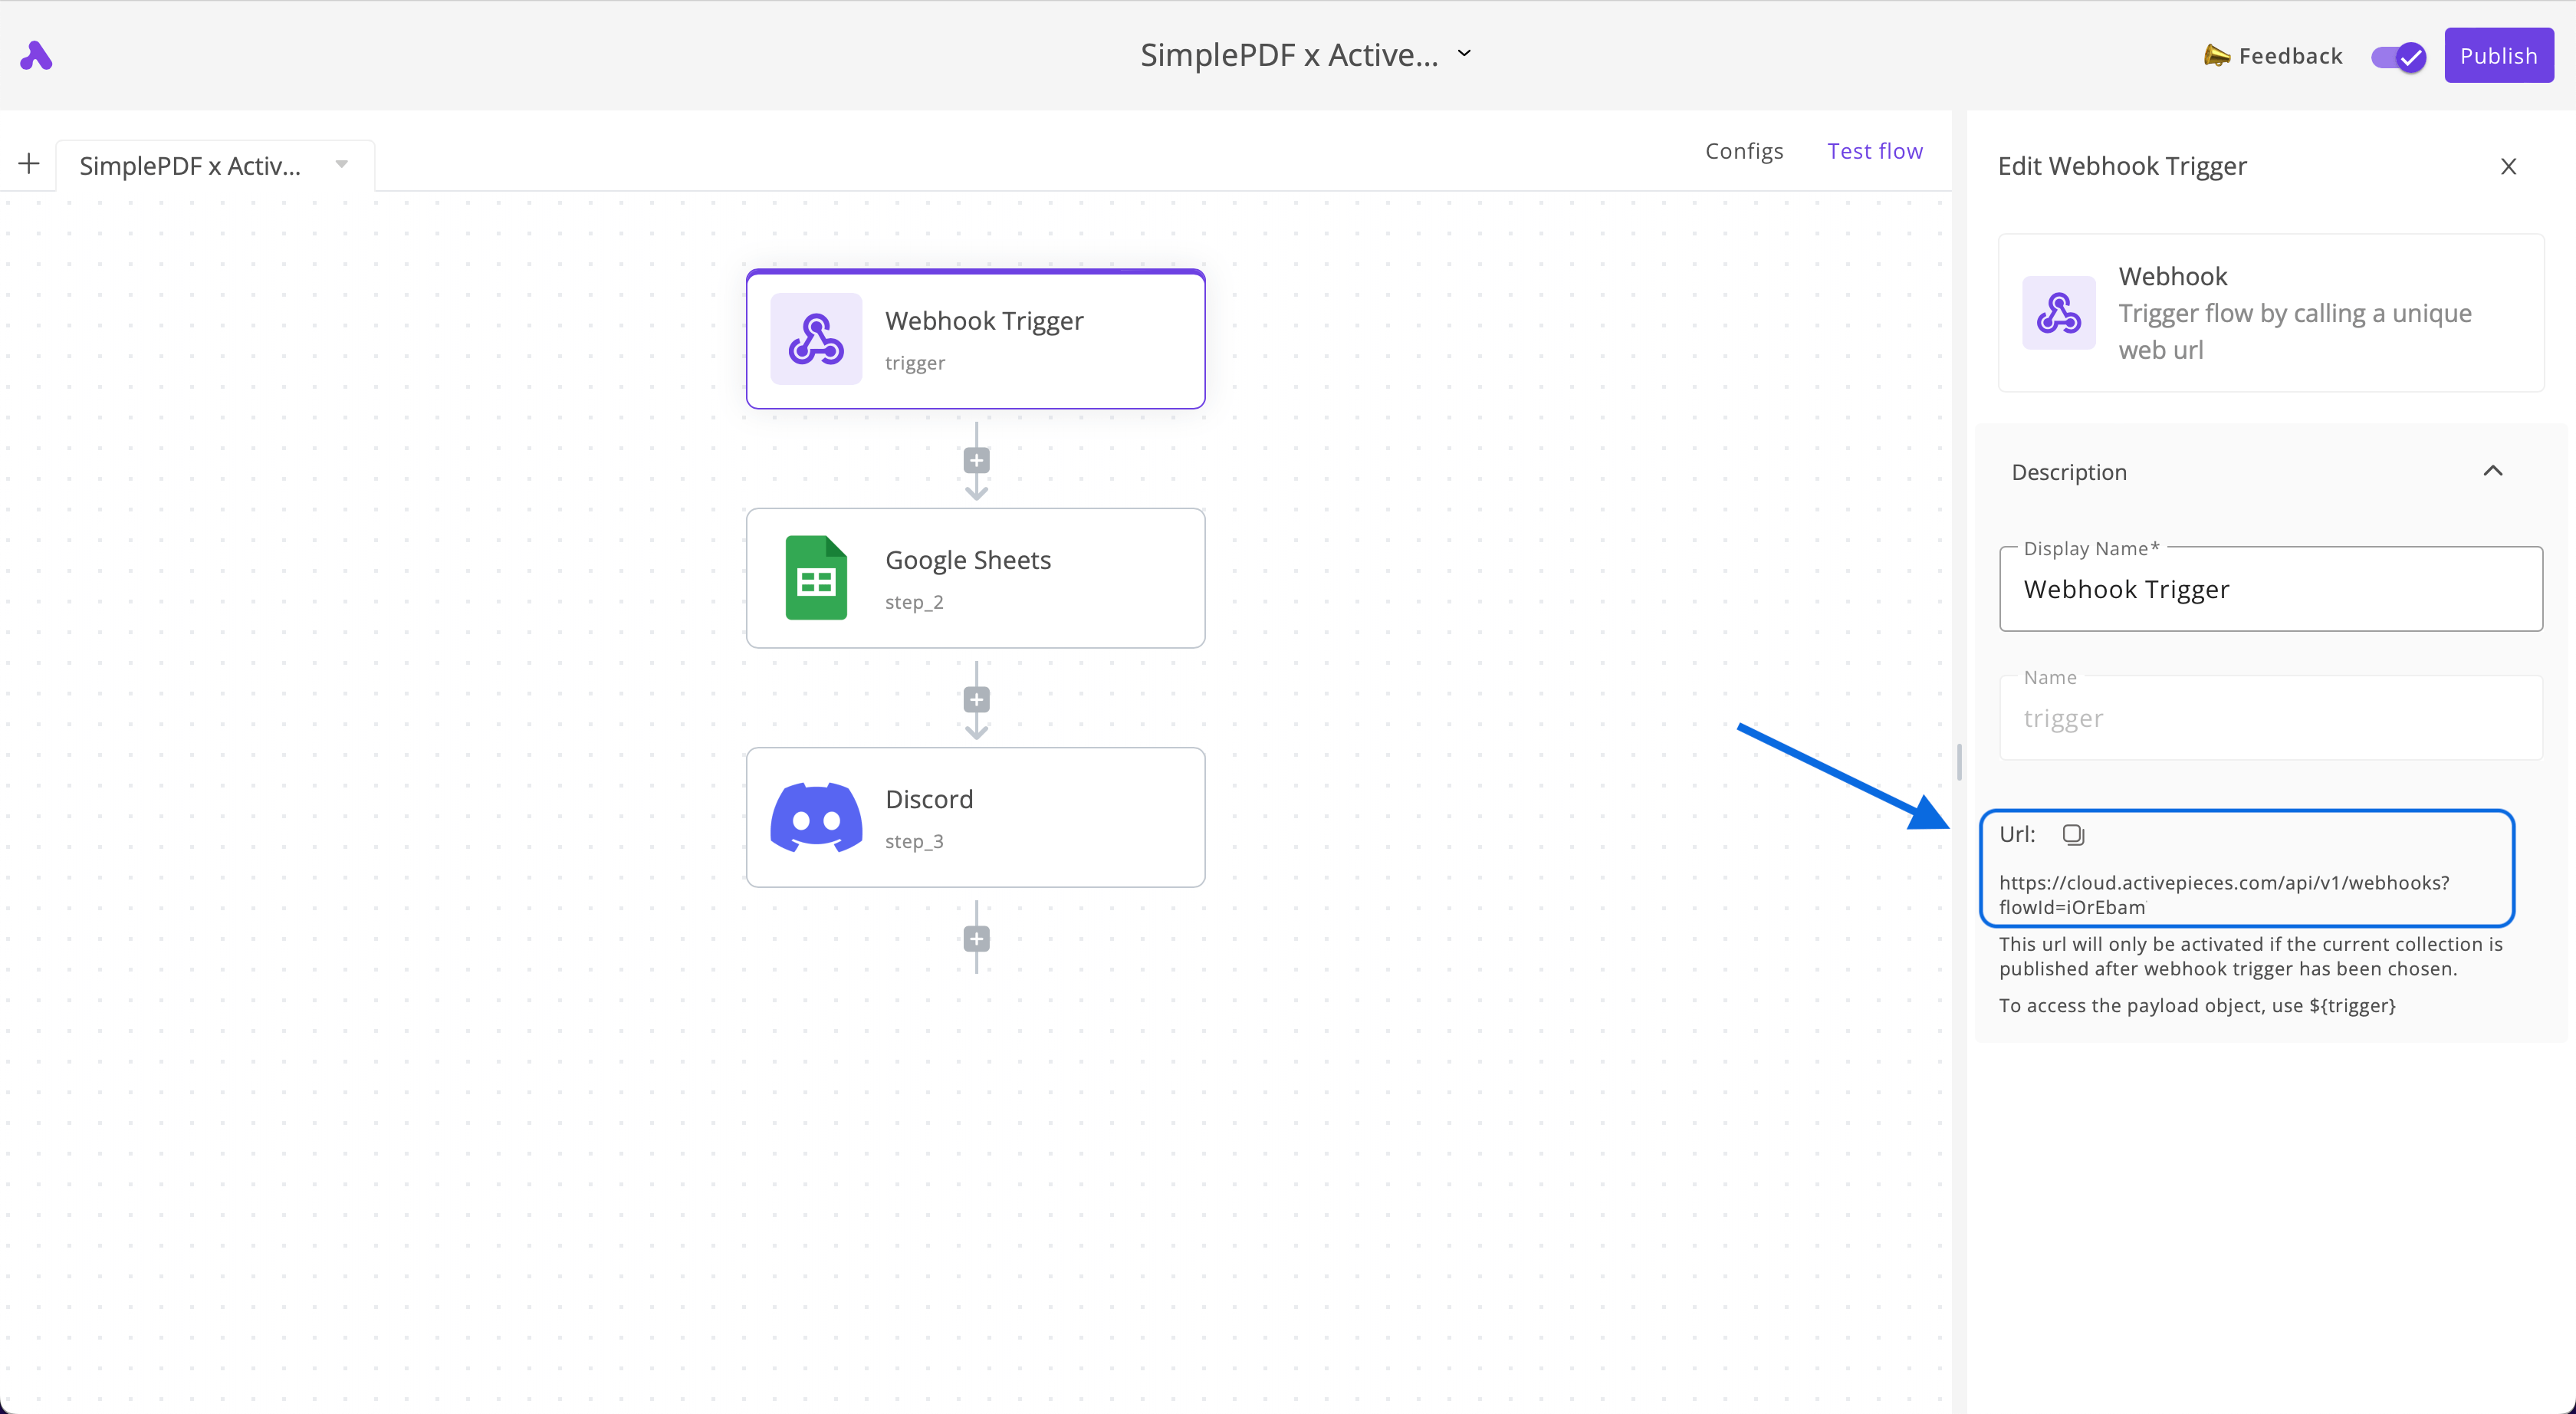
2. **Add the webhook URL to your webhook configuration in your account**

_You can follow this guide: [configure Webhooks to get notified of new PDF form submissions](/help/how-to/configure-webhooks-pdf-form-submissions) for more details on how to configure Webhooks in SimplePDF._
### 3. Configuring the 2nd step of the flow: Google Sheets
1. Create a Google sheet where you want the submissions to appear
_We created [this Google Sheet](https://docs.google.com/spreadsheets/d/1-XMxucyO4Yxe0FoE79HfF66ZGHq42D6Qfii73Yug1Oc) for this example_
2. Select the action `Insert Row`, connect to your Google Sheets account and select the **Sheet** you want to add the submissions to:
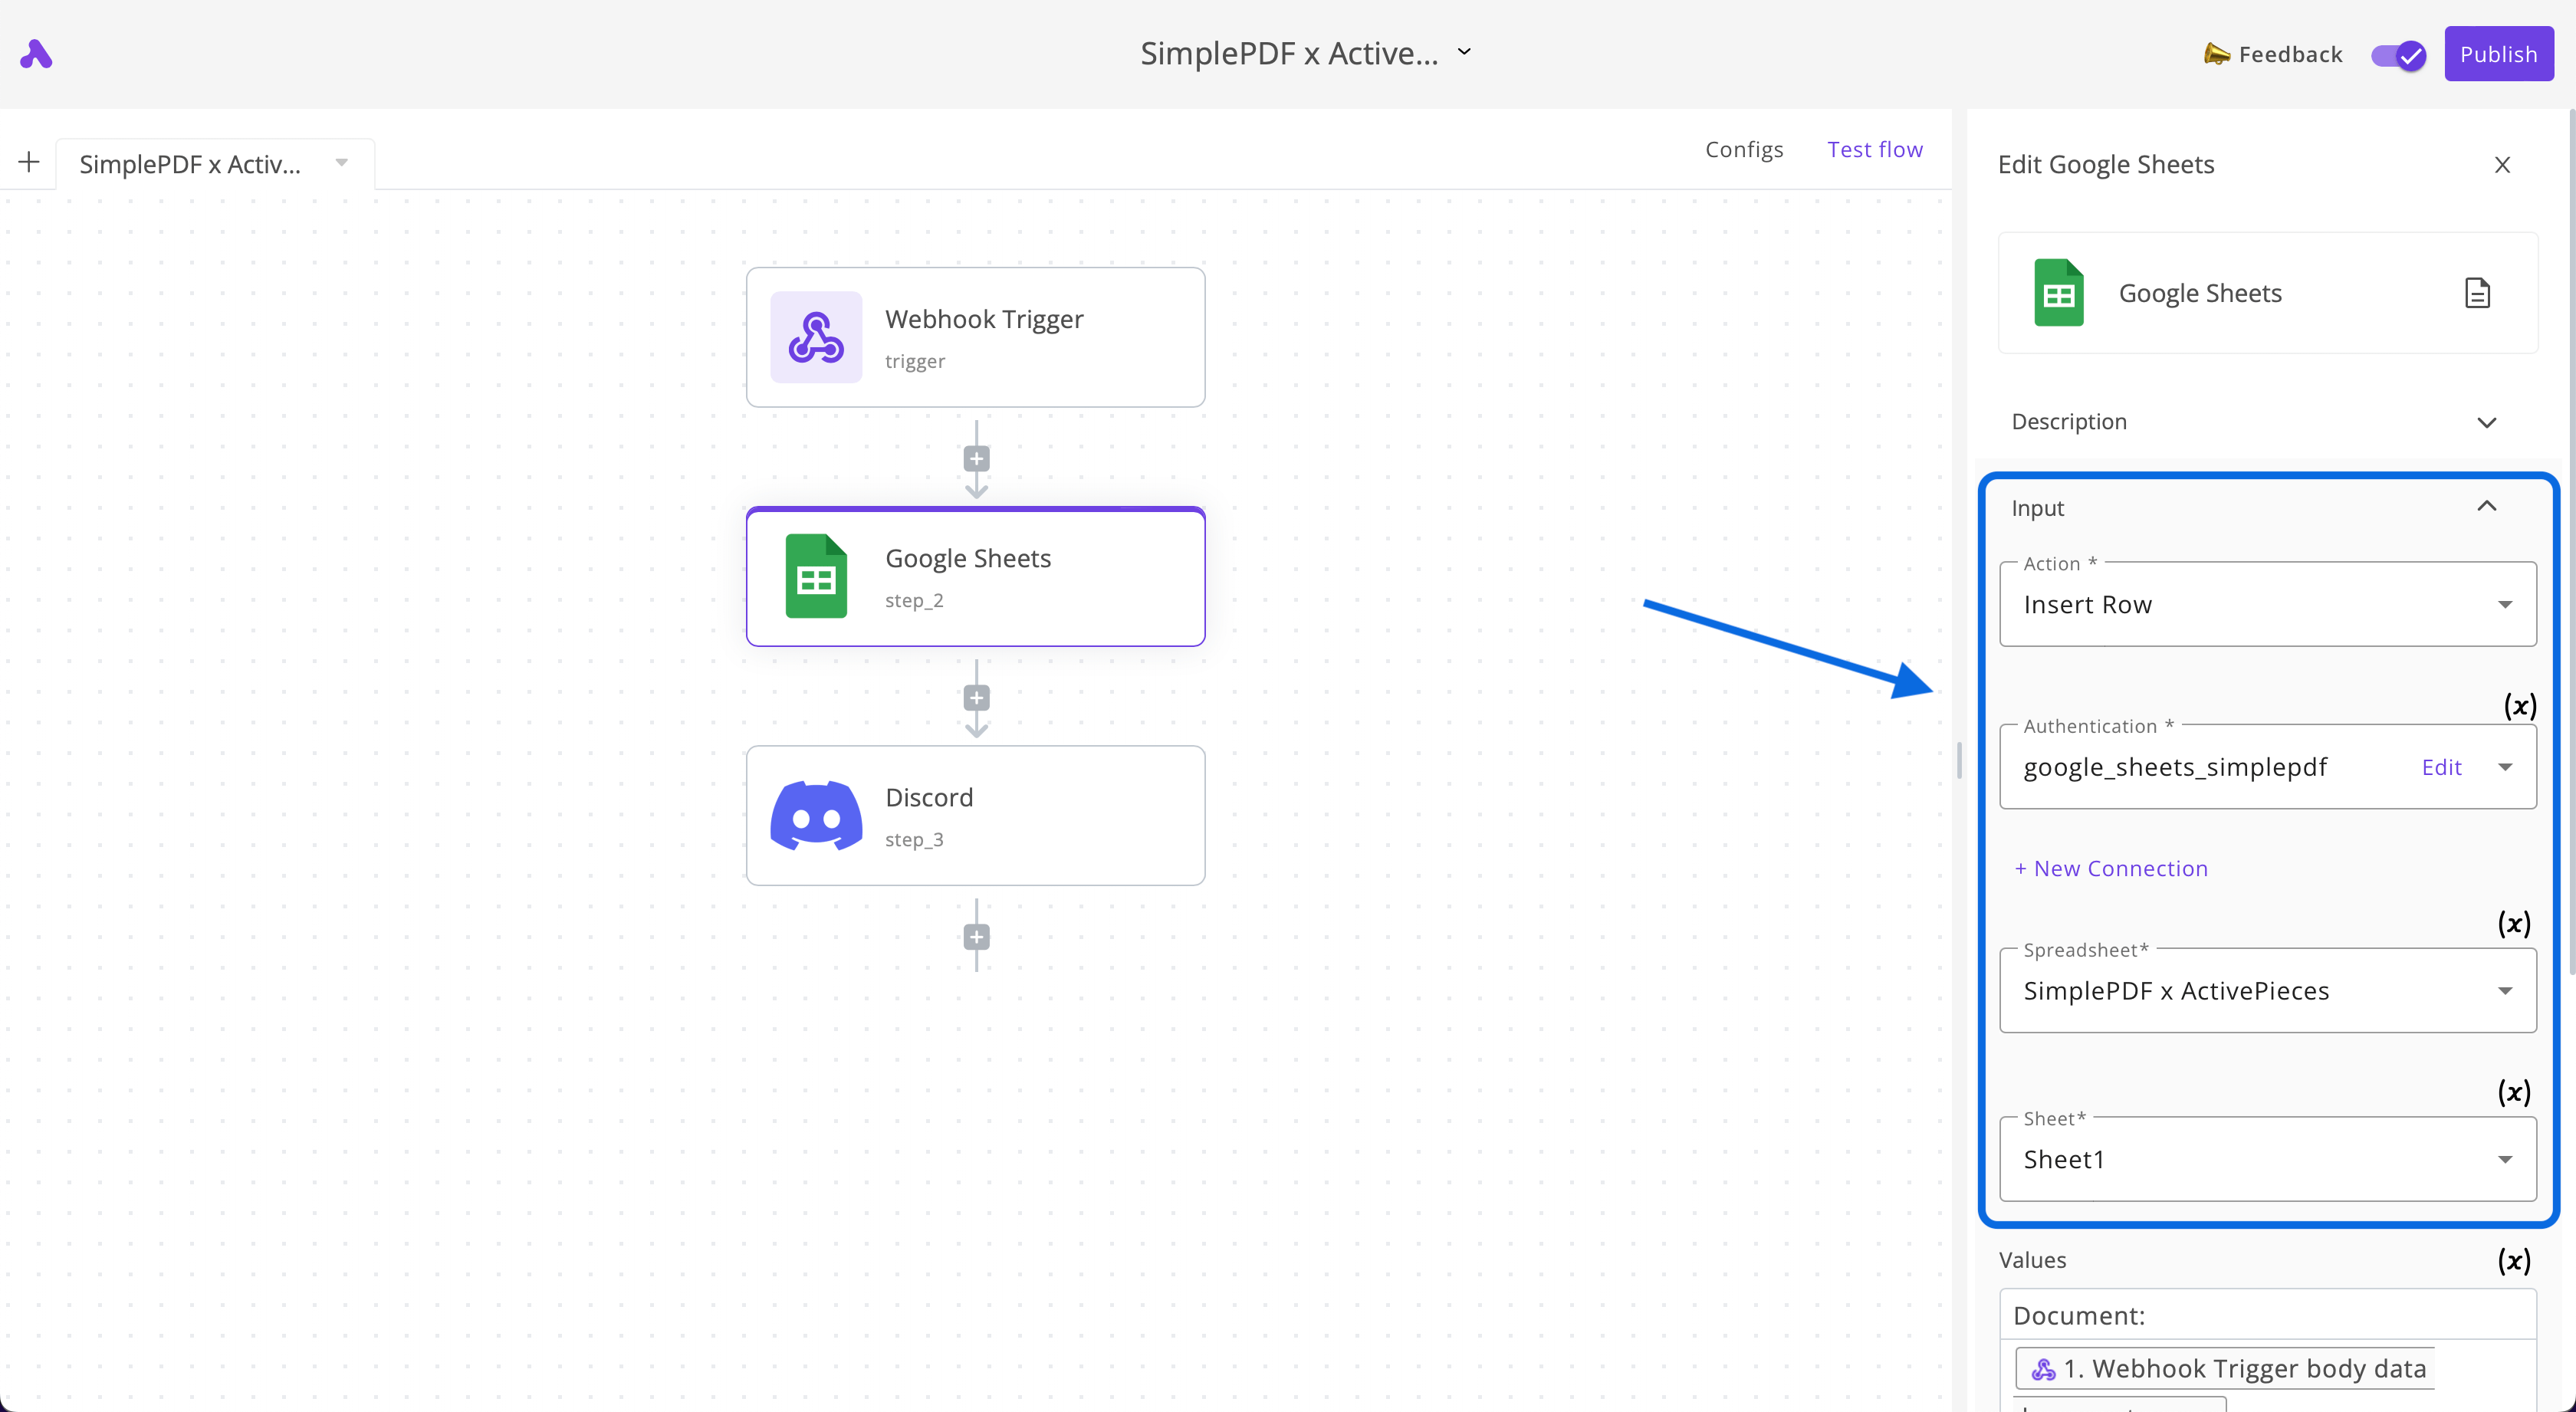
3. In the **Values** section of the **Google Sheet** piece, enter the following values:
_One line per value_
```
Document:
${trigger.body.data.document.name}
Submission URL:
${trigger.body.data.submission.url}
Submitted at:
${trigger.body.data.submission.submitted_at}
```
_Use the `Data to insert` > `Webhook Trigger` button for the values starting with `$`_
If you followed our example, your **values** should look as follows:

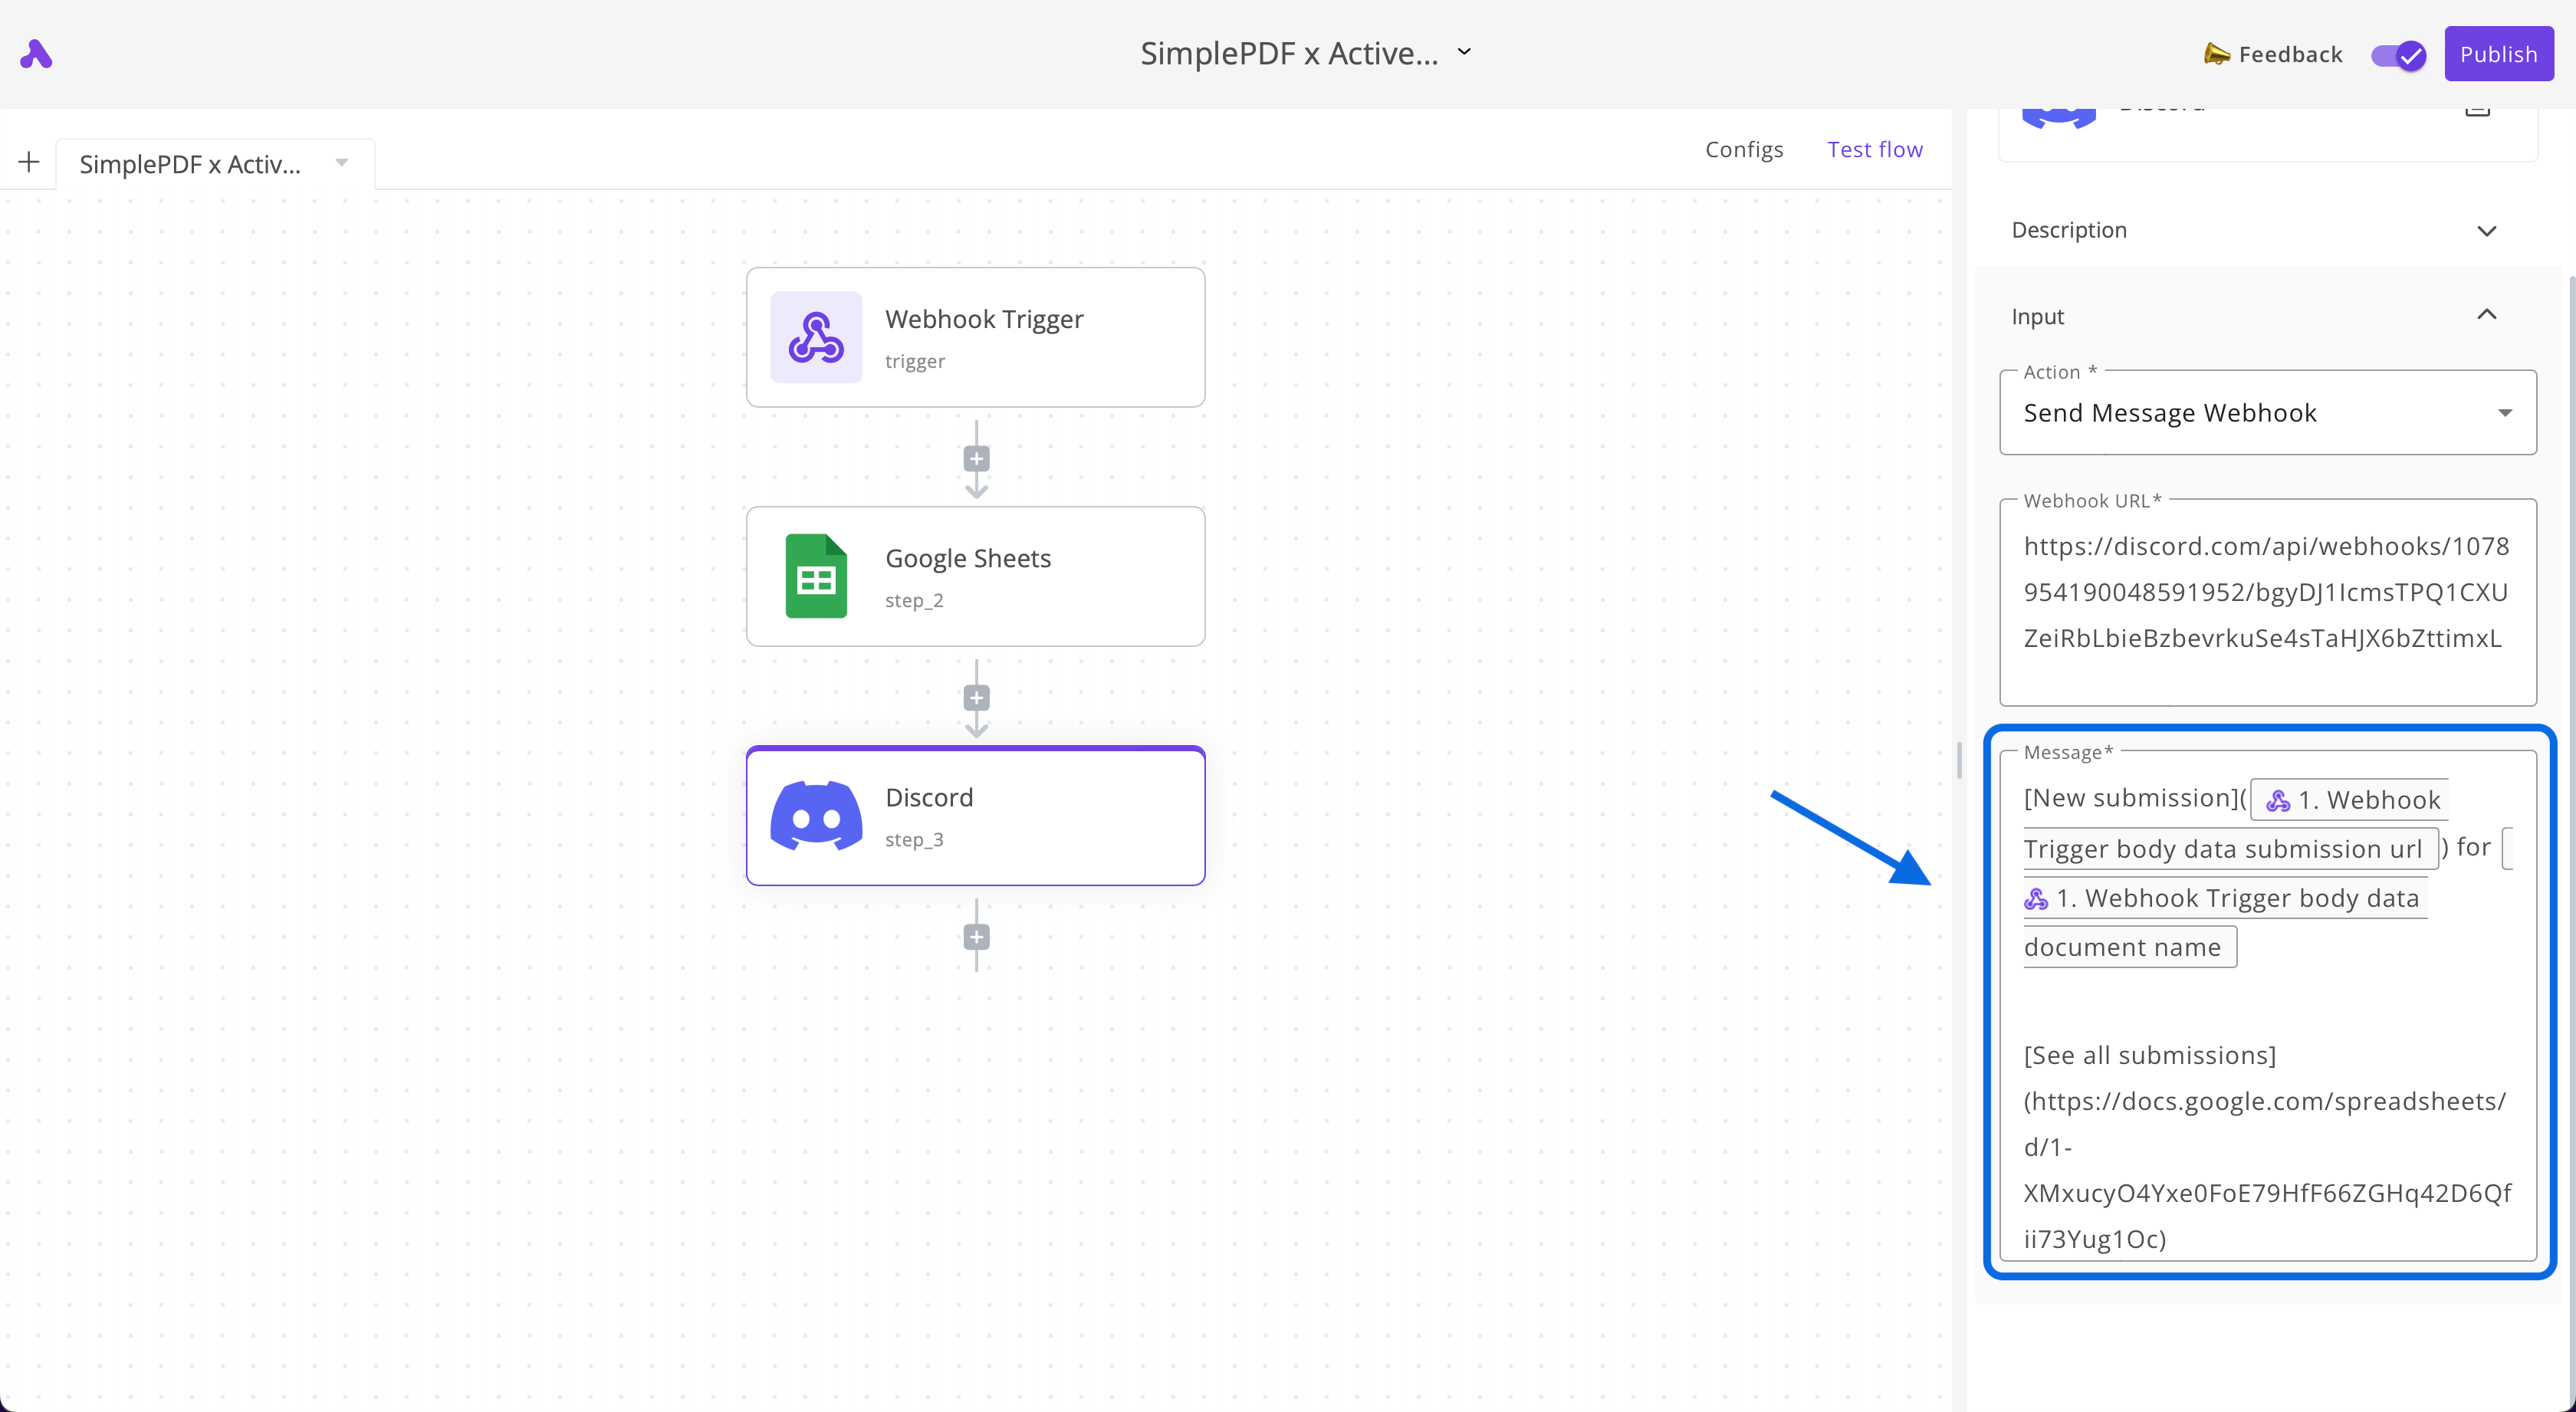
### 4. Configuring the 3rd step of the flow: Discord
1. Create a **webhook URL** for the Discord channel where you want to receive notifications
_Follow [this guide](https://support.discord.com/hc/en-us/articles/228383668-Intro-to-Webhooks) by Discord to set up webhooks for your preferred channel_
2. Select the action `Send Message Webhook`
3. Paste the **webhook URL** that you retrieved in the first step
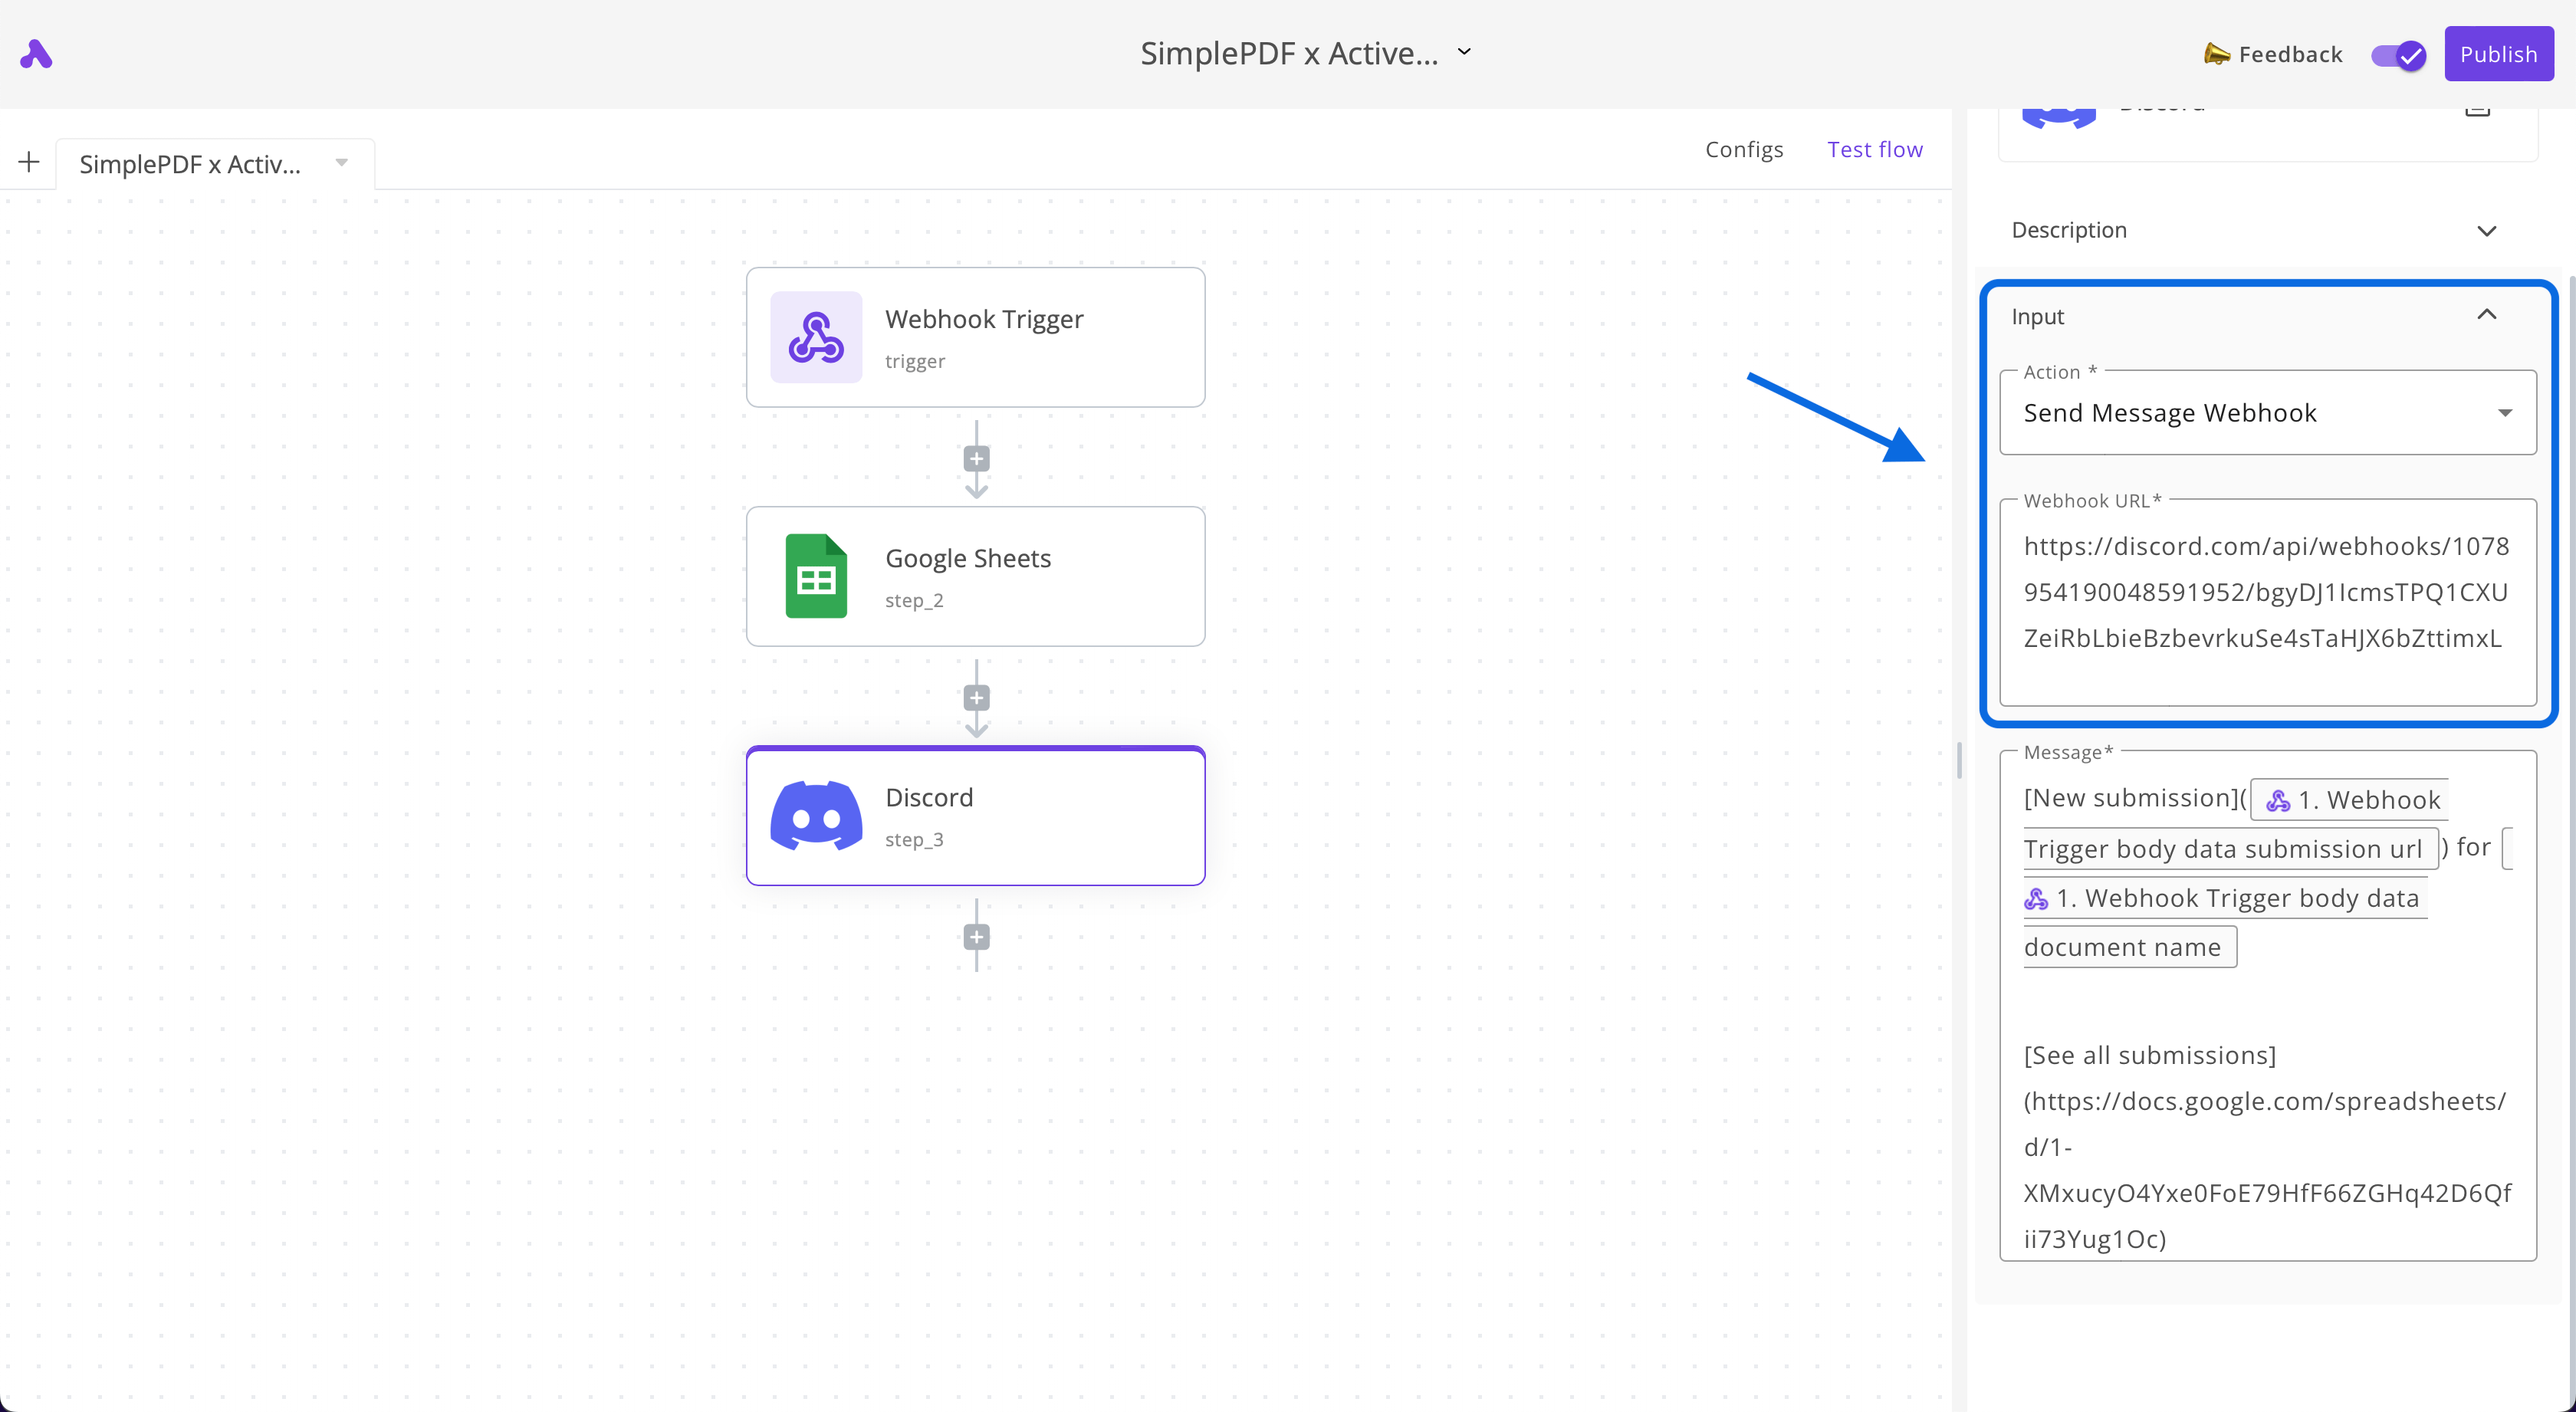
4. In the **Message** section of the **Discord** piece, enter the following:
```
[New submission](${trigger.body.data.submission.url}) for ${trigger.body.data.document.name}
[See all submissions](LINK_TO_YOUR_GOOGLE_SHEET)
```
_Replace LINK_TO_YOUR_GOOGLE_SHEET with your own and use the `Data to insert` > `Webhook Trigger` button for the values starting with `$`_
## Conclusion
That's it! We now automatically get notified of any new SimplePDF submission on **Discord** and
a new row with information about this submission is added in **Google Sheets**.
### Try it yourself
1. [Submit this form](https://dundermifflin.simplepdf.com/form/d8d57ec7-f3e9-4fc9-8cc5-4a92c02d30d0) belonging to DunderMifflin (neither the form nor the company are a real one, so you don't risk messing anything up!)
2. Join our [Discord](https://discord.com/channels/1049358940481273856/1078953886905290792) and see your submission appear
3. Have a look at the [Google Sheets](https://docs.google.com/spreadsheets/d/1-XMxucyO4Yxe0FoE79HfF66ZGHq42D6Qfii73Yug1Oc) that lists all submissions (including your own if you submitted it!)
_If you have any questions, feel free to reach out to [support@simplepdf.com](mailto:support@simplepdf.com)_
---
# How to customize the editor and add your own branding with SimplePDF
You have embed SimplePDF in your own website or [React app](/help/how-to/add-simple-pdf-editor-to-react-next-app) and you want to tailor it to your use-case.
The obvious first need is to **use your own logo**
And you may be **using SimplePDF for one of the following use-cases:**
- Offer a **fill & sign** PDF documents
- Allow **annotating documents** before sending them to you
- Use it to stitch documents together (**"merge PDF"**)
- A **RAG dataloader** for your **AI** work-flow, [uploading automatically the document to your storage](/help/how-to/use-your-own-s3-bucket-storage-for-pdf-form-submissions)
In that case, you won't need most of the other features of the PDF editor and you may want to hide certain tools and options, keeping it simple and focused on your specific use-case.
_Branding the PDF editor is available with the [PRO plan](https://simplepdf.com/pricing)_
1. Log into your account and head over to the **Account** page
2. Click the `Edit` button next to the "Account" heading:
3. In the modal, upload your `logo` (jpeg, png) and/or `loading` animation (gif):

4. Click `Update`
_Customizing the PDF editor is available with the [PRO plan](https://simplepdf.com/pricing)_
1. Log into your account and head over to the Embed editor page
2. In the configuration section you will be able to modify and tweak the configuration of the editor.
_Scroll below the screenshot to see the list of available options_

- `Sidebar`: show / hide the sidebar entirely. When disabled, the editor displays only the PDF document without any sidebar, providing a complete white-labelling experience. All actions (page navigation, tool selection, submission) can still be performed programmatically using the [widget's programmatic controls](https://github.com/SimplePDF/simplepdf-embed?tab=readme-ov-file#programmatic-page-control).
- `Logo location`: whether the logo should be displayed at the top or bottom of the sidebar when in full screen
- `Submission modal`: when documents are submitted through your portal, a confirmation modal will popup to tell your users that they can now close the window. You can choose to hide this modal if you have implemented your own by listening to **[Iframe events](https://github.com/SimplePDF/simplepdf-embed/blob/main/documentation/IFRAME.md#events-sent-by-the-iframe)**
- `Text`: show / hide the text tool
- `Checkbox`: show / hide the checkbox tool
- `Signature`: show / hide the signature tool
- `Remember between submissions`: when enabled, the signature of the user is stored on the local device and is automatically filled for any new signature field.
- `Add timestamp to signatures`: when enabled, a "Signed on [date] [time] [timezone]" text is added below each signature when the document is submitted.
- `Allow drawn signature`: when enabled, users can draw their signature using a mouse or touch input. Disable this if you only want typed signatures.
- `Allow typed signature`: when enabled, users can type their name to create a signature. Disable this if you need handwritten signatures only (useful for compliance with regulations requiring non-typed signatures).
- `Picture`: show / hide the picture tool
- `Boxed text`: show / hide the boxed text tool
- `Allow moving, rotating, deleting pages`: when enabled, buttons next to each pages are displayed allowing to move the pages around, rotate and delete them.
- `Allow adding new pages`: when enabled, tyour users can add additional PDF documents using the `+` in the document preview sidebar.
- `Allow downloading a copy`: when enabled, your users can choose to download a copy of the document that they are submitting.
- `Flatten forms`: when enabled, fields present on the form will be be editable after submitting. This is especially useful if you want to prevent future edition of the fields once the document is submitted.
That's it! You now have the perfect editor, nicely blending in your own website or app!
_If you have any questions, feel free to reach out to [support@simplepdf.com](mailto:support@simplepdf.com)_
---
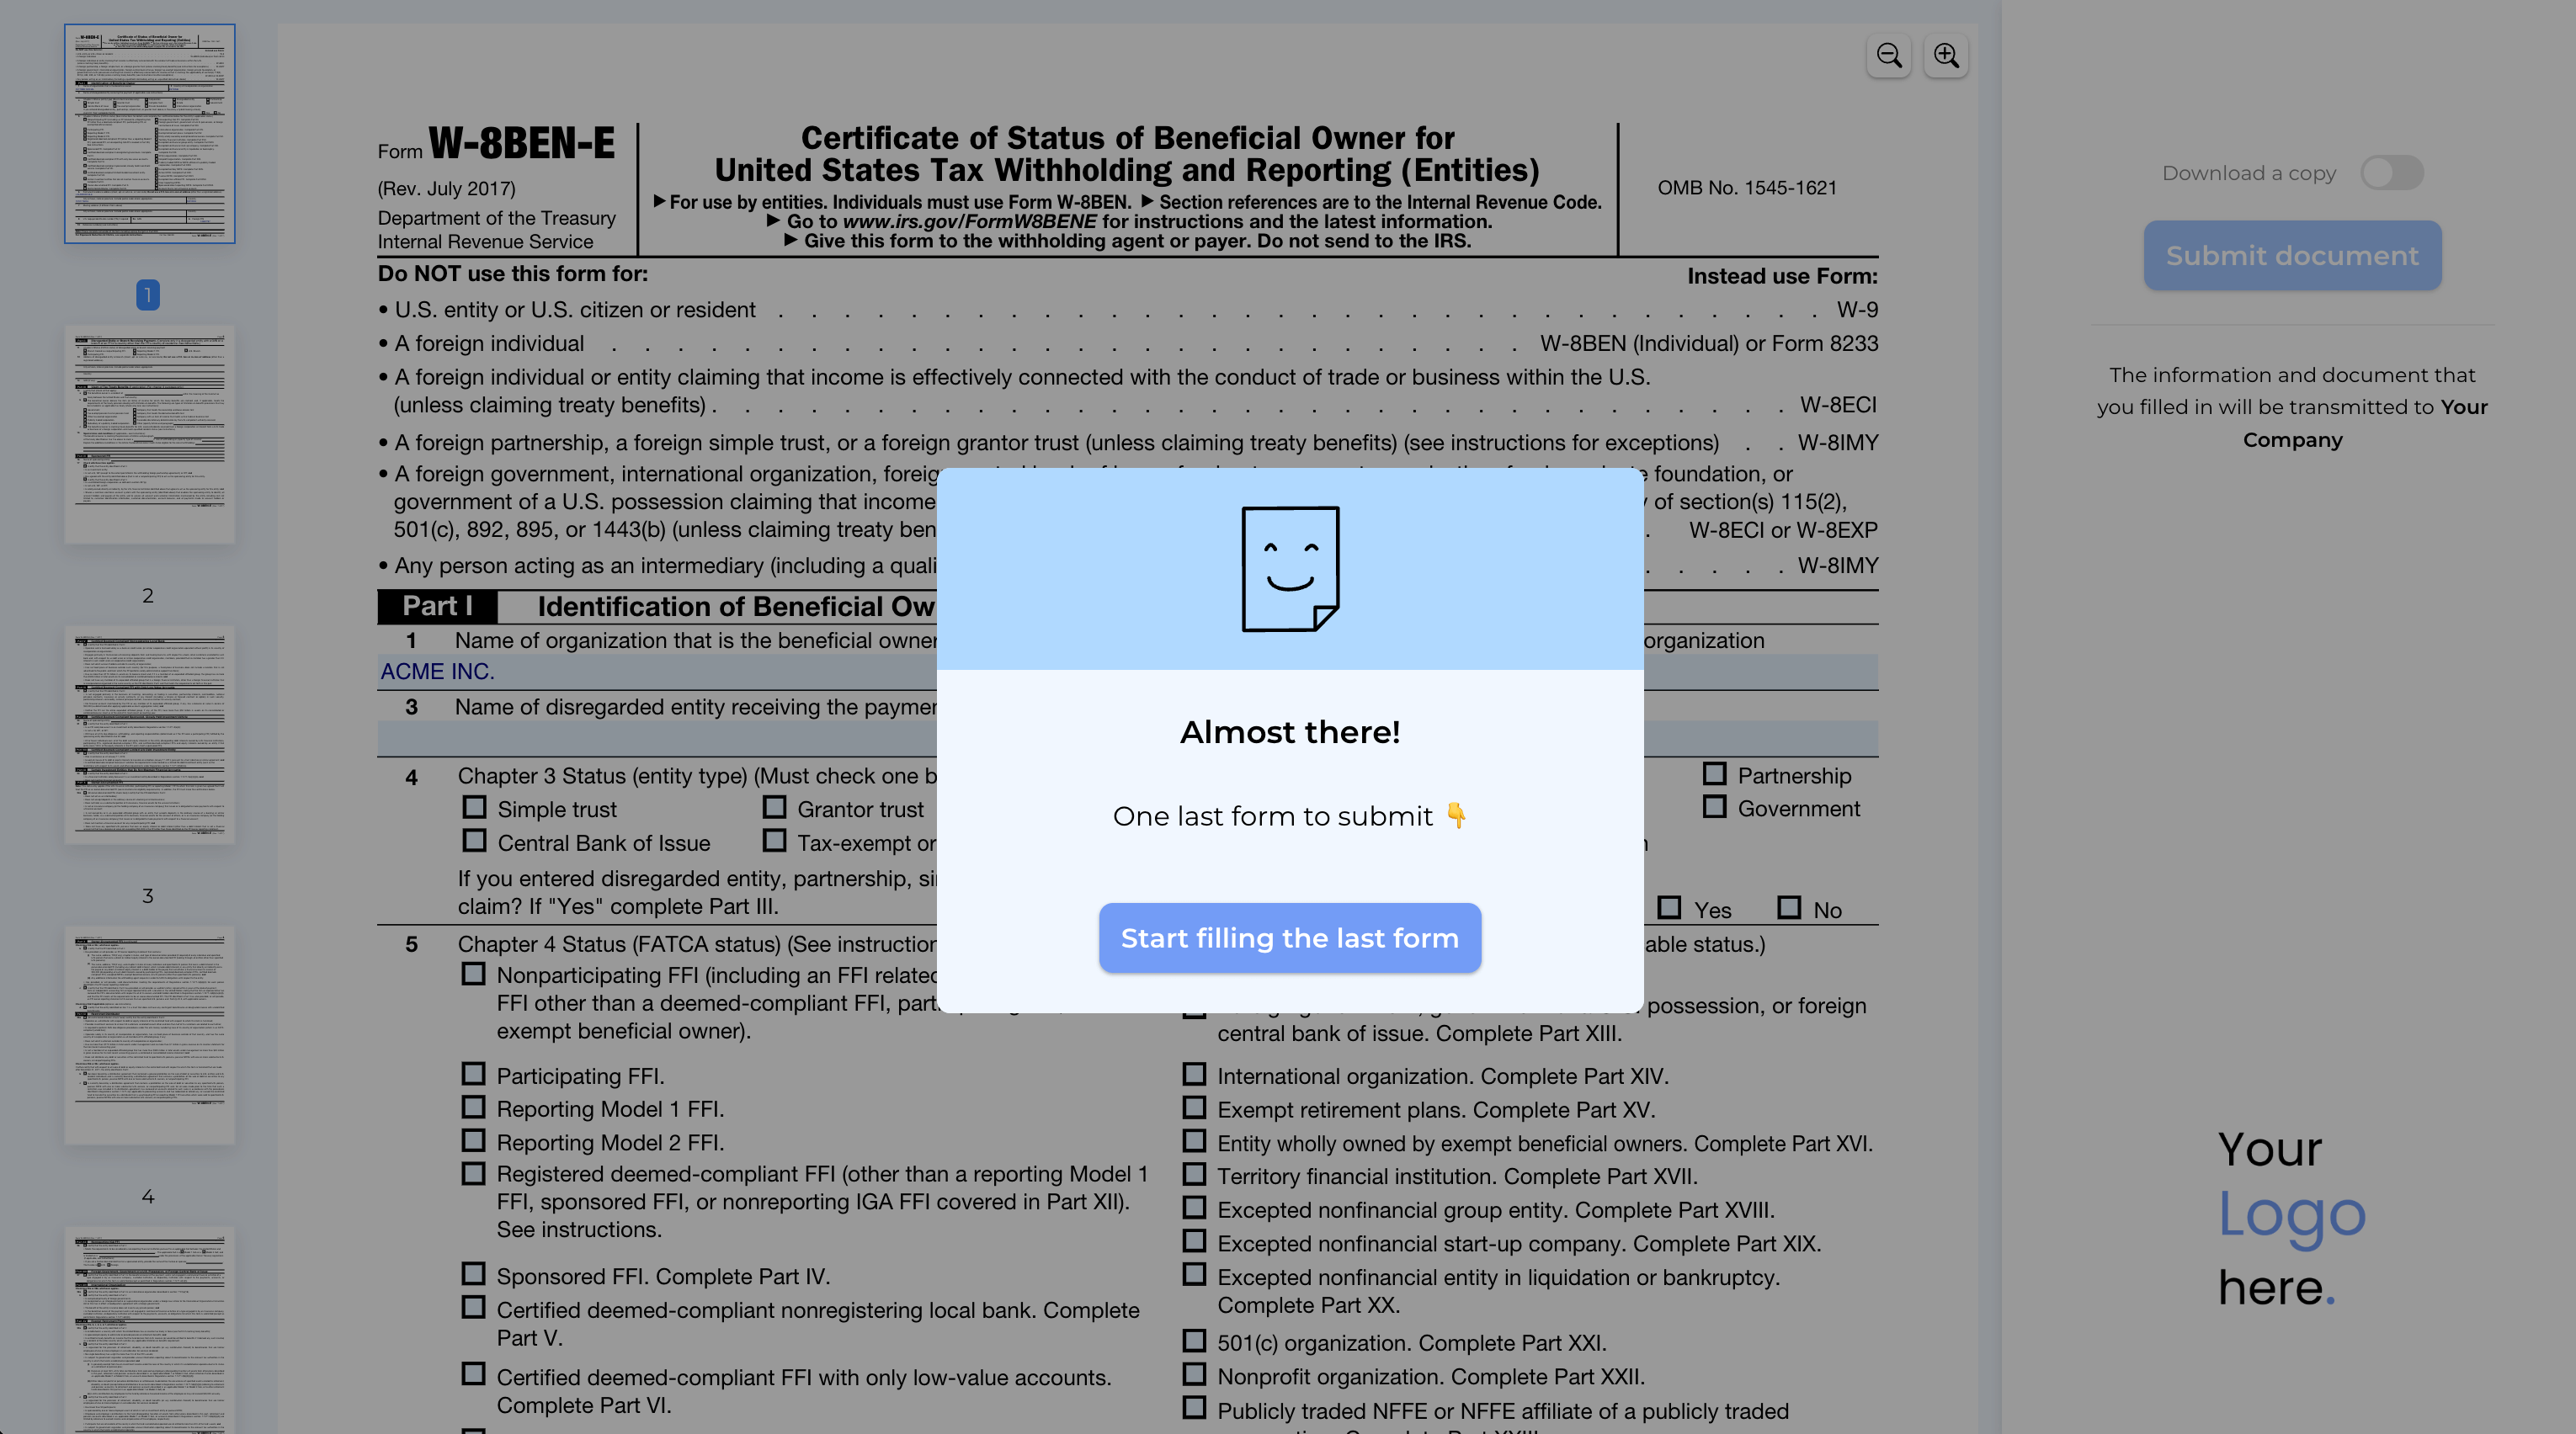
# How to customize the submission confirmation
You have already [turned your PDFs into forms](/portal) and are receiving submissions directly [to your email inbox](/help/how-to/get-email-notifications-for-pdf-form-submissions).
However, in industries like insurance, real-estate or healthcare, **one form often isn't enough**.
Typically, you might send two SimplePDF form links to your customers and ask them to fill out both.
But **what if you could send just one form**, and after it's submitted, your customers are **automatically prompted to fill out the second one?**
Or perhaps you want to guide them to explore your services after they complete the form.
You can **easily achieve this by customizing the submission confirmation**, which is what we'll cover in this tutorial.
## Customizing the submission confirmation.
_Customizing the submission confirmation is available with the [PRO plan](https://simplepdf.com/pricing)_
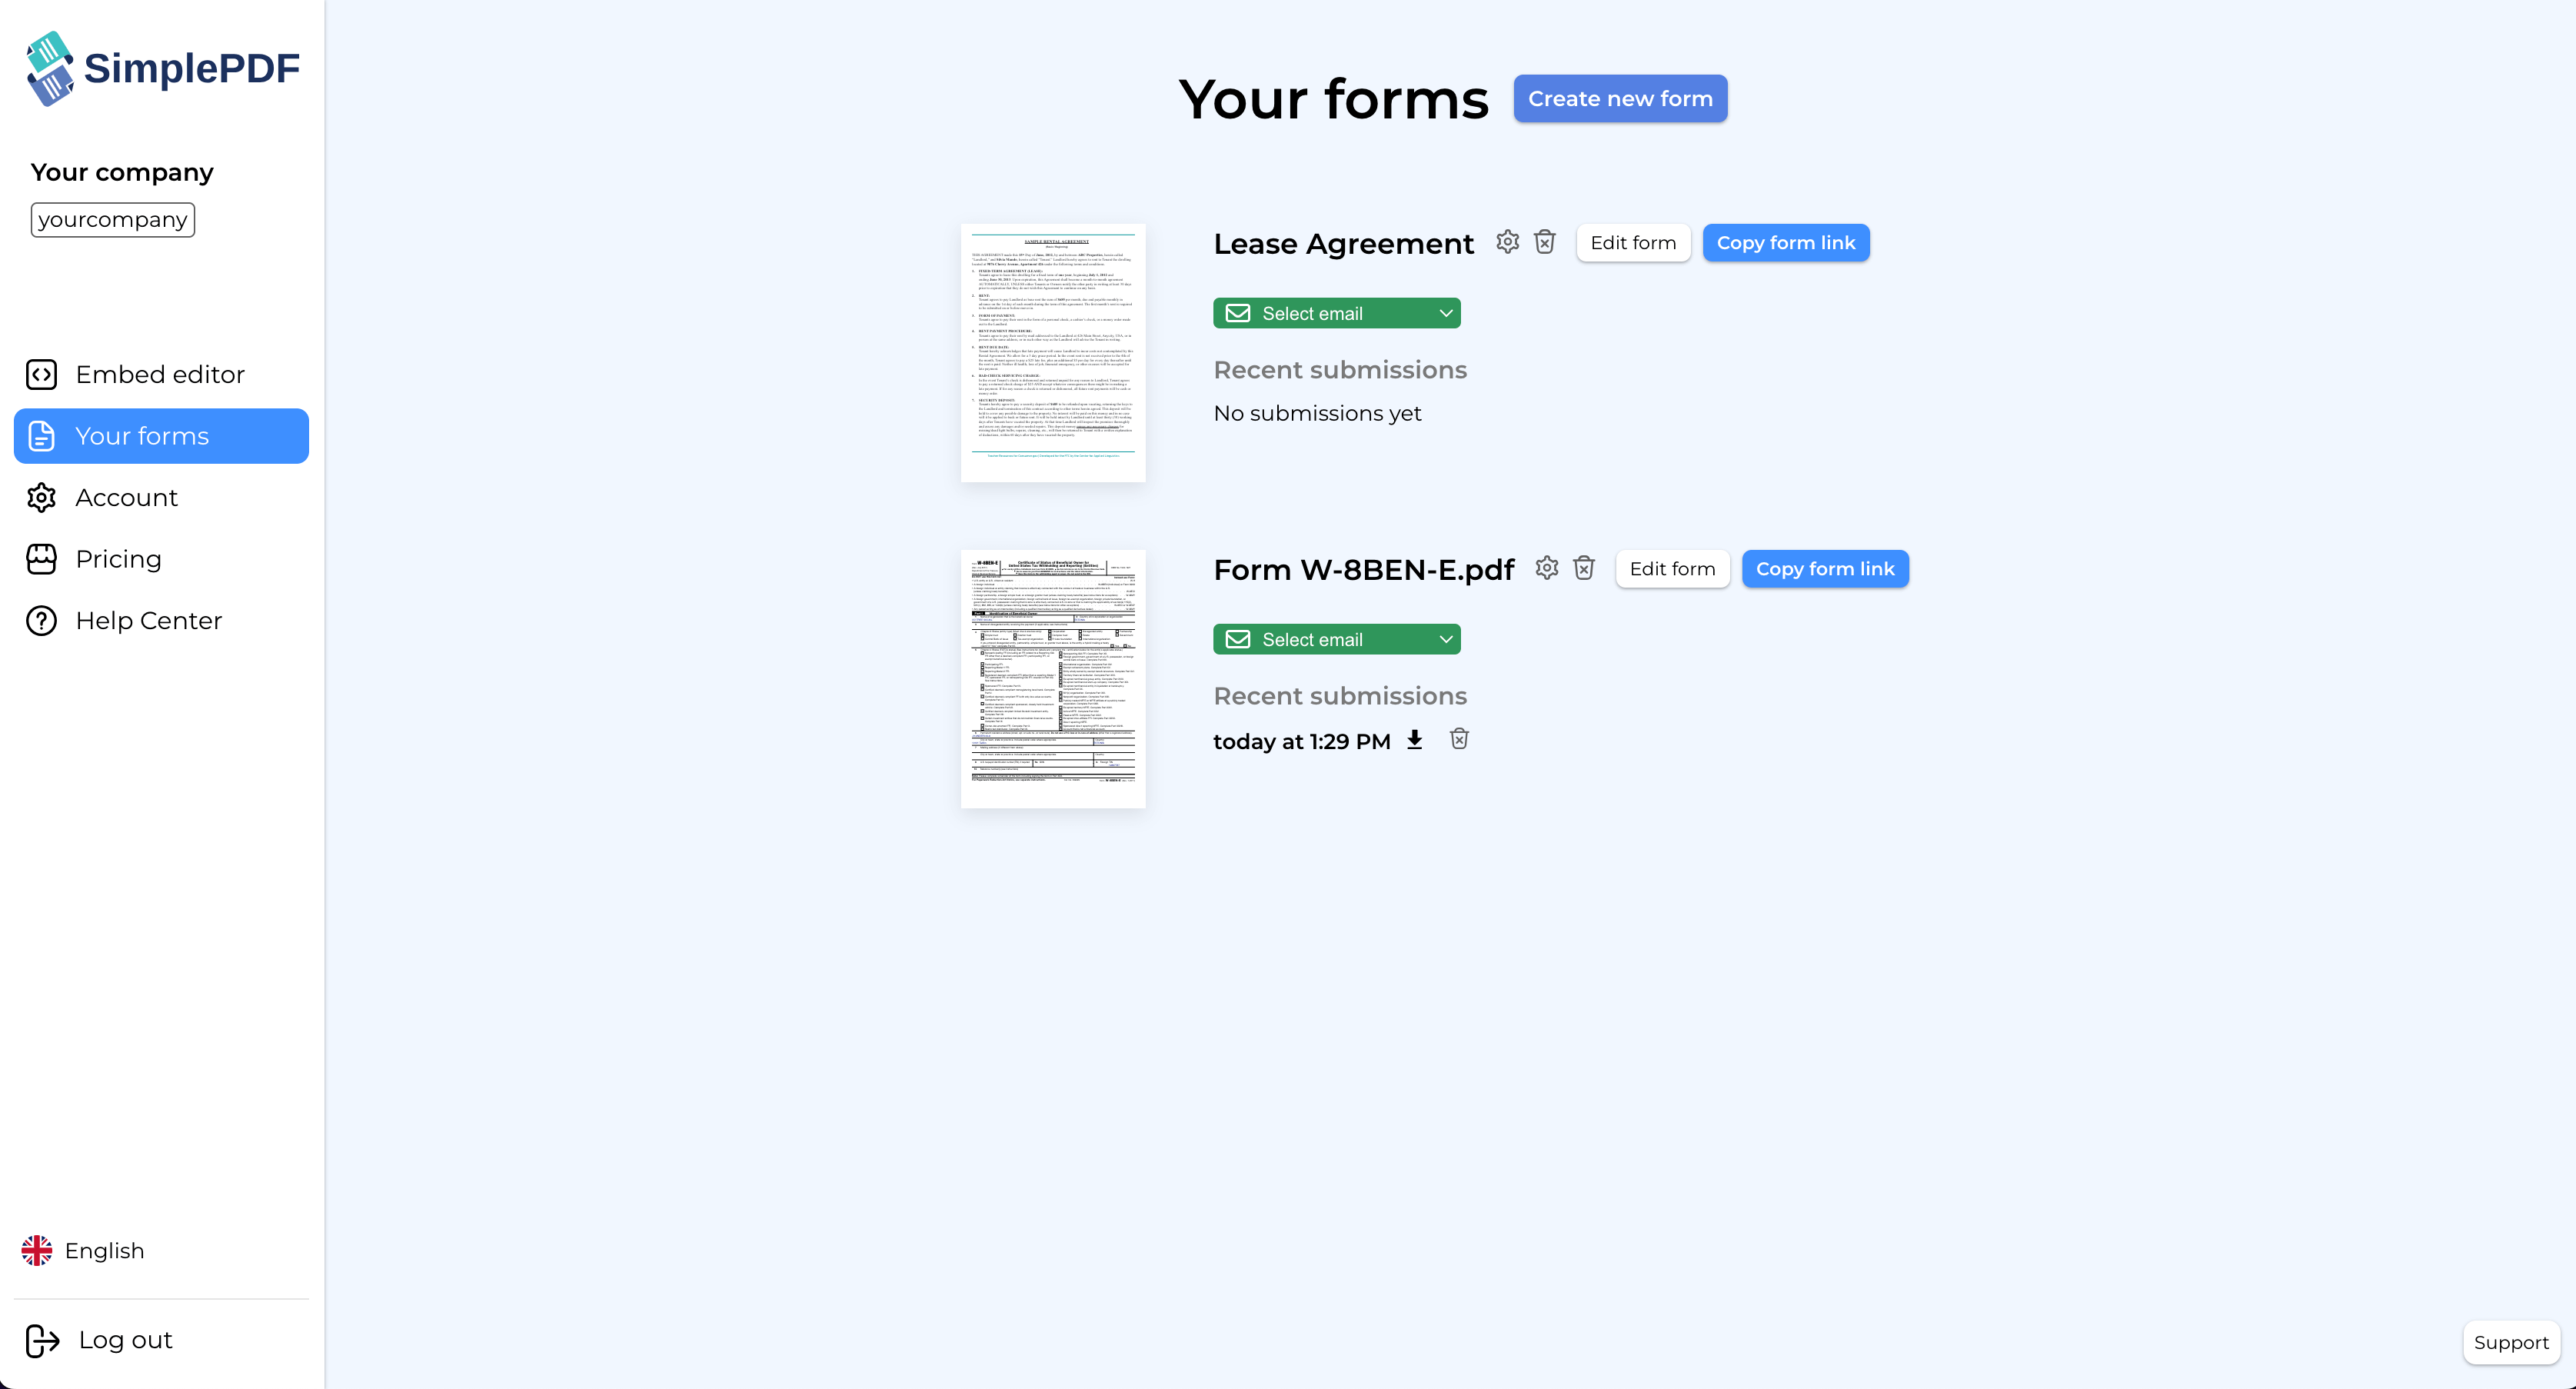
1. Log into your account and go to the **"Your forms" page**.
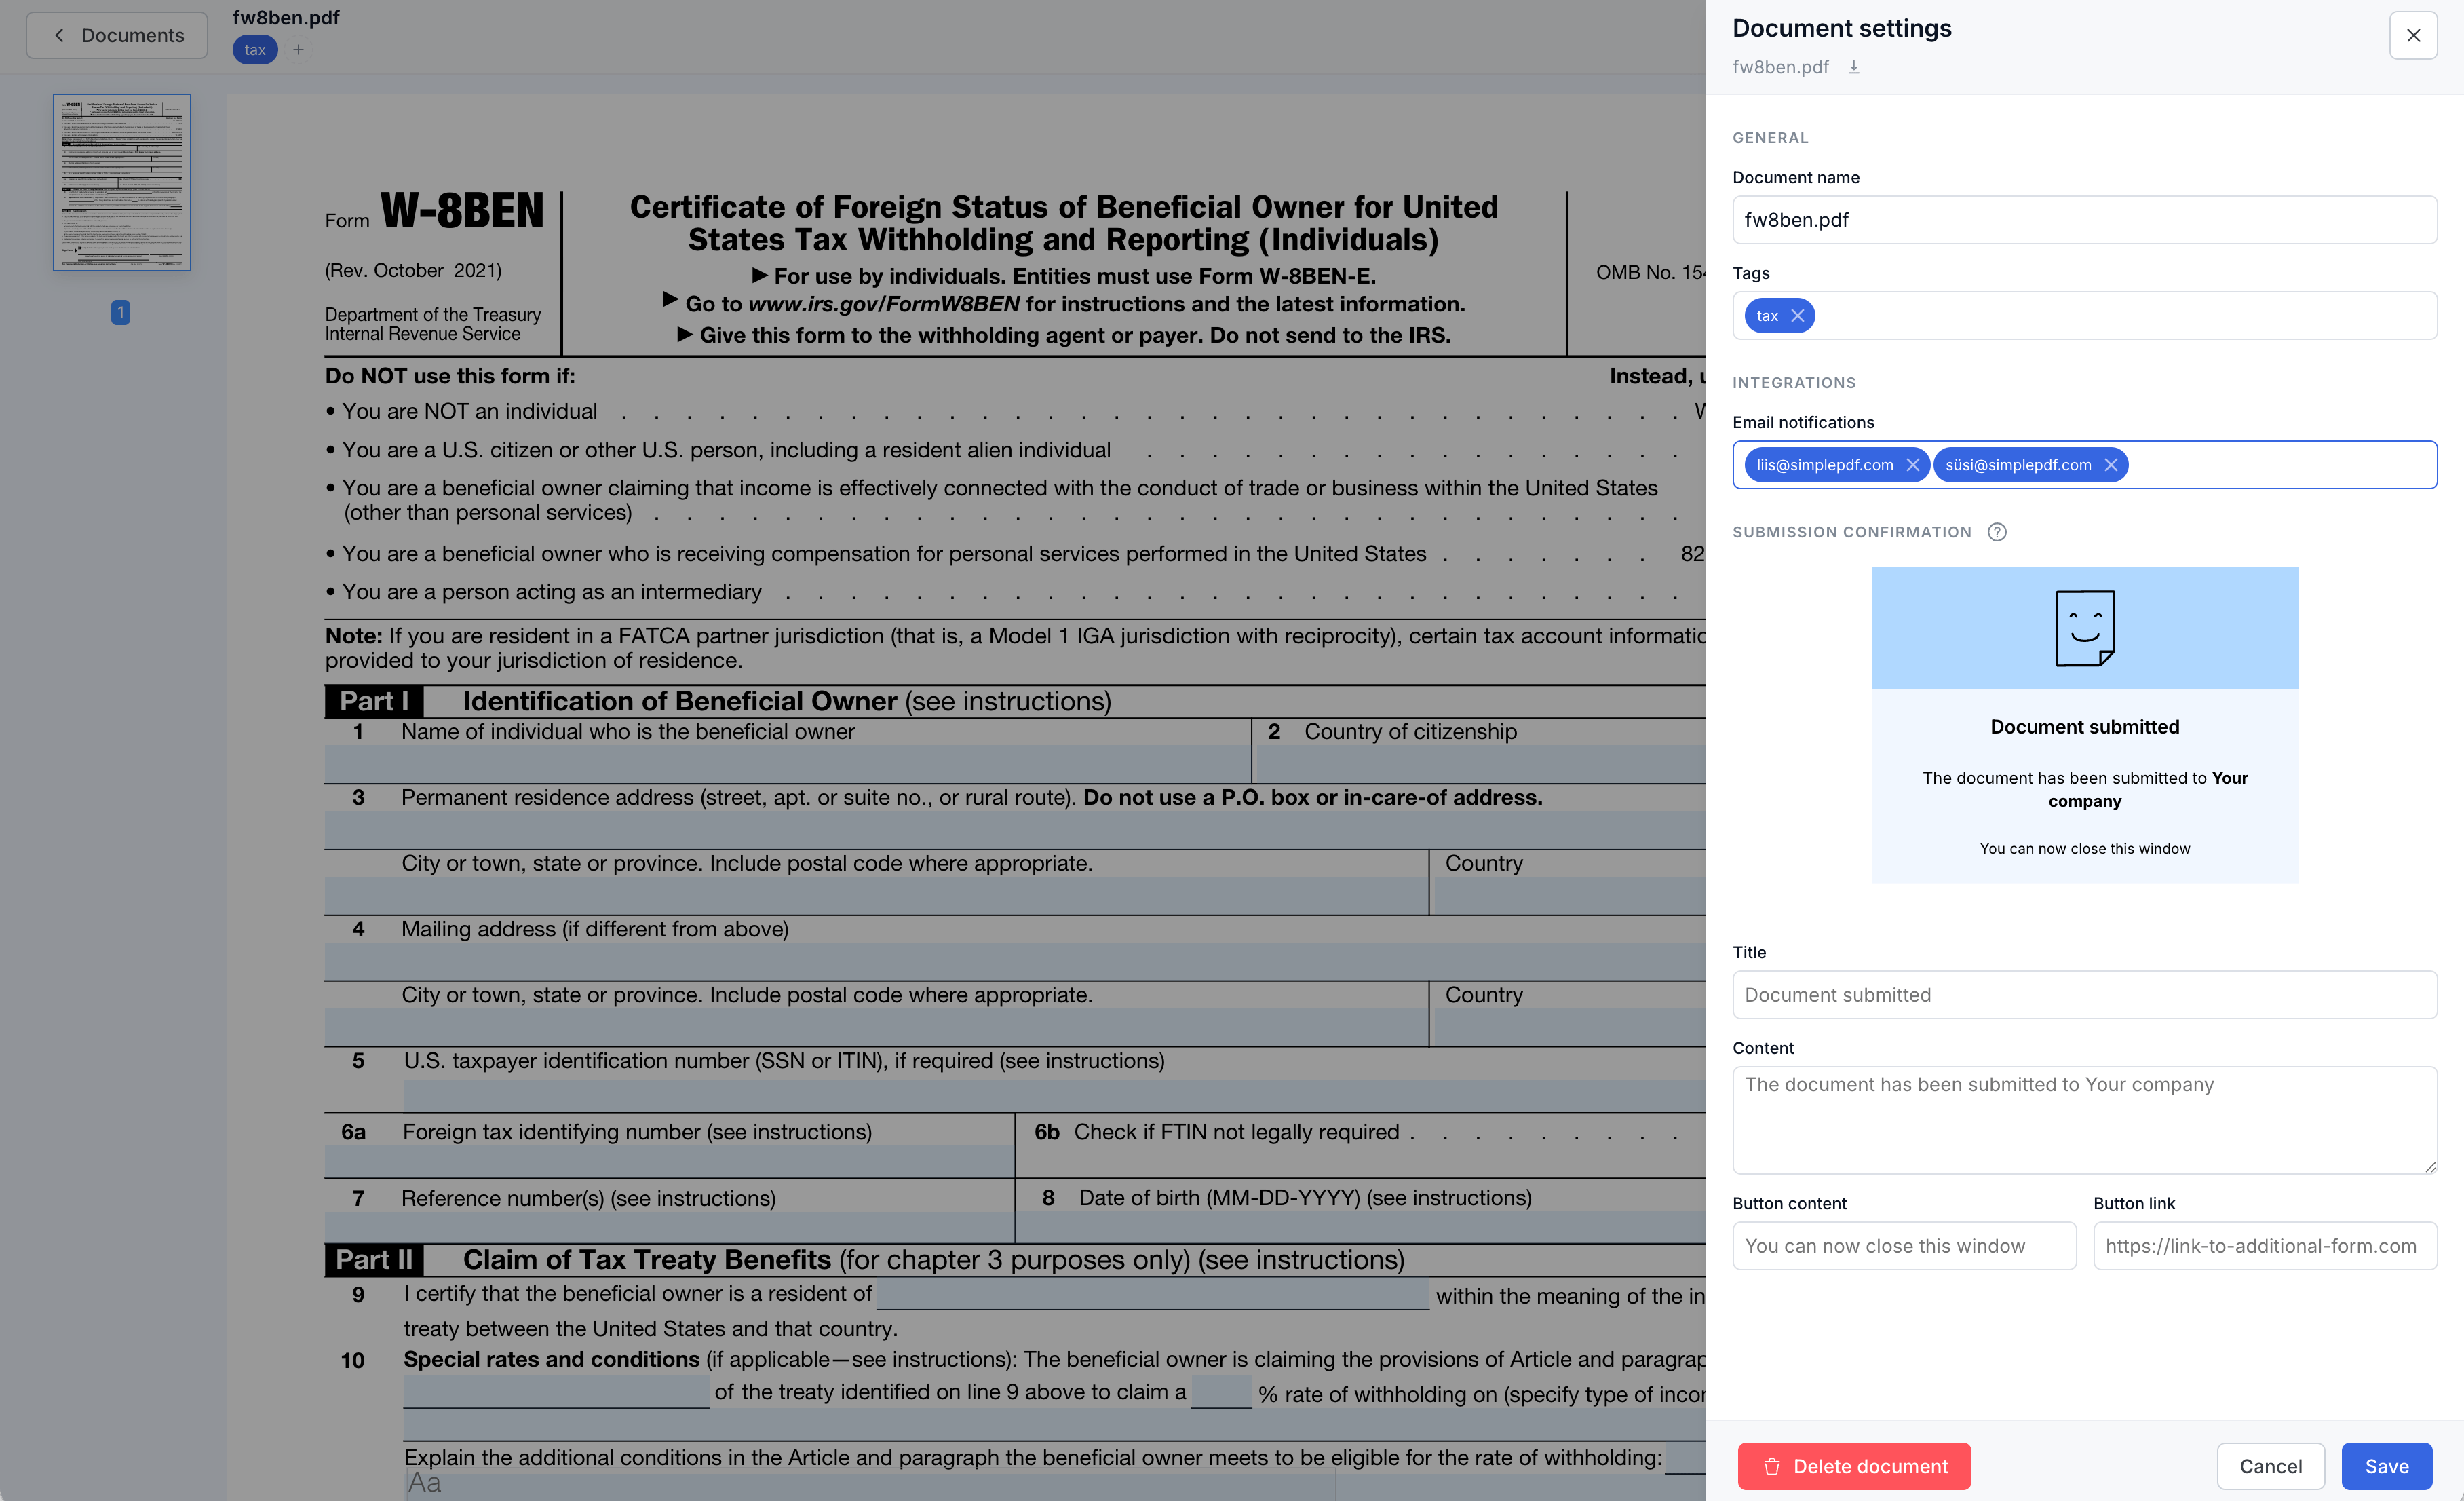
2. Click the **`cog` icon next to any form** you've created to open the configuration view.
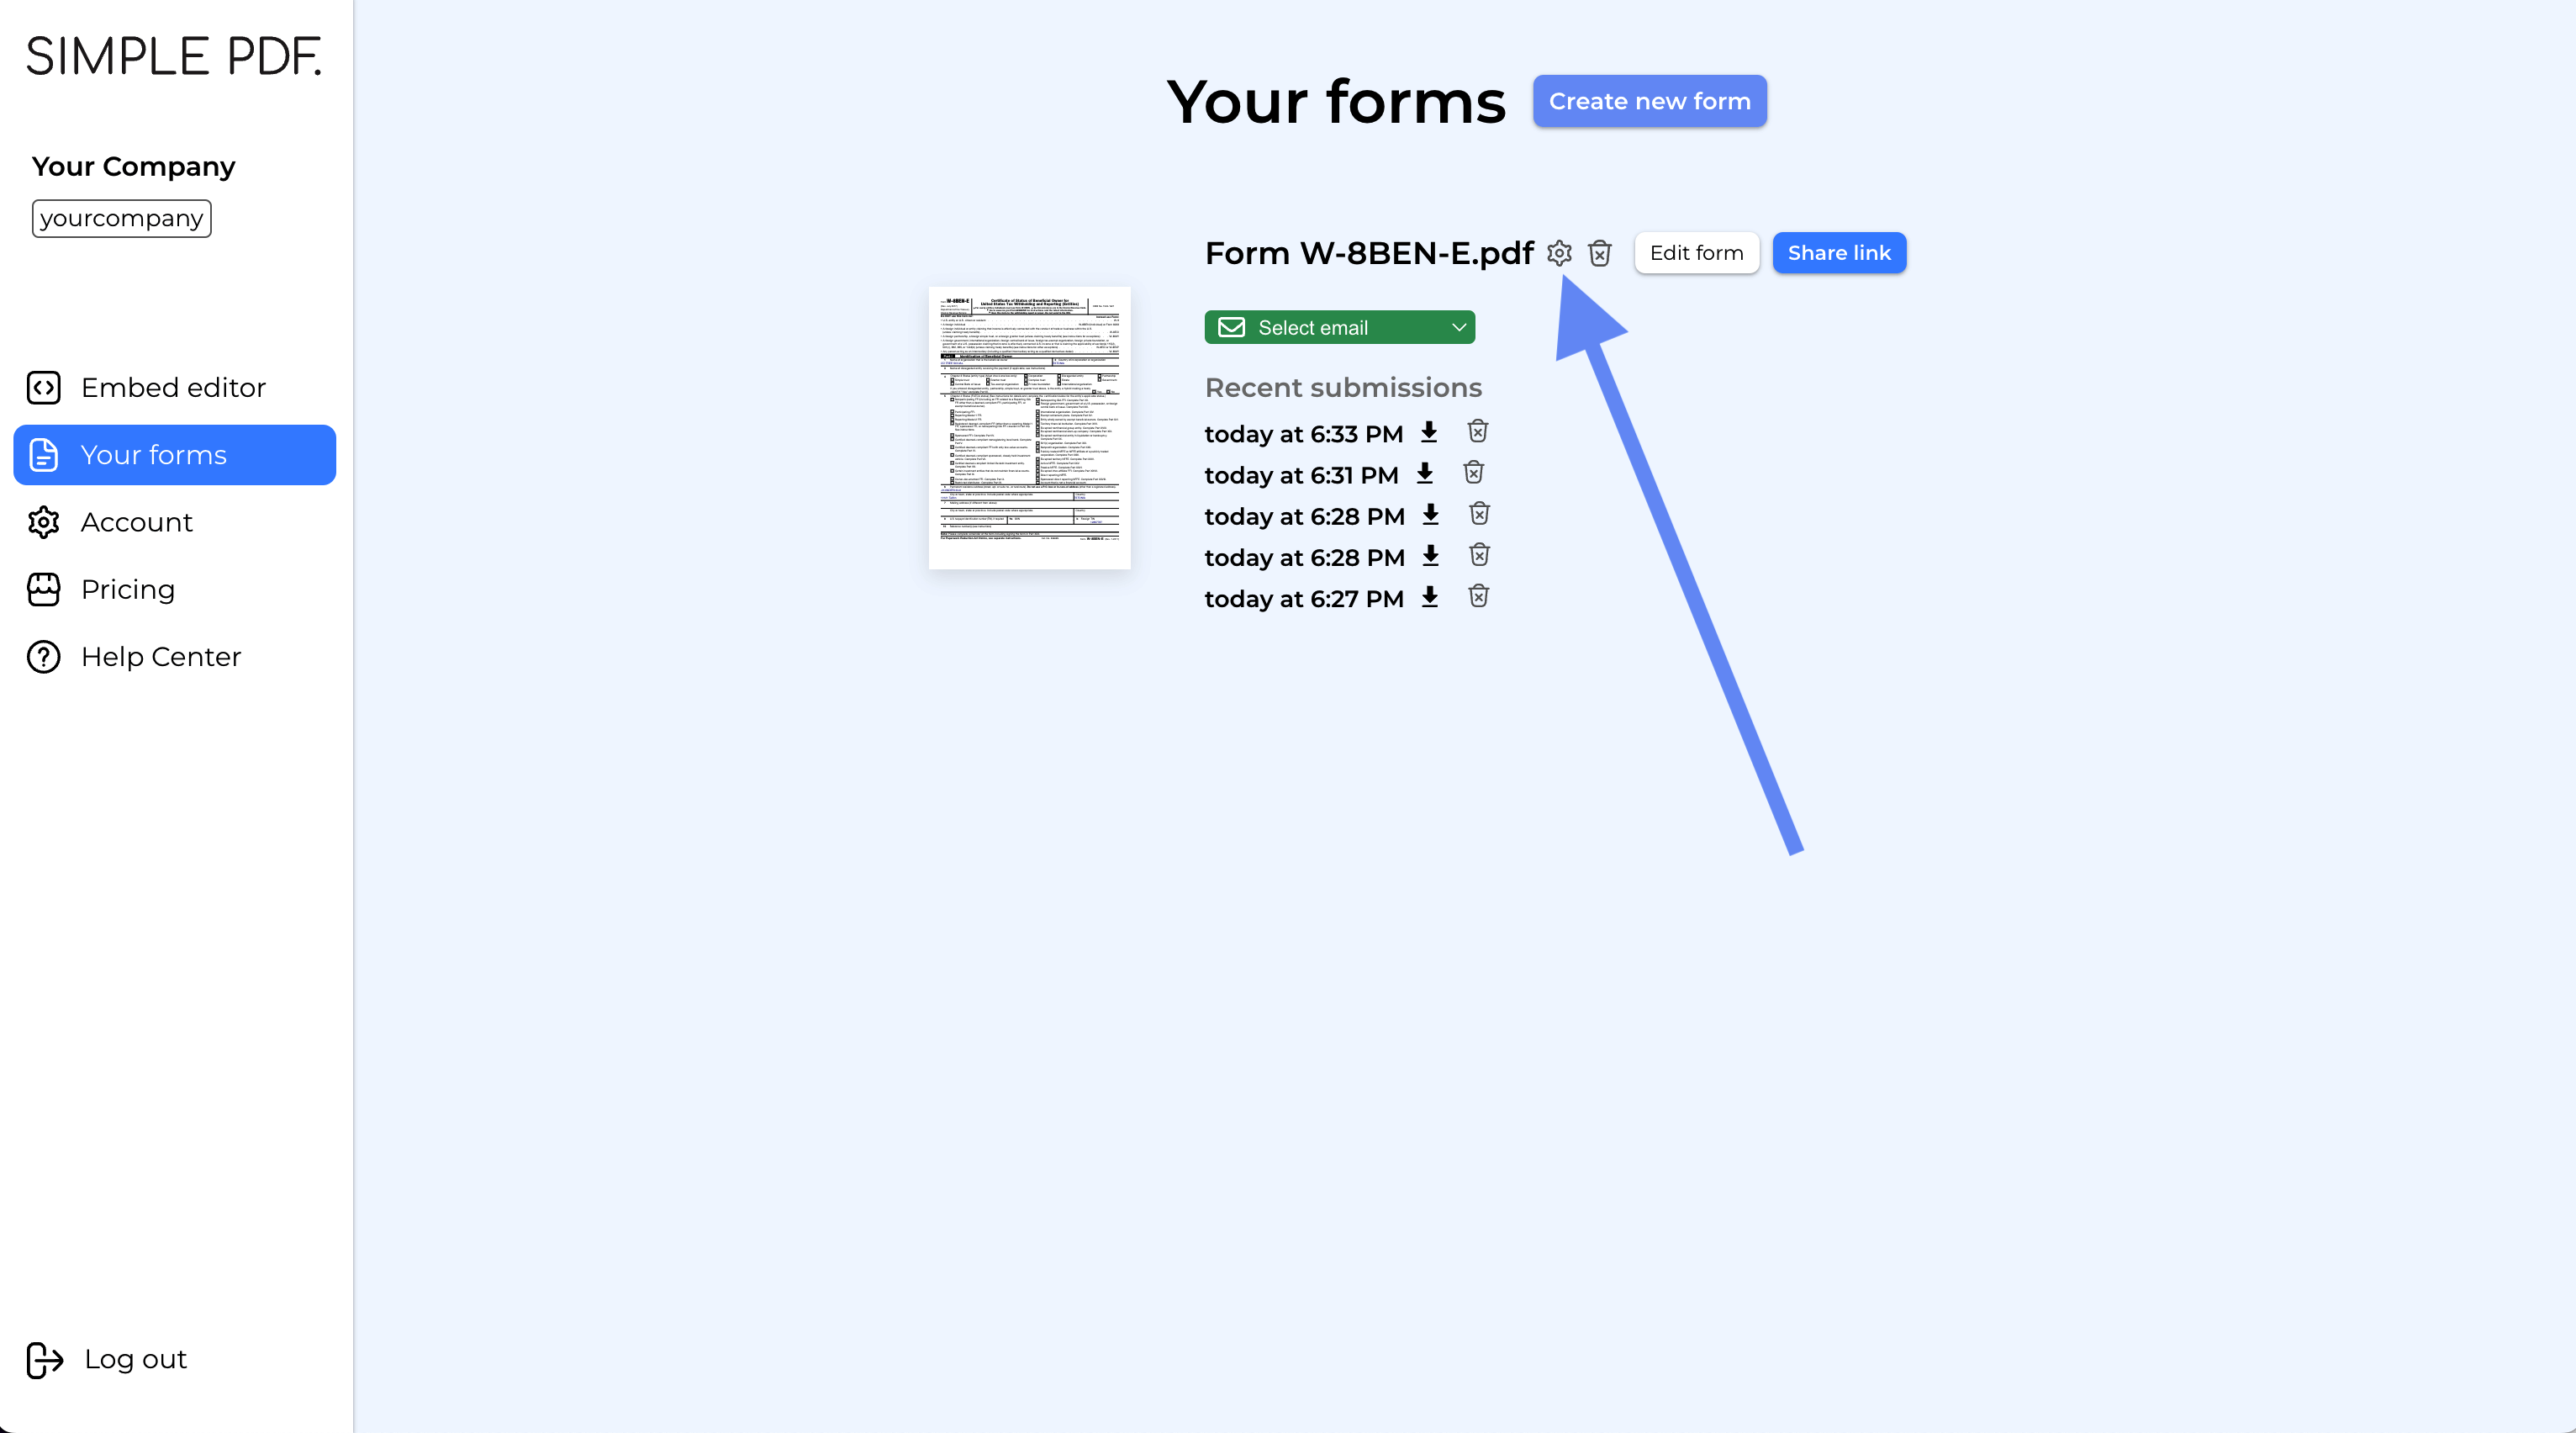
3. Modify the **title**, **content**, and **add a link**. Your changes will be **visible in the preview** on the right side.
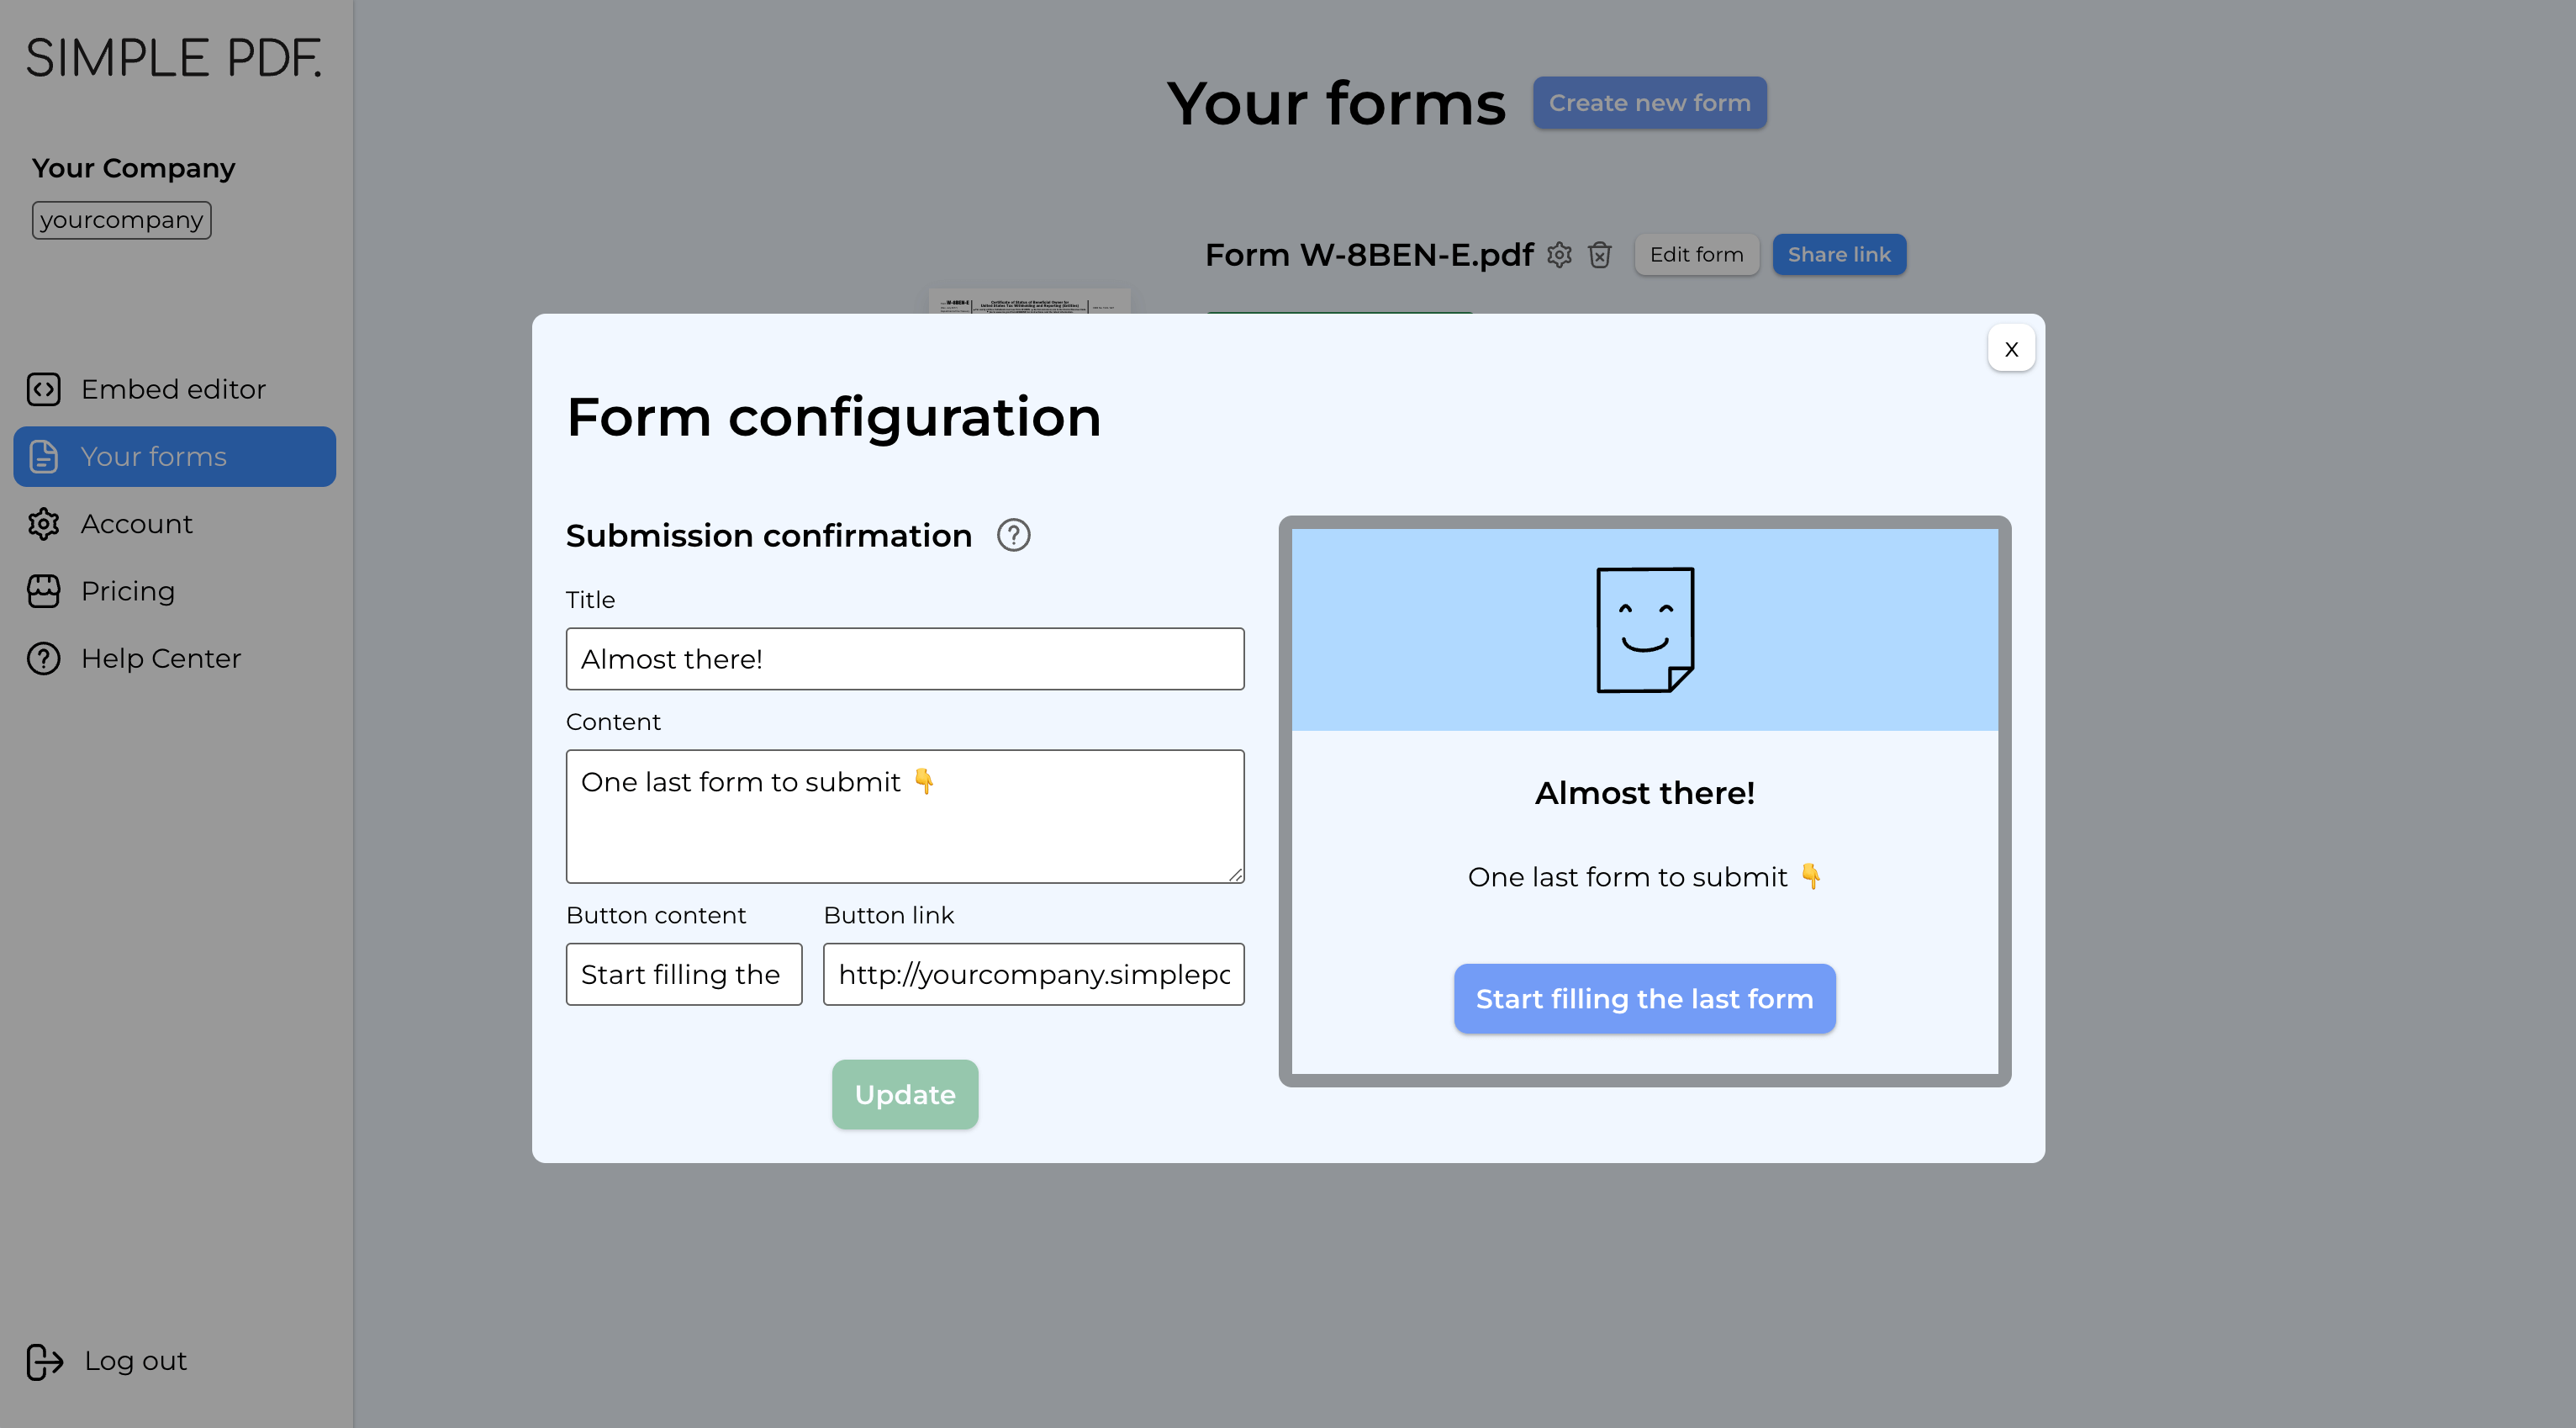
4. Click `Update`
That's it! Now, whenever your customers submit this form, the confirmation message will display the information you configured.

You can direct your customers to a specific website or another SimplePDF form.
Plus, there's no limit—each form can lead to another form, creating a seamless flow for your customers!
_If you have any questions, feel free to reach out to [support@simplepdf.com](mailto:support@simplepdf.com)_
---
# How to view and edit PDF in Excalidraw
**What if you could look at the design document right next to your sketches in Excalidraw?**
Or sketch some diagrams for your class while the PDF is opened on the side...
Or even ask your customers about their preferred sketch and illustration
without having to leave Excalidraw?
It's **now possible, thanks to the SimplePDF integration in Excalidraw!**
## Excalidraw?
[Excalidraw](https://excalidraw.com) is a virtual hand-drawn style whiteboard that offers collaborative features and is end-to-end encrypted.
At SimplePDF we use Excalidraw for sketching features, both the technical implementation as well as the designs.
We also use Excalidaw for illustrations! In fact you may have noticed them on the [SimplePDF embed page](/embed)
So when Excalidraw announced the ability to embed websites into any board, we could not miss the opportunity!.
**Adding SimplePDF to Excalidraw is the best way to view, edit and even submit forms without leaving your board**
## Adding SimplePDF to excalidraw
**TL:DR: Add `https://embed.simplepdf.eu` as a Web-Embed in Excalidraw**
### 1. Select the Web-Embed in Excalidraw
### 2. Enter the SimplePDF Embed URL
- Opening PDF from your device: `https://embed.simplepdf.eu`
- Opening a PDF hosted online: `https://embed.simplepdf.eu/editor?open=URL`
_It also works with any SimplePDF form_
### 3. That's it!
_If you have any questions, feel free to reach out to [support@simplepdf.com](mailto:support@simplepdf.com)_
---
# How to embed the PDF editor in SharePoint
SharePoint pages don't natively support PDF editing. With SimplePDF, you can add a full PDF editor to any SharePoint page using the Embed web part. Users fill, sign, and submit PDFs without leaving SharePoint.
Combine this with [SharePoint BYOS](/help/how-to/connect-sharepoint-as-your-own-storage-for-pdf-submissions) to have submitted documents stored directly in your SharePoint document library.
## Prerequisites
- A SharePoint Online site with editing permissions
- Site collection administrator access to configure iframe allow-list
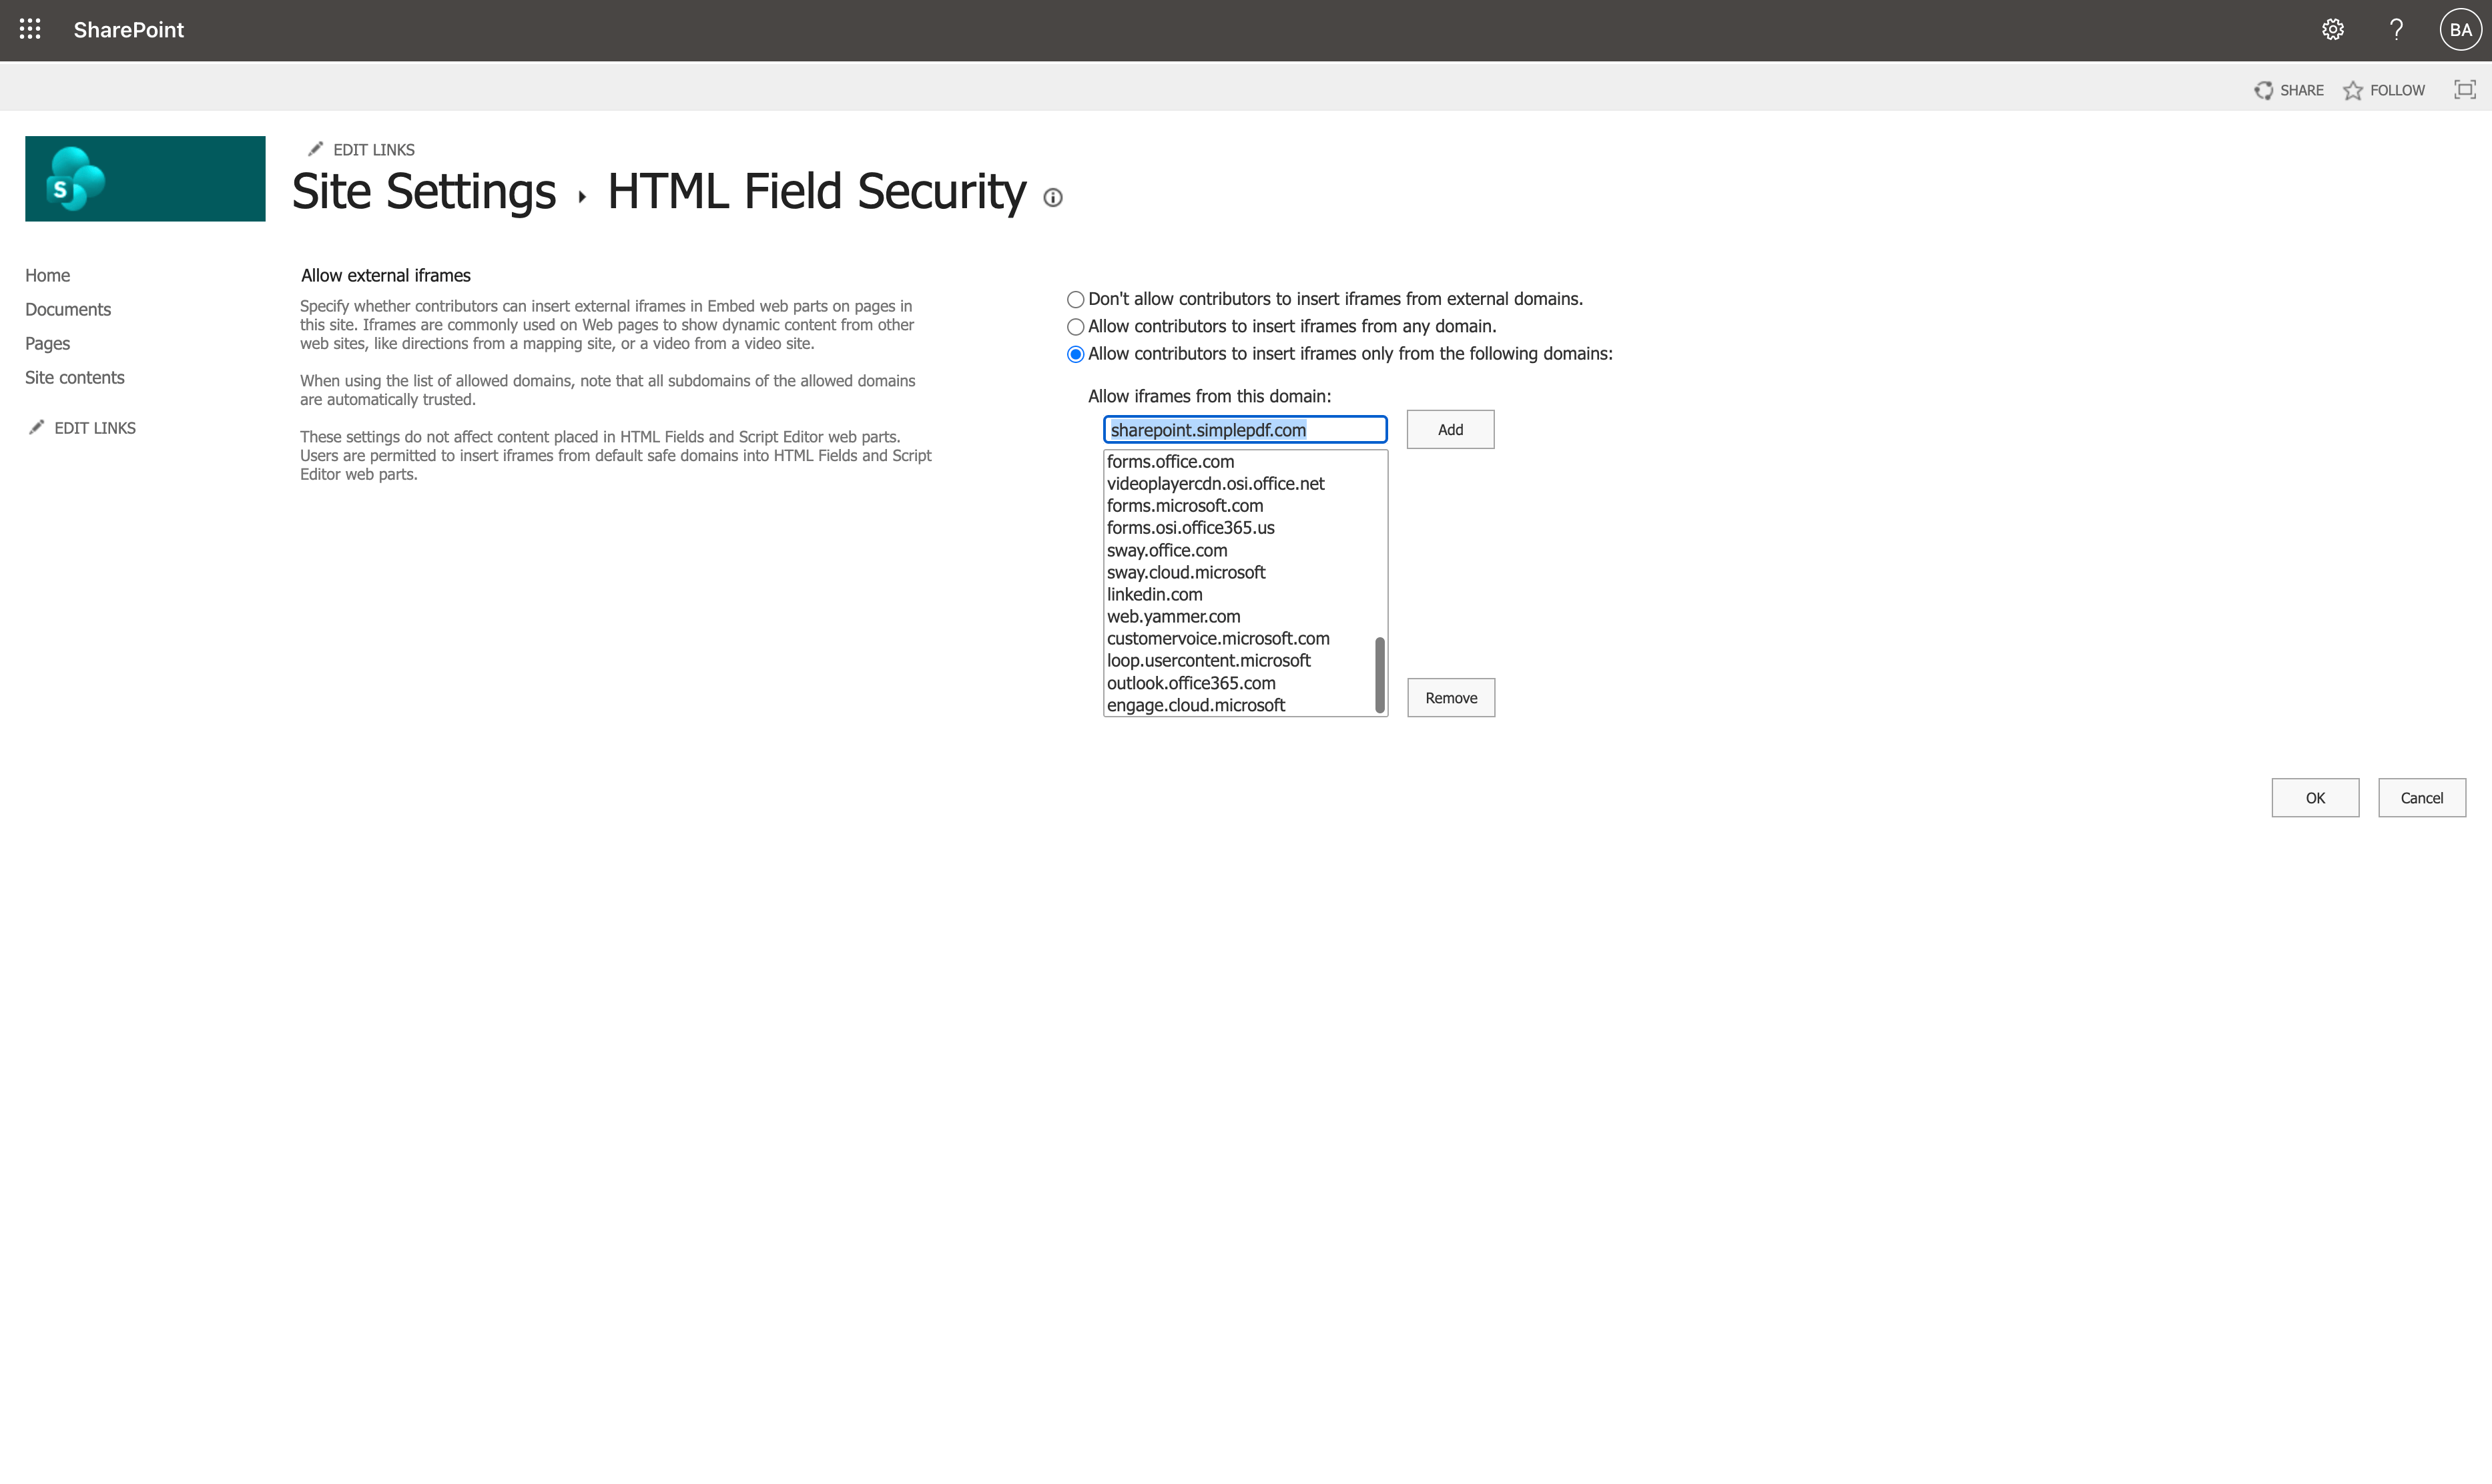
## Step 1: Allow the SimplePDF domain in SharePoint
By default, SharePoint restricts which domains can be embedded via iframes. You need to add the SimplePDF domain to the allow list.
1. Navigate to your SharePoint site
2. Click **Site contents** in the navigation
3. Click **Site settings** in the top-right
4. Under **Site Collection Administration**, click **HTML Field Security**
5. Select **Allow contributors to insert iframes only from the following domains**
6. Type `sharepoint.simplepdf.com` in the input field and click **Add**
7. Verify the domain appears in the list, then click **OK**
## Step 2: Add the Embed web part to a SharePoint page
1. Navigate to the SharePoint page where you want the PDF editor
2. Click **Edit** to enter edit mode
3. Click the **+** button to add a new web part
4. Search for and select **Embed**
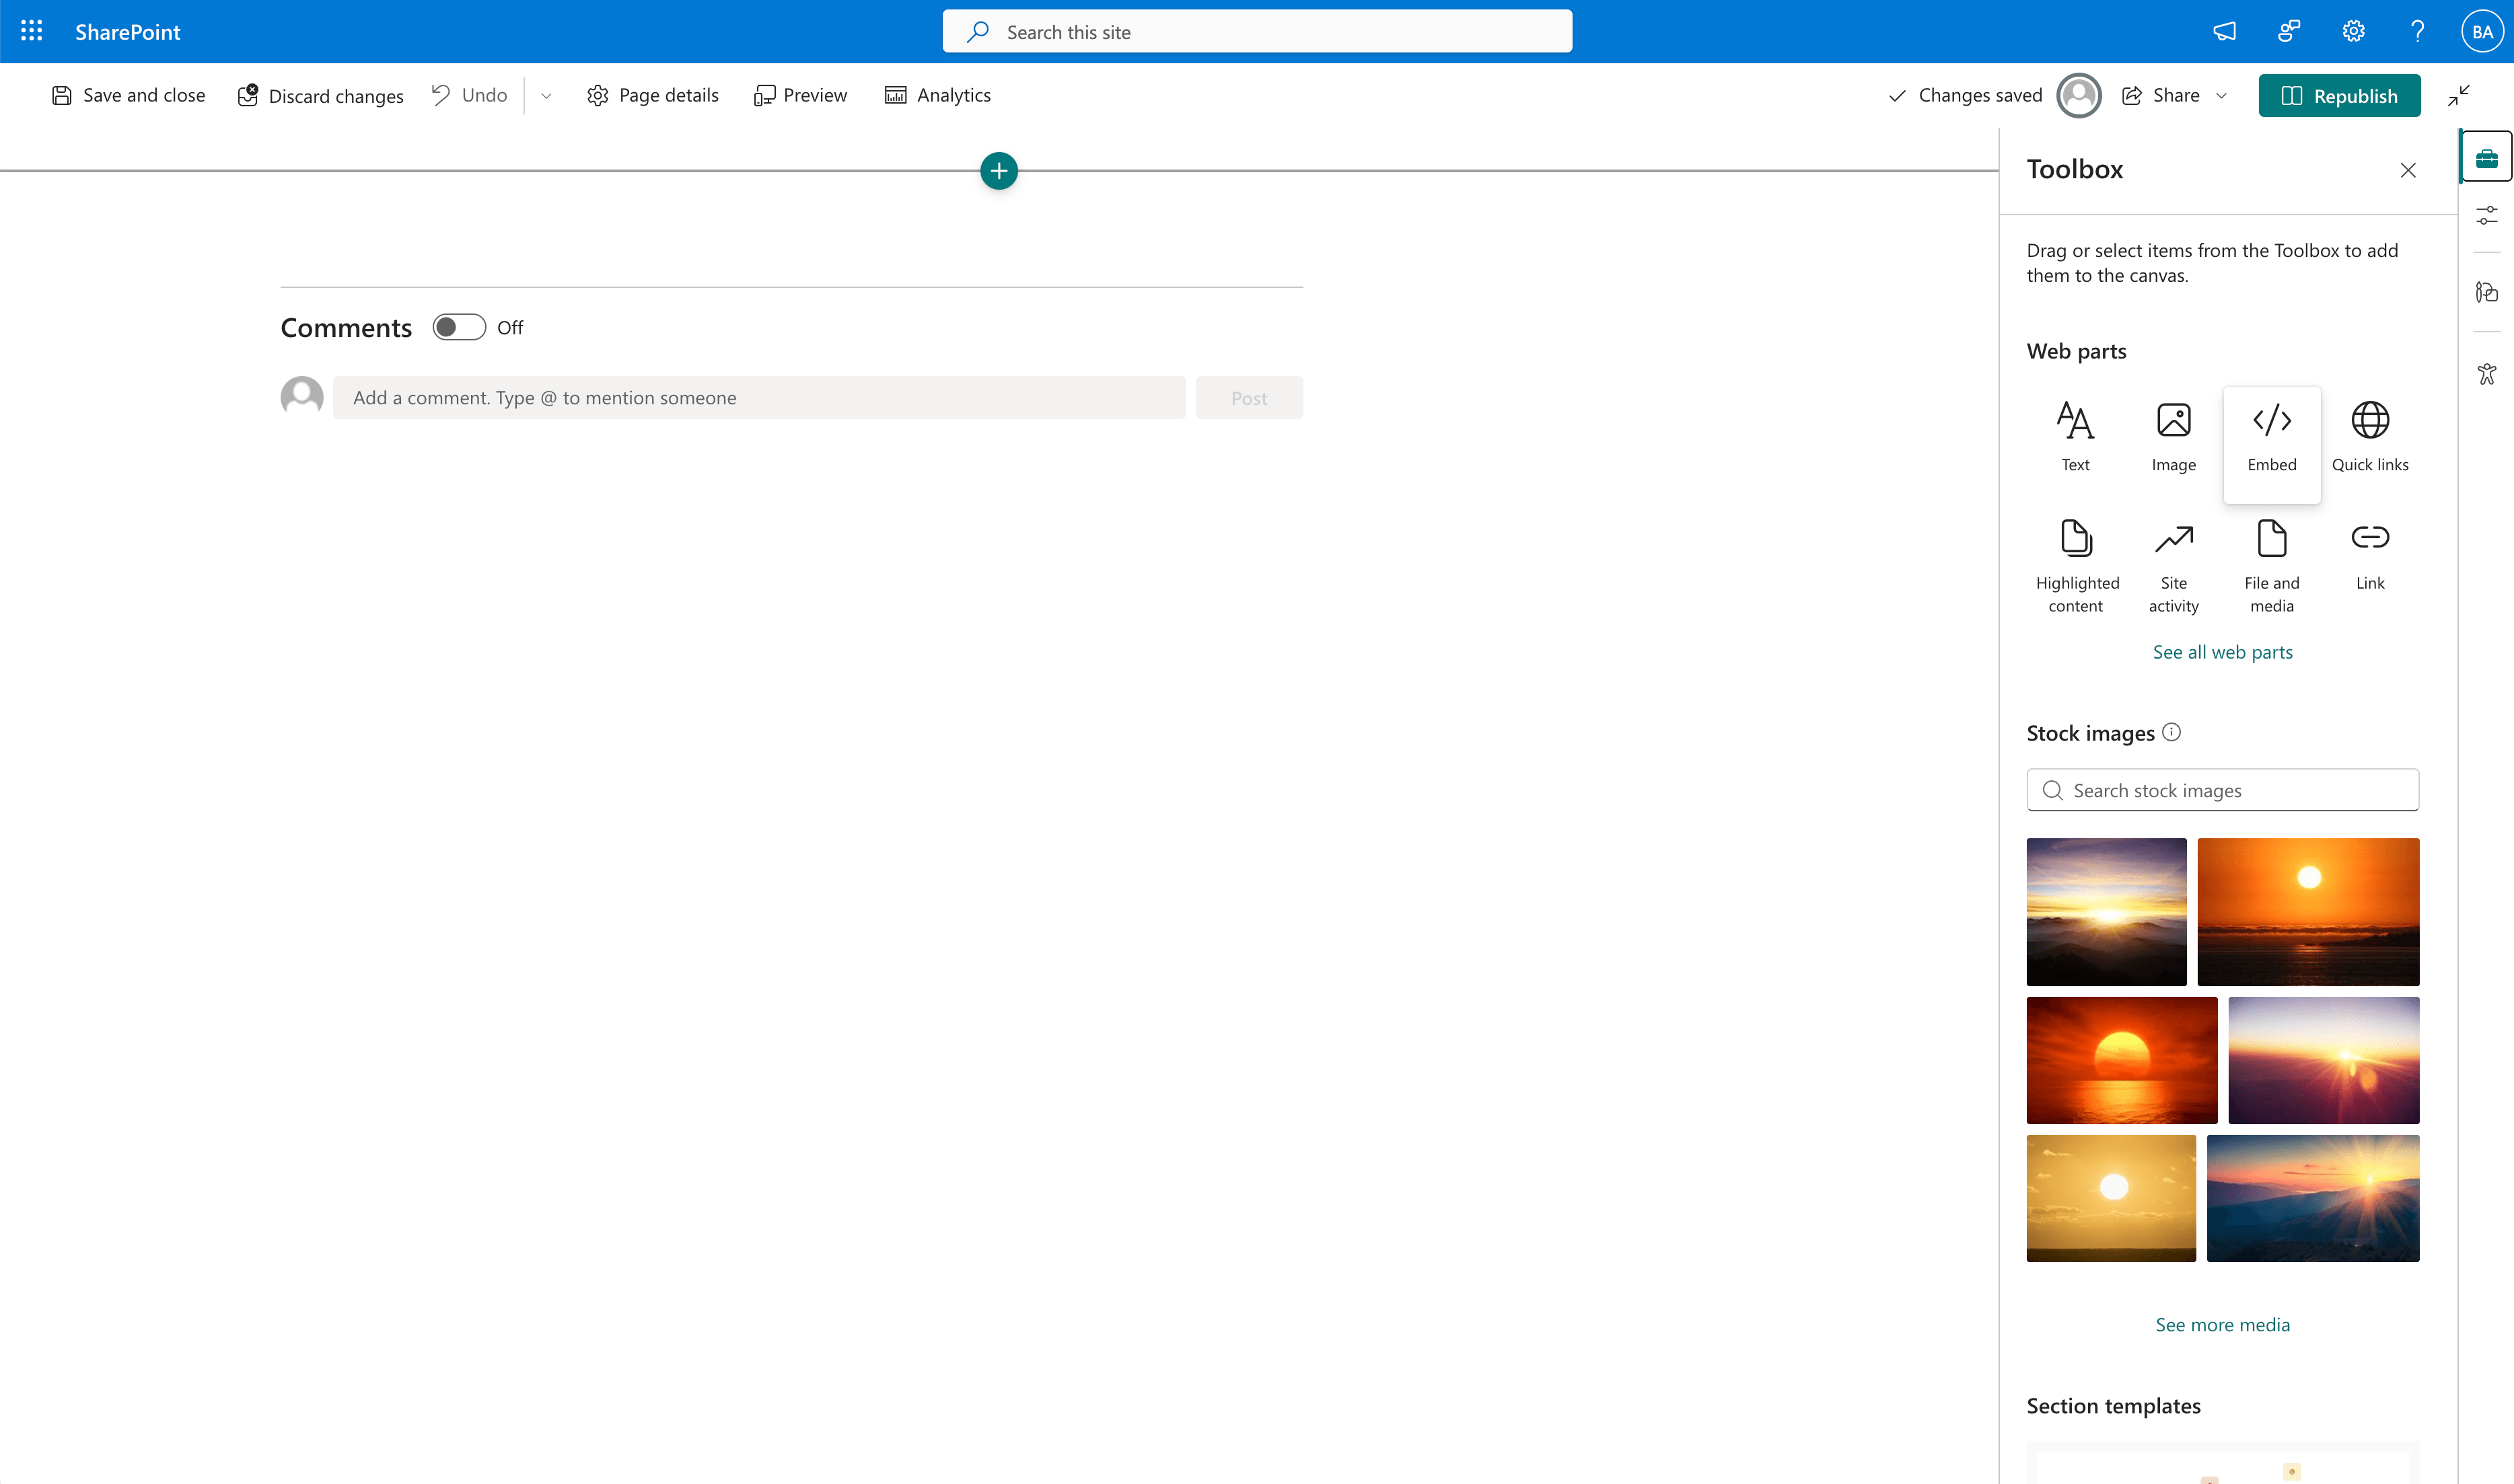
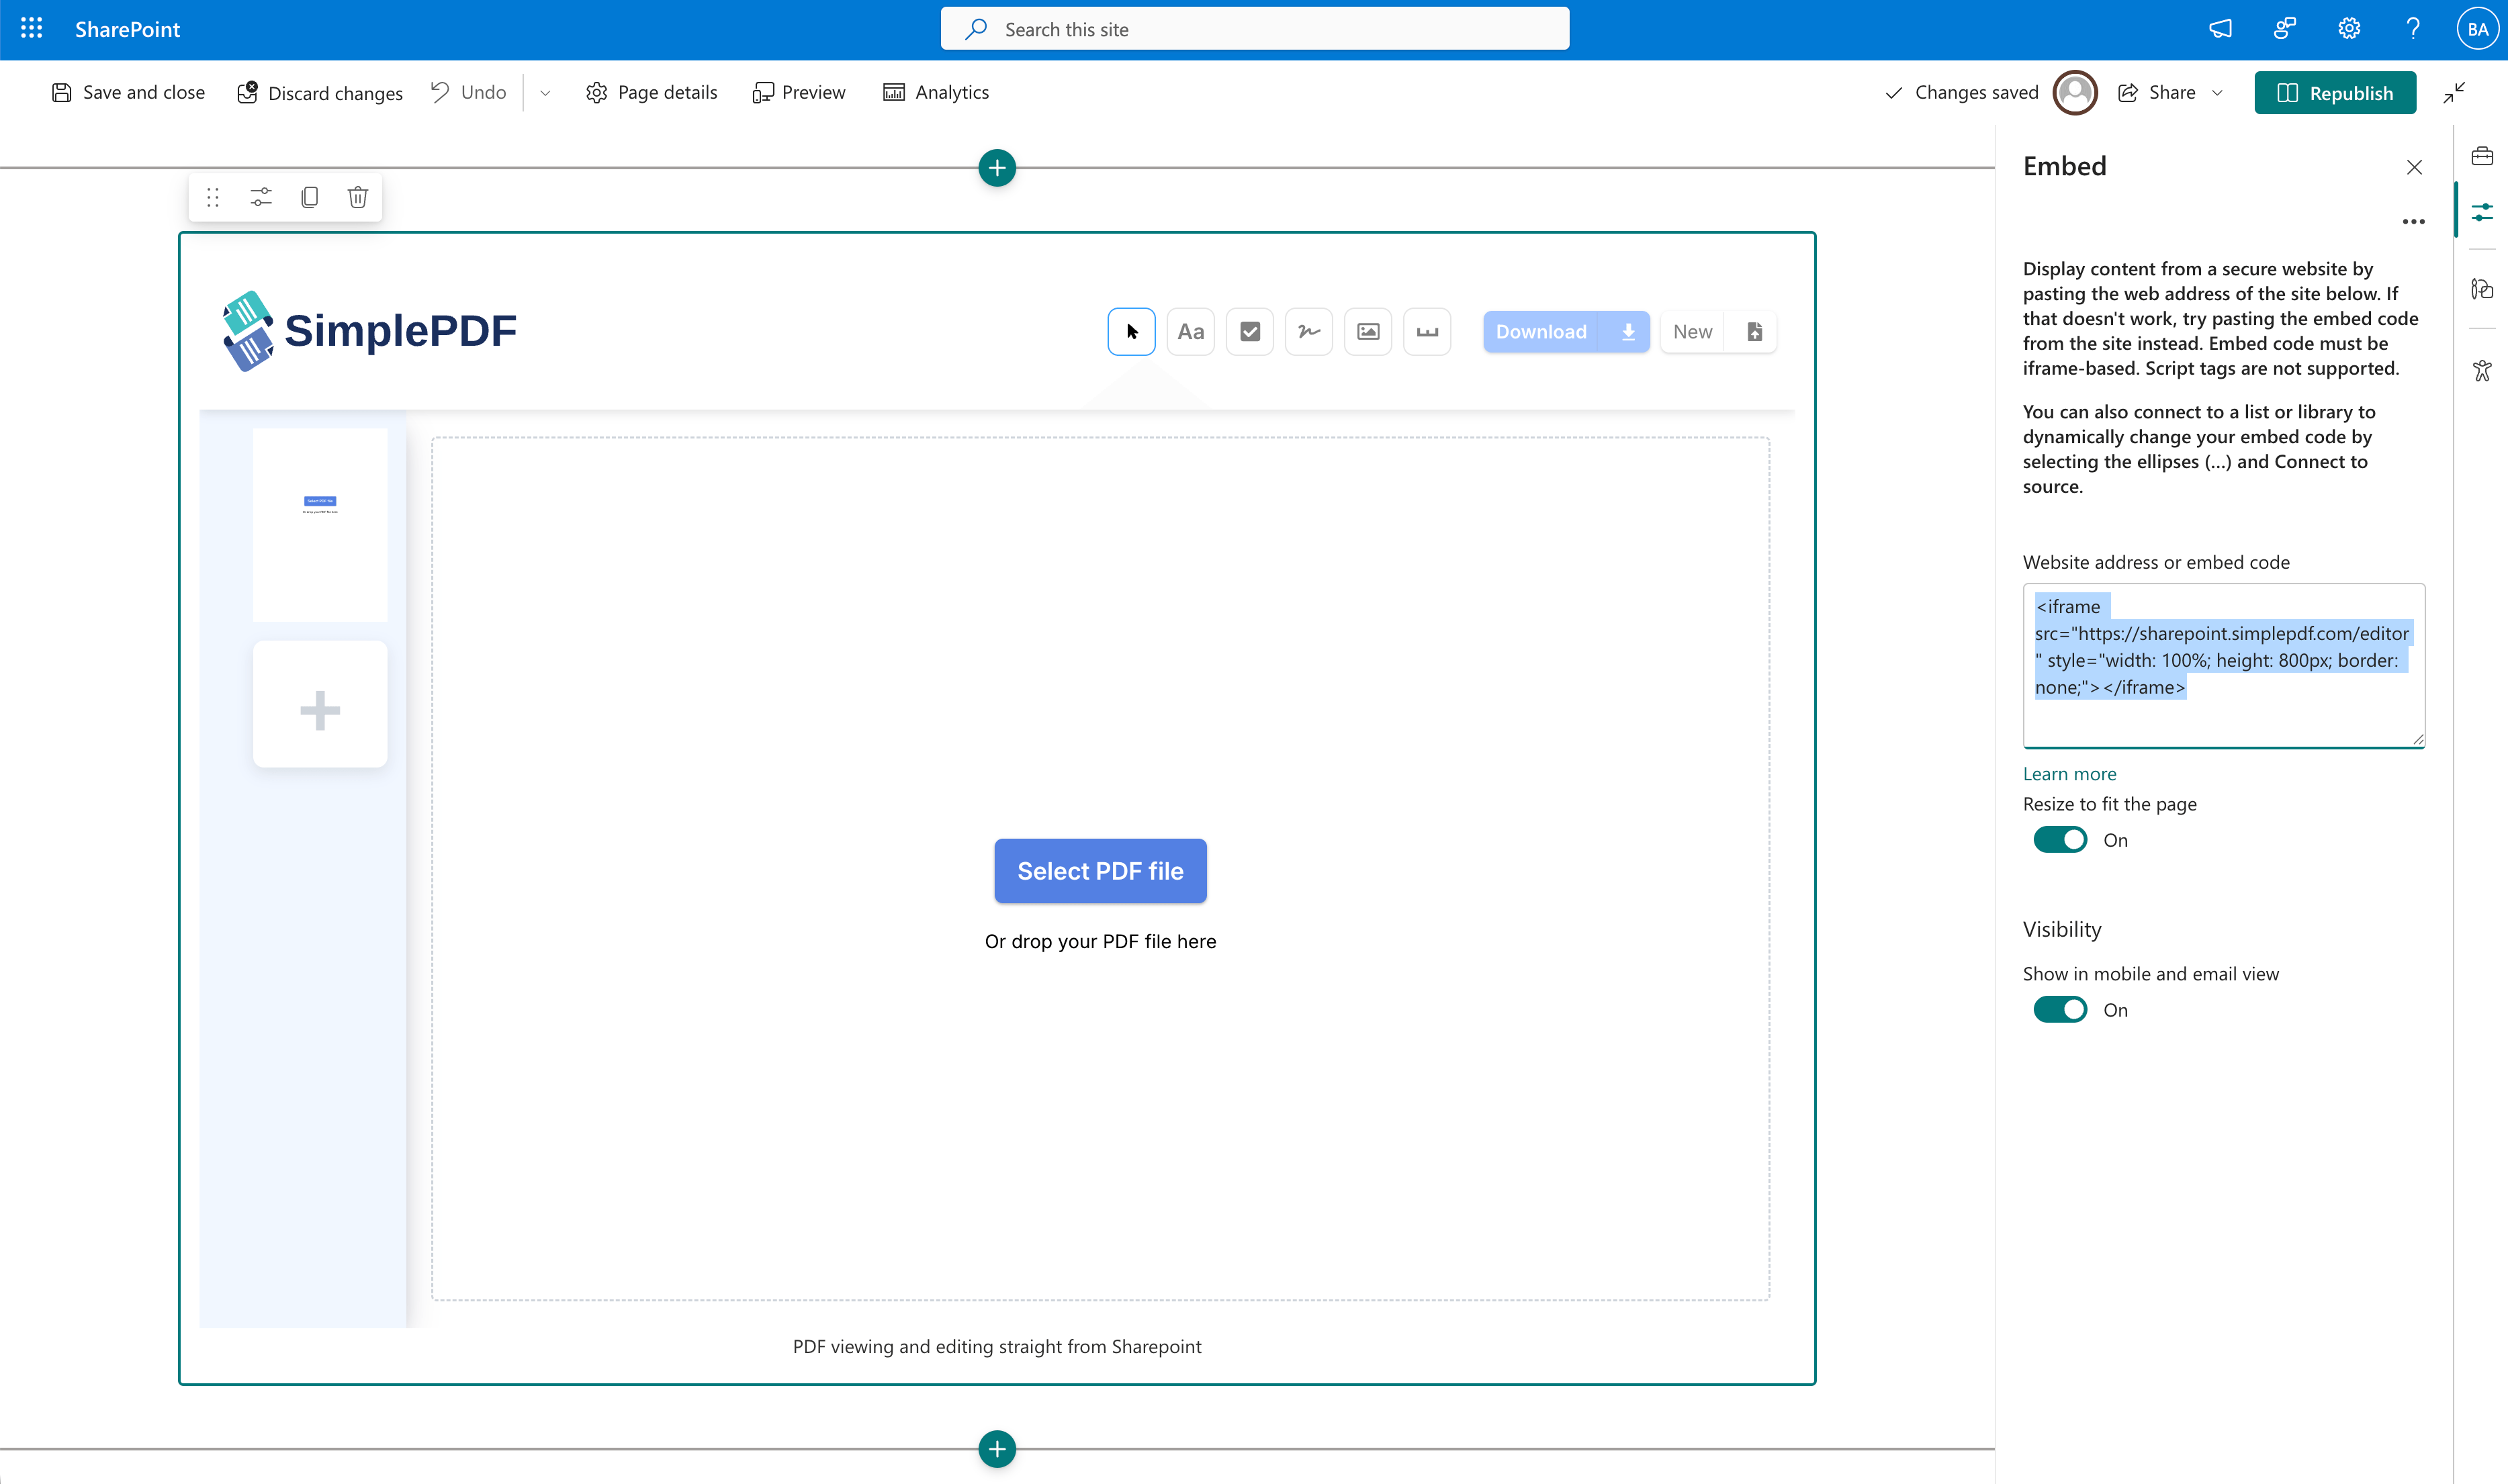
## Step 3: Configure the embed
1. In the Embed web part, paste the following iframe code:
```html
```
2. Click **Apply** or press Enter
## Step 4: Publish the page
1. Click **Republish** to save the page
2. The SimplePDF editor is now live on your SharePoint page
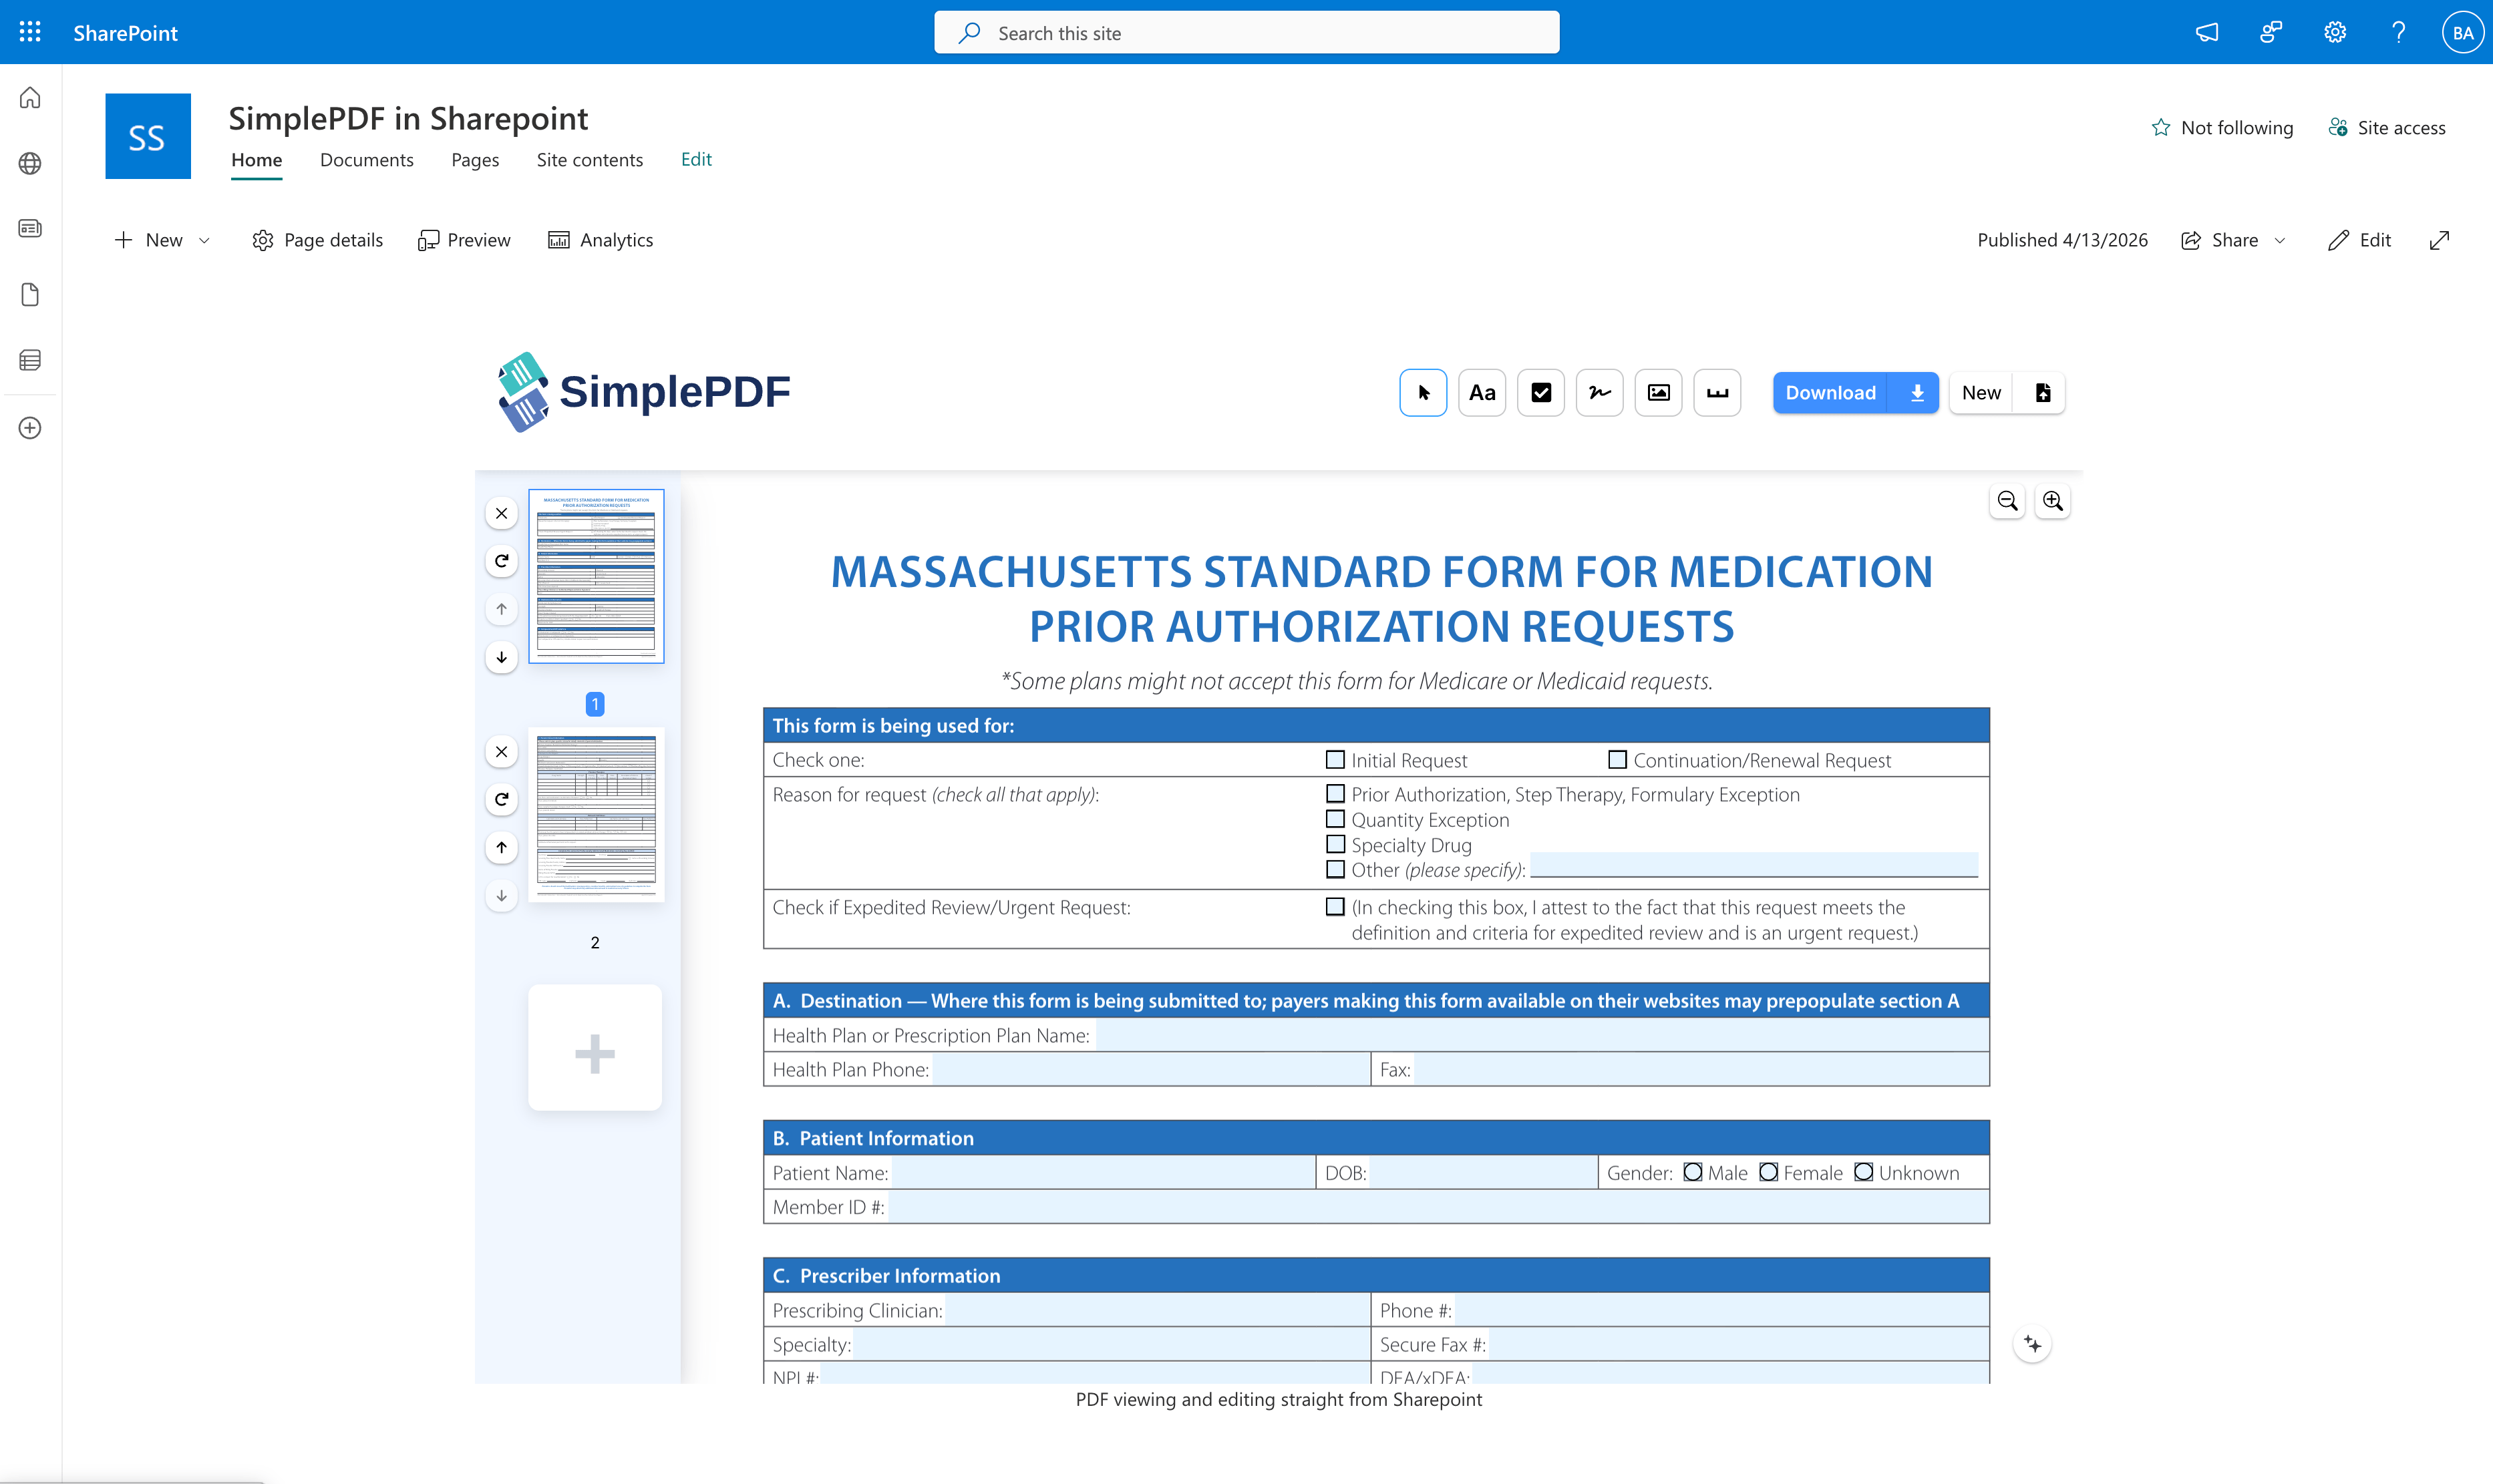
Users can now open PDFs, fill fields, add signatures, and submit documents directly from SharePoint.
## Combine with SharePoint BYOS
For a fully integrated experience, [configure SharePoint as your storage](/help/how-to/connect-sharepoint-as-your-own-storage-for-pdf-submissions). When both are set up:
- Users fill and submit PDFs from within SharePoint
- Submitted documents are stored directly in your SharePoint document library
- No documents leave your Microsoft 365 environment
**That's it! Your SharePoint page now has a fully functional PDF editor.**
_If you have any questions, feel free to reach out to [support@simplepdf.com](mailto:support@simplepdf.com)_
---
# How to get notified via email on PDF form submissions
You have [turned your PDF into an online form](https://simplepdf.com/portal) and you're now getting submissions from your customers.
Everything is great except that you have to log into your SimplePDF portal everyday to see whether or not there's a new submission.
**What if you could just get an email that a form has been submitted?**
Read on to enable email notifications for your PDF forms!
## Configuring the email notifications
_Configuring email notifications is available with the [BASIC plan](/pricing)_
1. Log in to your account
2. **Navigate to the documents view**
3. Locate the form for which you want to configure email notifications
4. **Open the form settings** by clicking the `cog` icon. You can reach it in two ways:
From the documents list, the `cog` appears on the form's row:
Or from inside the editor, in the top-right corner of the page:

5. Under **Email notifications**, type the name of the person to receive the emails or select them from the dropdown. You can add multiple recipients.
6. Click **Save**
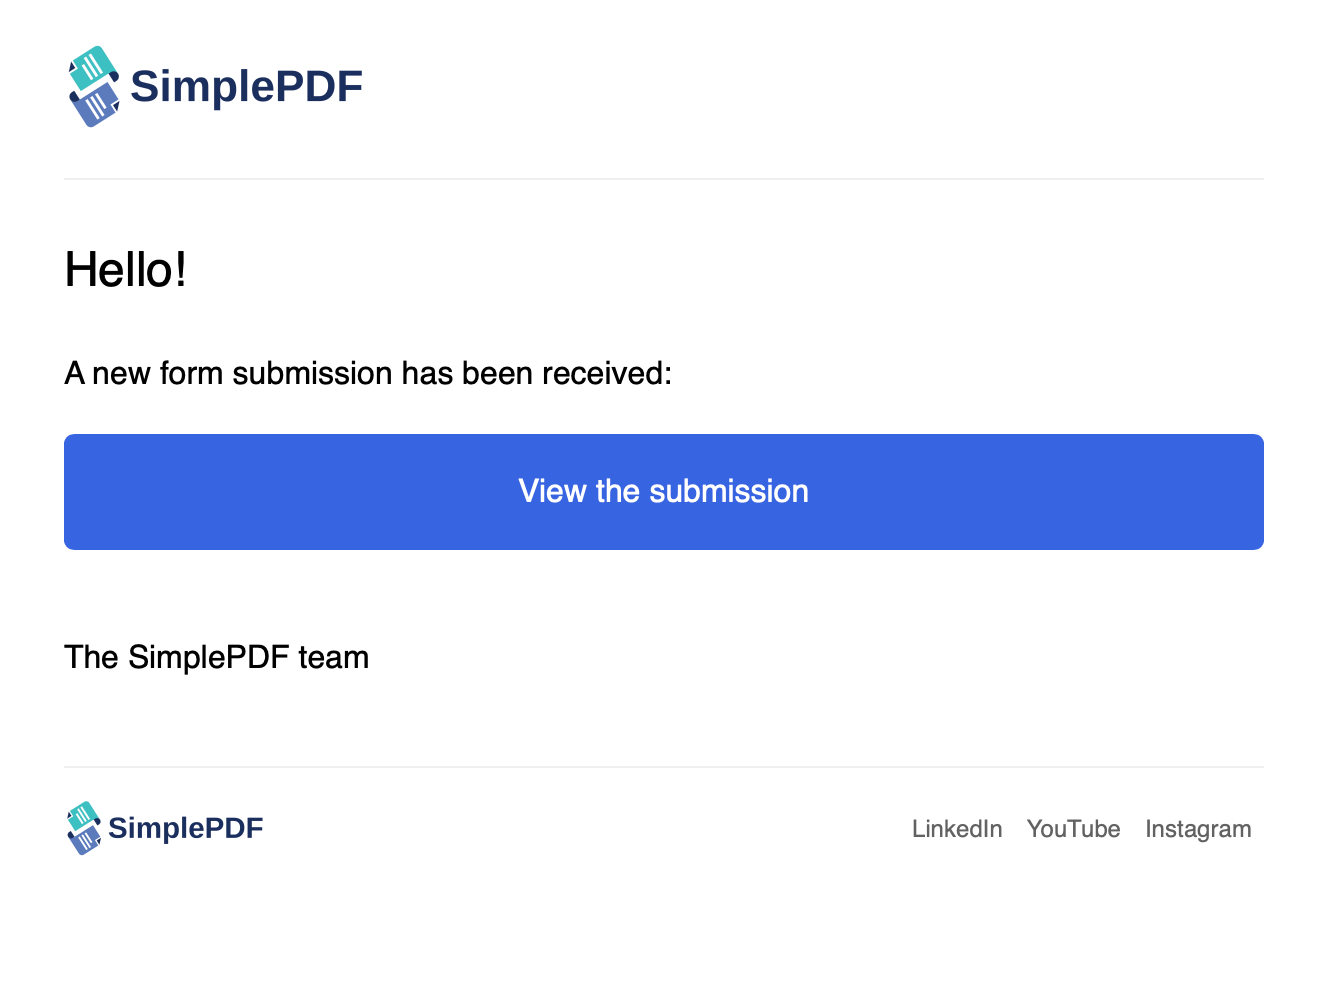
7. Some time elapses... and the form is submitted: you get a new email with a direct link to the submission!
### I don't see a specific email in the list, how can I add it?
The notifications can be sent to any member of your SimplePDF account: simply send an invitation to the email and accept the invitation upon receiving it in your mail box.
The newly added email will now be selectable in the email configuration dropdown.
**That's it! You're now getting email notifications every time a PDF form is submitted!**
_If you have any questions, feel free to reach out to [support@simplepdf.com](mailto:support@simplepdf.com)_
---
# How to organize PDF documents with tags in SimplePDF
As your Documents Dashboard grows, finding the right document gets harder. Tags let you categorize documents by project, client, department, or any label that fits your workflow.
## Adding tags to a document
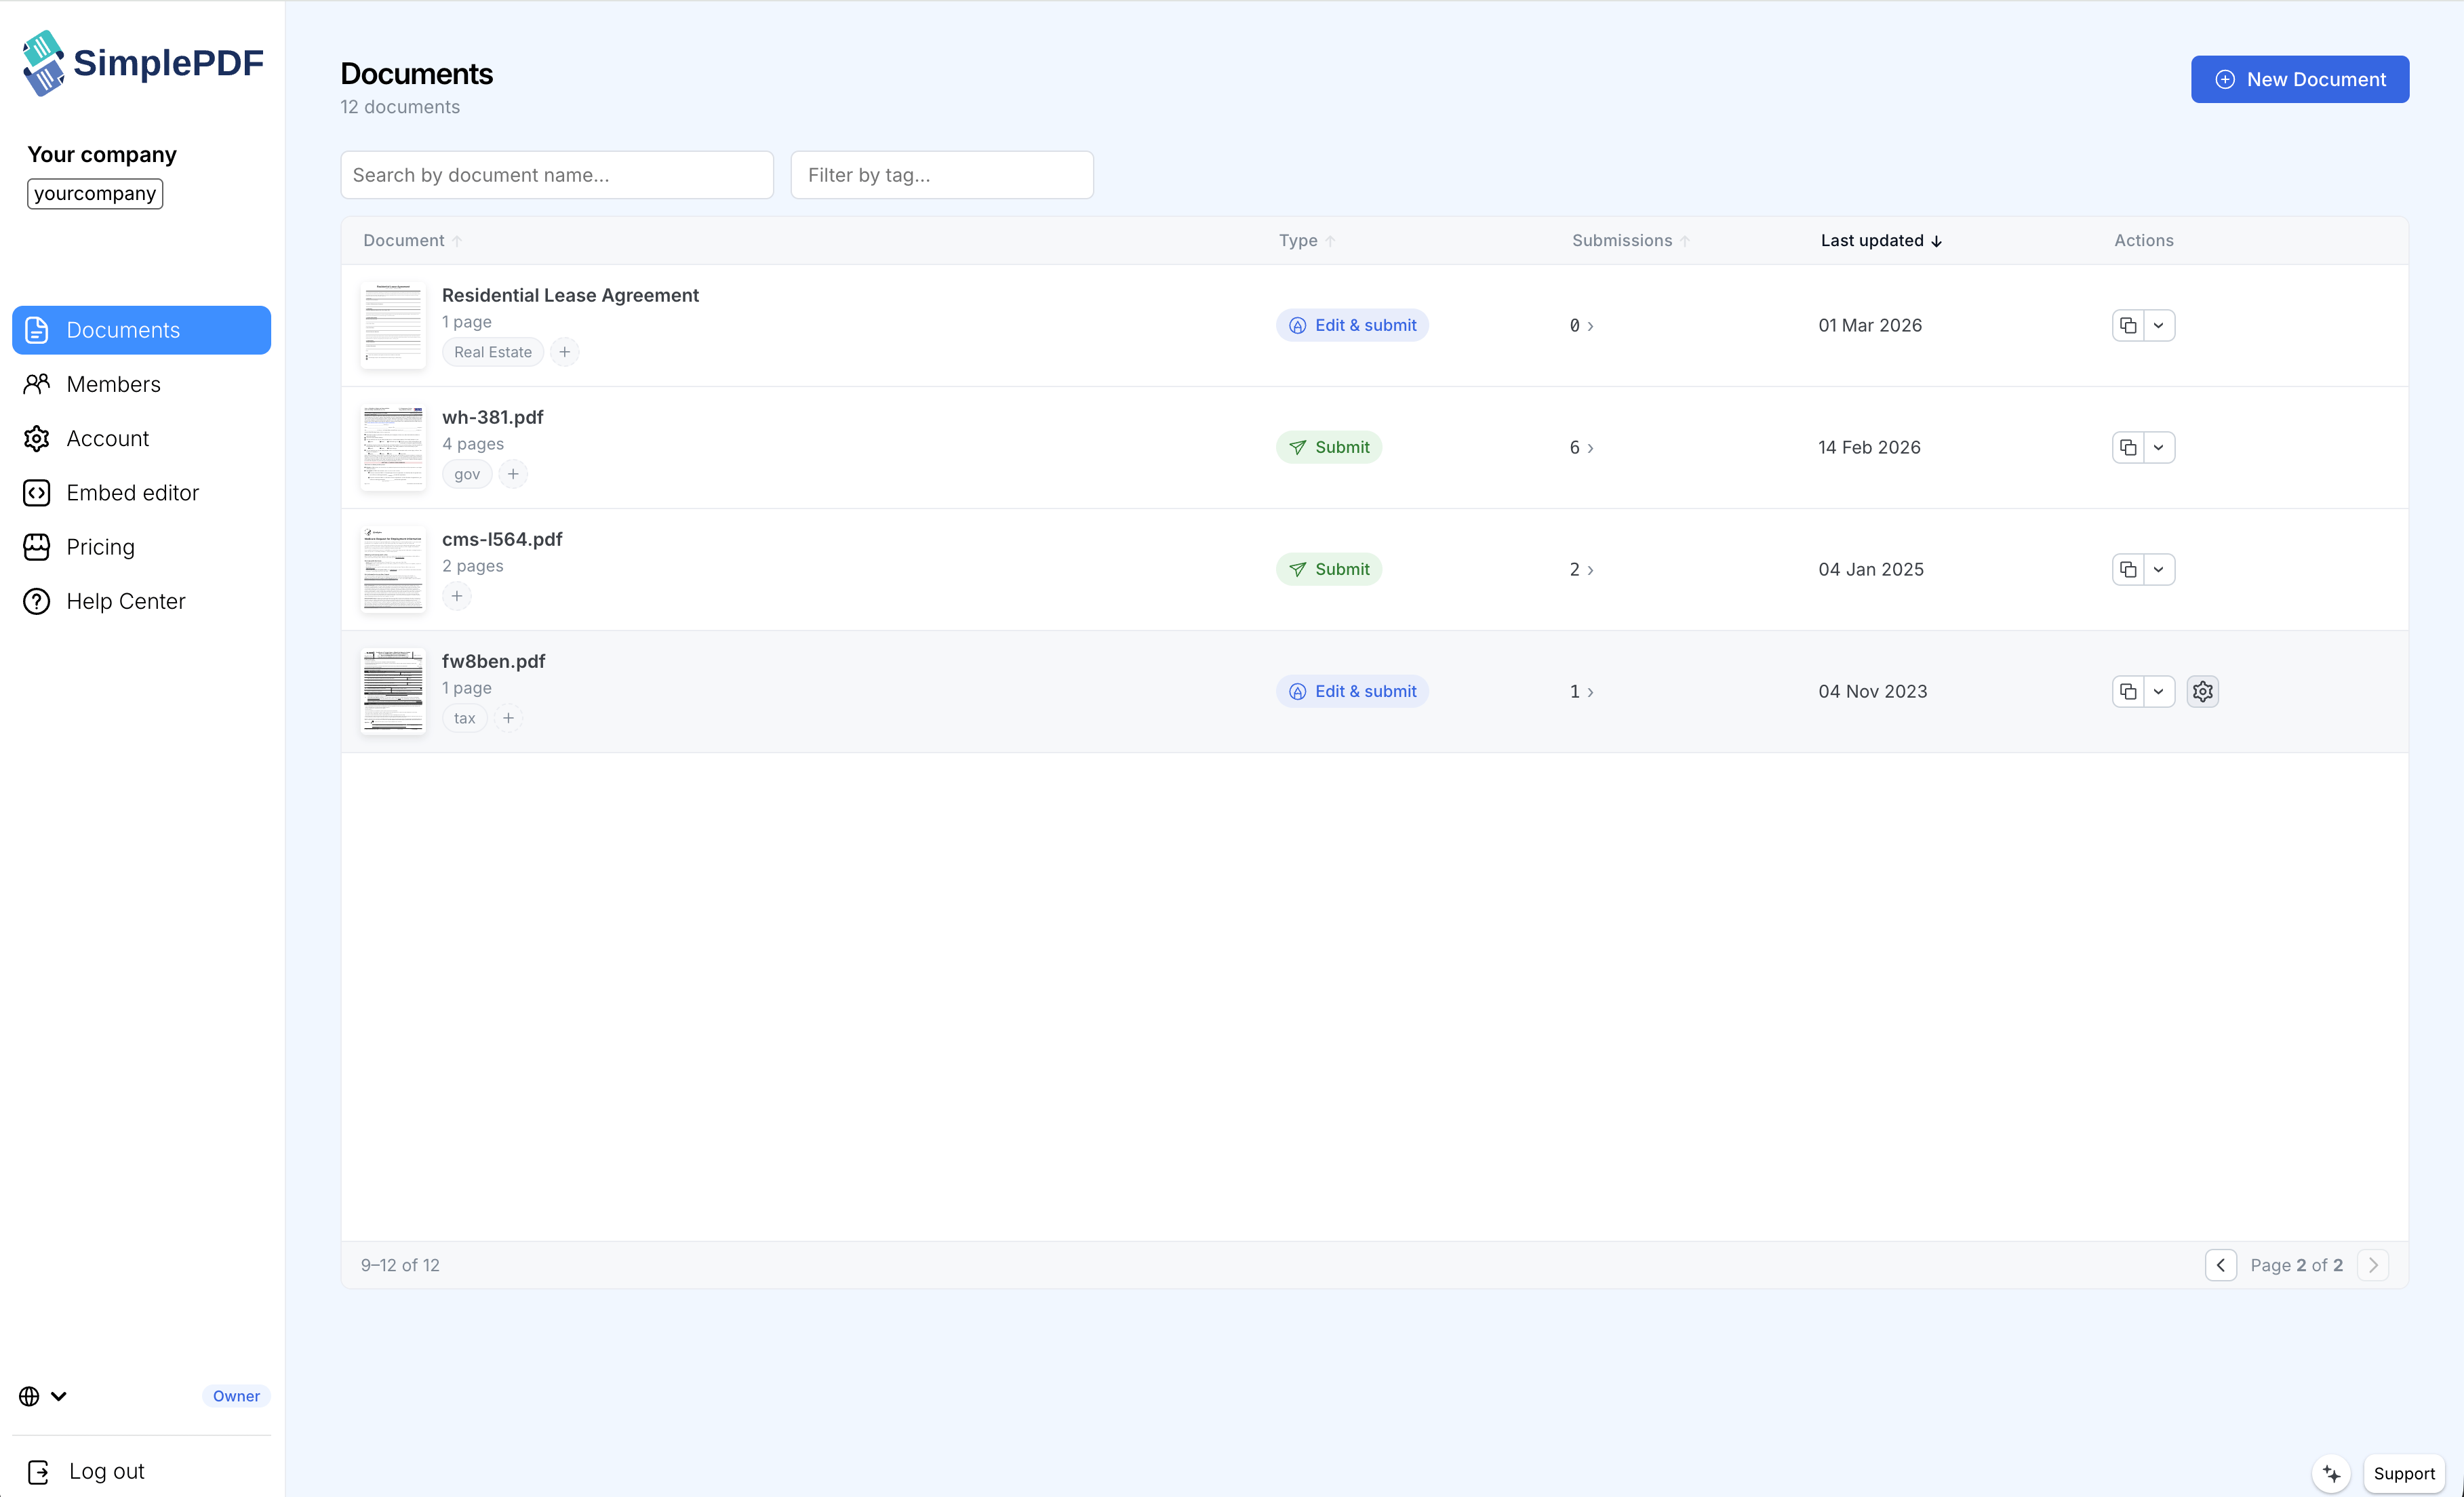
1. Go to your [Documents Dashboard](/account/documents)
2. Click the settings icon on the document you want to tag
3. In the settings drawer, find the **Tags** field under the General section
4. Type a tag name and press Enter to create a new tag, or select an existing one
5. Add as many tags as needed
6. Click **Save**
Tags are company-wide: once created, a tag is available for all documents in your account. You can also add a tag directly from the table by clicking the **+** button next to a document's existing tags.
## Filtering documents by tag
There are two ways to filter by tag:
- **Toolbar filter**: Use the tag filter in the toolbar above the documents table. Select one or more tags to show only documents that have those tags.
- **Click-through**: Click any tag pill displayed on a document row in the table to instantly toggle filtering by that tag.
Search and tag filters work independently. When both are active, documents must match the search query and have at least one of the selected tags.
## Tips
- **Categorization patterns**: Use tags for projects (`project-alpha`), departments (`legal`, `hr`), document status (`needs-review`, `approved`), or clients.
- **Free on all plans**: Tags are available at no cost, regardless of your plan.
- **Combine with search**: Narrow results by searching within a tagged subset of your documents.
**That's it! Your documents are now organized with tags, making them faster to find and manage.**
_If you have any questions, feel free to reach out to [support@simplepdf.com](mailto:support@simplepdf.com)_
---
# How to save edited PDF submissions to Supabase
You have [added SimplePDF to your app, or your AI Agent](https://simplepdf.com/embed) and
you would like to store the PDF submissions in your Supabase Storage.
**You could for example**:
- **Automate** further the handling of the submissions: for example **extracting the data from the forms to process them**
- **Store the PDF in a vector store** to offer **semantic search** or automatically **detect duplicates or similarities** in the submitted PDF
For this tutorial we'll be using two [PRO features from SimplePDF](https://simplepdf.com/pricing):
1. [The webhooks integration](https://simplepdf.com/help/how-to/configure-webhooks-pdf-form-submissions) - together with [Supabase Edge Functions](https://supabase.com/edge-functions)
_The code for the Supabase Edge function can be found [here](https://github.com/SimplePDF/simplepdf-embed/tree/main/examples/with-supabase)_
2. [The S3 integration](/help/how-to/use-your-own-s3-bucket-storage-for-pdf-form-submissions) - together with [Supabase Storage](https://supabase.com/storage)
## Configuring Supabase Storage for the PDF submissions
In this section we'll walk you through setting up **Supabase Storage as a storage for the edited PDF submissions** (and documents) instead of SimplePDF's default storage.
1. Head over to Storage in your Supabase project and click **New bucket**
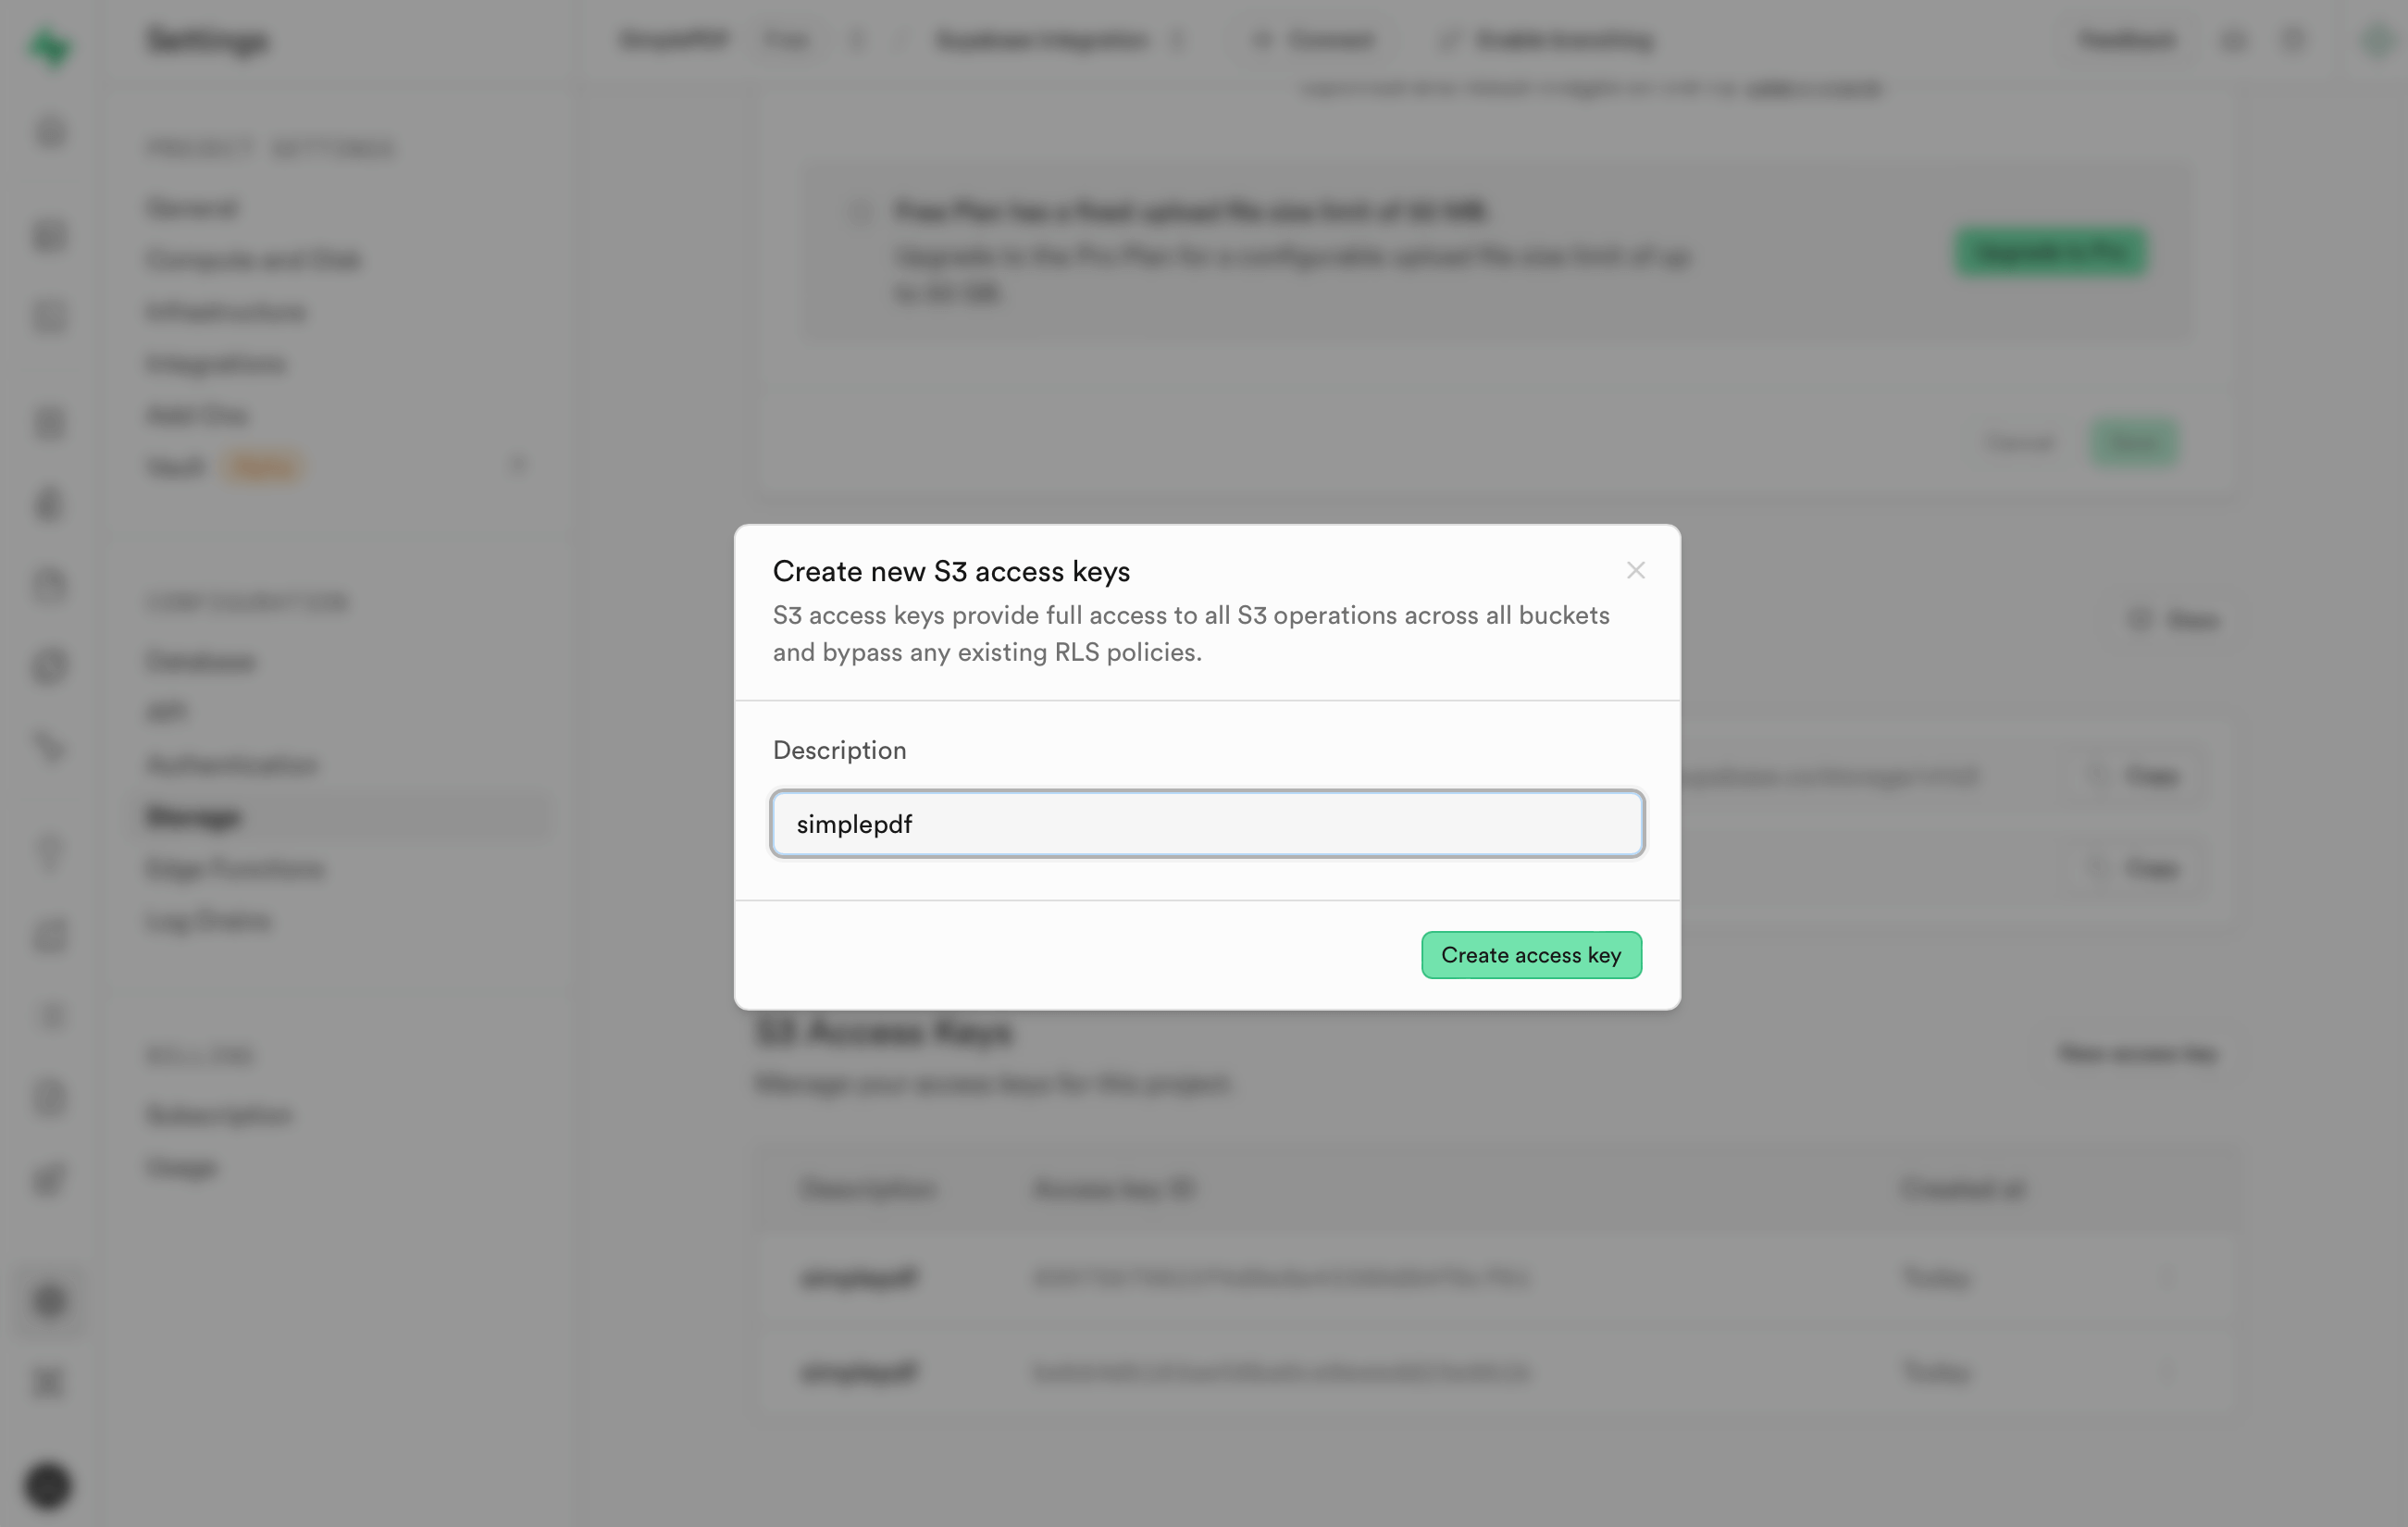
2. Name your bucket, keep it private (**do not toggle** Public bucket) and then click **Save**

3. In the Storage settings, create a new **S3 Access Keys**
4. Head over to your **SimplePDF account** and **configure the S3 storage** as follows:
_You can find a step-by-step [here](/help/how-to/use-your-own-s3-bucket-storage-for-pdf-form-submissions)_
```
Endpoint:
Path-style:
Region: